My Kitchen Clatter

Real Food - Real Life

  • About Me
  • Classes
    • Upcoming Classes
    • Baking Classes
    • Pressure Cooking Classes
    • Fermentation Classes
    • Canning Classes
    • Kombucha Classes
  • Equipment
    • Nutrimill Plus Grain Mill
    • Nutrimill Classic Grain Mill
    • Nutrimill Harvest Grain Mill
    • Bosch Universal Mixer
    • Ankarsrum Original Assistant
    • Filter Pro Dehydrator
  • Grains & Supplies
  • Recipes
  • Clatter in the Kitchen

Apple Pancake

September 26, 2015 by andrea Leave a Comment

I usually just throw the apples in the pan - none of this fancy arranging!

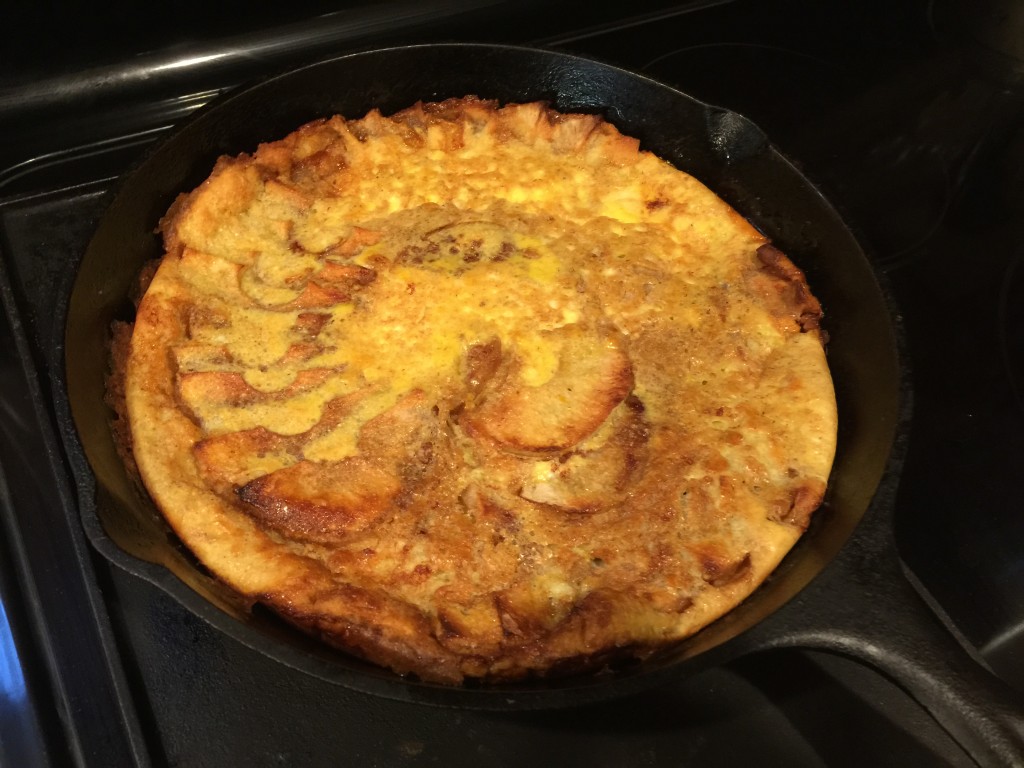
I usually just throw the apples in the pan – none of this fancy arranging!

This apple pancake is one of our favorite fall breakfasts. My boys and six and eight enjoy making the pancake themselves. Get one of those fancy apple peelers and let them at it. I do the work with the hot cast iron skillet, but they like this pancake so much that they are willing (and able) to most of the work themselves. It’s fun to have the little ones happy in the kitchen.

Apple Pancake
Author: Andrea
Prep time: 20 mins
Cook time: 30 mins
Total time: 50 mins
Serves: 6
Ingredients
  • 4 eggs
  • 1/2 cup whole wheat flour
  • 1/2 t baking powder
  • 1 T sugar
  • 1 pinch salt
  • 1 cup milk
  • 2 T butter, melted
  • 1/2 t ground nutmeg
  • 1/4 cup white sugar
  • 1 t ground cinnamon
  • 1/4 t ground nutmeg
  • 1/4 cup unsalted butter
  • 3 large tart apples, peeled, cored and sliced
Instructions
  1. Place 12-inch cast iron skillet in oven and pre-heat oven to 400 degrees
  2. While oven is preheating, combine eggs through 1/2 t nutmeg in a medium bowl. This mixture can be made the night before and kept in fridge, ready to go for the morning.
  3. Combine 1/4 cup sugar, cinnamon, and 1/4 t nutmeg in a small bowl.
  4. When oven and skillet are hot, put 1/4 cup butter in skillet and put skillet back in oven until butter is melted, about 3 minutes. Remove skillet.
  5. Sprinkle about half of the sugar cinnamon mixture over the bottom of the skillet. Remember skillet is HOT! Layer apples on top of the sugar and then sprinkle with remaining sugar cinnamon mixture. Put pan back in oven to bake apples for 10 minutes.
  6. Pour batter over the top of the apples and finish cooking until top is golden brown and apples are cooked, about 20-25 minutes.
3.5.3208


Filed Under: recipes Tagged With: apple, breakfast, pancake

My Thoughts on Flour

September 15, 2015 by andrea Leave a Comment

I’ve been meaning to put this article out here for a while. These are just my personal opinions on flour and food. I make no claims to know what is really affecting so many people’s bodies. Is it gluten? Or is it too much sugar? Too much processing? Too many chemicals? Or a combination of all of these things?
I don’t really know the correct answer – and honestly, I don’t think anyone really does. But, like most people, I have some thoughts on the subject. And once in a while someone asks me why I mill my own flour. People might be aware that white flour isn’t that great for us, but they wonder if there is really much difference between store bought and freshly ground whole wheat flour. And honestly, when I was first introduced to the concept of flour milling, I wasn’t sold on the idea that it was so much healthy. But it didn’t take long for me to be convinced. All I had to do was make a loaf of bread using the freshly milled flour and I was converted. The dough was softer than any dough I’d made using whole wheat flour. And the bread tasted fabulous.
I think that because we don’t hear about flour milling very often that people assume it must be something that is difficult or time consuming. If you’ve been to one of my classes, you already know that it’s neither of those things. If you grind your coffee beans most mornings, then you are already exerting the same amount of effort as I do when I grind flour. So, it’s not hard. And as a mother of four who occasionally fits in a little civil engineering on the side, I honestly don’t have time for anything that adds an extra challenge. But I do make time for things that I feel make a difference to the quality of my family’s food and health – and flour is one of the easiest places I’ve found to make a difference. Plus baking your own bread is a rewarding and relaxing experience in its own right.

Before wheat berries are ground into flour, they can be considered a live food. If they are exposed to moisture, they will sprout and germinate. When they are ground into flour, they immediately begin to oxidize. And just like your coffee beans, the flour will taste better when it is freshly ground. Oxidation also affects the vitamin and nutrient levels in the flour. Most of the vitamins and nutrients are contained in the wheat germ. There is also Vitamin E oil in the wheat germ. Over time, the Vitamin E oil eventually will go rancid in whole wheat flours. If you have ever had whole wheat flour that tastes bitter, it is likely it’s been sitting on the shelf too long. This is one of the reasons that white flour became so popular for mass production – it has the germ removed for shelf stability, but removing the germ also removes the vitamins and nutrients from the flour. White flour also has the bran removed, which contains fiber and helps with digestion. All of this processing means that white flour barely resembles the original whole wheat flour made directly from wheat berries.

kernel_jpg_935612582

Source for image: http://wbc.agr.mt.gov/wbc/Consumer/Diagram_kernel/

I can go on and on about the flour. But really, in the end, you should decide for yourself. Here’s some ideas to start:

  • Do some research on processed flour. While it can be hard to find clear, non-biased articles, try this one on WebMD as a start and then try googling processed flour. You’ll find that flour is one of the most processed foods in our grocery stores.
  • Take one of my classes or find a local class on whole grain baking. You’ll learn something new and get lots of samples. Try this link through Bosch Kitchen Centers to locate other demonstrators who teach milling and whole grains.
  • Bake your favorite recipe using freshly milled whole grain flour and see if you don’t love it.


Filed Under: Clatter in the Kitchen Tagged With: flour, fresh flour, milling, whole grain, whole wheat, whole wheat flour

Spicy Yellow Tomato Jam

August 29, 2015 by andrea 7 Comments

Yellow Tomatos

I find that people often give me a second look when I talk about tomato jam. Not many people have heard of it, but it is definitely a jam worth the effort. I think of it as a grown up jam – I don’t share it with the kids – it’s too good for them. They won’t fully appreciate it, so I save the strawberry and raspberries for them. I’ve had more than a few people ask for the recipe, so here you go!

When picking your tomatoes, I recommend you find a nice flavorful heirloom variety from the farmer’s market or your own garden. Don’t even bother with the watery tasteless store bought imitations from the grocery store. My absolute favorite tomatoes to use are yellow and orange varieties. I find them fun to work with and they typically have a less acidic, more mellow, sweeter flavor.

The time it takes for this recipe will vary greatly depending on several factors – your tomatoes’ water content, the size of your simmering pot, whether it’s a full moon. Get the idea? Allow lots of time for this one. I’ve let some batches simmer for four or more hours until they got nice and thick like I wanted. Whatever you do, don’t try to double this recipe. You will be simmering forever. Trust me on this.

As far as ideas for using this jam – once you taste it, you’ll come up with endless ideas on your own. But here are some starters. Try it on cream cheese or goat cheese with crackers. It is wonderful with scrambled eggs – like a fancy katsup. It also makes a great sandwich spread with ham or turkey.

Okay! Now get simmering!

Spicy Yellow Tomato Jam
Author: Andrea
Prep time: 15 mins
Cook time: 4 hours
Total time: 4 hours 15 mins
Serves: 4 pints
Ingredients
  • 5 lbs tomatoes
  • 3 cups sugar or 2 1/2 cups of honey
  • 1/2 cup lime juice
  • 1 T freshly grated ginger
  • 1 T cinnamon
  • 1/2 t ground cloves
  • 1 T salt
  • 1-2 T red pepper flakes – adjust to your taste
Instructions
  1. Core and finely chop the tomatoes. Save yourself some time and use the food processor. I don’t skin them or deseed them – if you chop the tomatoes fine enough you won’t notice the skins, plus they help thicken the jam.
  2. Add all ingredients to a large stainless steel pot and bring to a simmer over medium heat. Reduce heat to low and keep a simmer. Simmer for 2-4 hours until the jam is thick. The jam should separate when you stir the bottom of the pan with a wooden spoon.
  3. Fill hot pint or half pint jars with jam, allowing 1/4 inch head space.
  4. Wipe jar rims and place hot lids on jars.
  5. Process in a water bath canner with water at least one inch over tops of jars for 20 minutes.
  6. Remove jars from canner and allow to cool completely (at least 12 hours) before checking seals.
  7. Makes 2-4 pints (4-8 half pints) – depending on tomato type.
3.2.2929


Filed Under: recipes Tagged With: canning, jam, preserving, tomatoes

Chocolate Chip Pumpkin Muffins

August 21, 2015 by andrea Leave a Comment

I’ve been meaning to post this recipe for chocolate chip pumpkin muffins for a long time. I originally started with a recipe from Cooking Light and have marked it up over the years to make it my own. I’m constantly amazed by how healthy cooking often focuses on eliminating fat, but it doesn’t always focus much on the sugar content. This is slowly changing, but my original recipe from 2006 had over half of the sugar that I call for in my recipe.

And with regards to the flour – I know you’ve heard it before, but I’m going to say it again. If you are using store bought flour instead of freshly milled flour, your results will turn out totally different from mine. The freshly milled flour works very similar to white flour – it may have a little more texture, but it will still create a fluffy beautiful muffin. My experience with store bought whole wheat flour is it results in a dense, dried out muffin. So if you are stuck with store bought flour, then you may want to mix in some white flour to get a better muffin. The difference with whole wheat is the taste. It really does taste better than white flour – I know it’s hard to believe that flour can taste good, but it’s true in my world.

Chocolate Chip Pumpkin Muffins
Author: Andrea
Prep time: 15 mins
Cook time: 18 mins
Total time: 33 mins
Serves: 18
Ingredients
  • 1 1/2 cups whole wheat flour (6.7 ounces)
  • 1 t baking powder
  • 1 t baking soda
  • 1 t cinnamon
  • 1/4 t cloves
  • 1/4 t nutmeg
  • 1/4 t salt
  • 1 cup chocolate chips
  • 1/2 cup b[packed brown sugar
  • 1 cup pureed pumpkin (canned or homemade)
  • 1/3 cup buttermilk, sour milk, whey, or milk kiefer
  • 3 T coconut oil or butter, melted
  • 1 T molasses
  • 1 t vanilla extract
  • 1 large egg
Instructions
  1. Preheat oven to 400
  2. Combine dry ingredients – flour through salt – in a medium bowl. Whisk together. Add chocolate chips and make a well in the center of the bowl.
  3. Combine remaining ingredients and combine with a whisk.
  4. Add the egg and sugar mixture to the flour and stir with a wooden spoon or dough whisk until just combined.
  5. Scoop batter into muffin tins – should make about 18 muffins.
  6. Bake for 18 minutes or until a toothpick comes out clean.
  7. Remove the muffins immediately and cool on a wire rack.
3.3.3077


Filed Under: recipes Tagged With: chocolate, chocolate chips, muffin, pumpkin

Chocolate Chip Zucchini Bread

August 6, 2015 by andrea Leave a Comment

OLYMPUS DIGITAL CAMERA

CHOCOLATE CHIP ZUCCHINI BREAD

It’s that time of the year again – zucchinis are coming out of my ears. I’m constantly dropping off the extra at friends’ and neighbor’s houses. I’m known as the zucchini fairy in several circles. Late in the season, I start leaving the zucchinis without ringing the doorbells, because I’m pretty sure that everybody else is done with zucchini also.


One Day's Worth of Zucchini Picking

One Day’s Worth of Zucchini Picking

This is a great recipe for zucchini bread. I really like it because it is not overloaded with fat or sugar. Of course, using whole wheat flour makes it even healthier. But it tastes so good, that you wouldn’t even know that it’s a little bit healthy. It also freezes really well. I often make a triple batch and freeze the extra loaves – just wrap them in some tin foil, freeze, and use within a couple months.

A couple tips to make your bread even better. You can peel the zucchini to get rid of the green skin. Also – if your zucchini is a big guy, you can quarter it and slice out the seeds. To shred the squash, use the larger shredder disk on your food processor or shredder attachment on your mixer.

Chocolate Chip Zucchini Bread
Author: Andrea
Prep time: 15 mins
Cook time: 60 mins
Total time: 1 hour 15 mins
Serves: 16
If you don’t like little bits of green in your zucchini bread, just peel the zucchini before you shred it.
Ingredients
  • 1/2 cup sugar
  • 3 tablespoons olive oil, melted butter or coconut oil
  • 2 large eggs
  • 1 cup applesauce
  • 2 cups whole wheat flour – I use freshly milled flour
  • 2 T unsweetened cocoa
  • 1 1/4 t baking soda
  • 1 t ground cinnamon
  • 1/4 t salt
  • 1 1/2 cups finely shredded zucchini (about one medium)
  • 1/2 cup semisweet chocolate chips
Instructions
  1. Preheat oven to 350 degrees. Oil a large 9×5 inch loaf pan.
  2. Combine sugar, oil, and eggs in a large bowl. Combine with a whisk.
  3. Whisk applesauce into sugar mixture.
  4. Combine flour, cocoa, soda, cinnamon, and salt in a separate bowl and add into sugar mixture. Stir until just combined.
  5. Add zucchini and chocolate chips to batter. Don’t overmix.
  6. Pour batter into prepared bread pan.
  7. Bake 50-60 minutes until toothpick inserted into the center comes out clean.
  8. Let cool a few minutes in the pan and then turn out onto a cooling rack.
3.2.2929


Filed Under: recipes Tagged With: bread, chips, chocolate, recipe, zucchini

Homemade Fruit Vinegars

June 27, 2015 by andrea Leave a Comment

Making your own fruit vinegar sounds so hard. But it’s not. Have you ever had a jar of apple cider go sour accidently? Or a bottle of win or beer? Then you’ve made vinegar and probably not even known it.

I’ve made vinegar from scraps of all sorts of fruits – apple, peach, pear, raspberry, strawberry, and blackberry. I’m even giving cherry a try this spring. Your final vinegars are more interesting than most store-bought options and they have the added advantage of containing beneficial probiotics. Give it a try, you’ve got nothing to loose.

The Basics – Getting Started

Vinegars are one of my favorite ferments to play with – I have to say I’m slightly obsessed with them. I love seeing science in action in my kitchen. This stems back to high school chemistry. I think. Anyway, to make a fruit vinegar, you start with fruit, water, and a little sugar. Mix everything together in a large glass jar with a wide opening. I like the 1/2 gallon Ball jars to start with – they are cheap and easy to find at most hardware stores. I also have some large one gallon jars that I picked up at our local beer brewing shop. You’ll want to use a glass or other non-reactive container for this so the vinegar doesn’t react with the metal. Also, the beneficial bacteria don’t like the metal either. Finally, look for a wide mouth jar since you want a good air to liquid contact area. The bacteria need oxygen to do their job on the vinegar.

I use fruit scraps to get my vinegars started. I love knowing that I’m not throwing away all those apple peals or slightly mushy strawberries. You can use the stems, peels, brown spots, and mushy fruit for this. Just make sure everything is clean – both the jar and the fruit scraps. Basically, you’ll ultimately end up making something out of nothing. Fill the jar about half full of the fruit scraps. Add anywhere from a tablespoon to a quarter cup of sugar per quart and top the jar off of with water. The sugar gives the bacteria a little boost to get to work and it will affect the sweetness of your final product. Try to use water that has not been chlorinated since the chlorine will stop the natural processes that we are aiming to encourage.

As the fermentation process proceeds, the jar may start attracting fruit flies. I normally cover  my containers with a breathable cover (such as a coffee filter, paper towel or cheesecloth) held on with a rubber band. Once I start seeing the flies, the jar usually gets kicked out of the kitchen to either the garage or basement. The temperature range for the fermentation process is pretty wide – between 59 and 94 degrees F – so this gives you a lot of flexibility on where to store your jars as they are fermenting.

During the first step, natural yeast and bacteria (Acetobactor) in the air start to go to work on the sugar and they produce alcohol, essentially turning the water into alcohol. Meanwhile, your fruit is also flavoring the water into juice. You’ll notice some bubbling in the mixture, which is a good sign that your reaction is taking place. Stir the container once a day to keep it oxygenated. Stirring also helps redistribute the fruit so that the pieces sticking out of the top don’t go moldy. If you get a moldy piece of fruit, just pick it out and keep going.

After about a week or so, the bubbling will stop and you can strain off the fruit and let the yeasts and bacteria keep working on the alcohol. At this point, your chemical reaction will change and the alcohol will ferment into vinegar.

This is the point where the process gets really fun – and some people may get grossed out by this stage. But you will start seeing a gelatinous mass begin to cover the top of the vinegar. At first it will look like a foam forming on the top. This mass is called the mother of vinegar and it is actually a cellulose mass of the Acetobactor bacteria. It consumes the alcohol in the liquid and expels acetic acid – or vinegar. The mother will get thicker as the fermentation proceeds. If you have a little unpasteurized apple cider vinegar or mother from a previous batch of vinegar, you can jump start the mother formation by adding a couple tablespoons to your jar. But I’ve actually seen mothers start to form within the first day of removing the fruit scraps.

Once the mother forms, try not to disturb the jar so that the mother can remain floating on the top. If it sinks to the bottom, don’t worry. The fermenation will keep proceeding, but the jar will probably start forming a second mother on the top.

The entire process is an aerobic process, which means that your jar of liquid needs to have oxygen for the chemical processes to occur. So keep the breathable lid on the container this whole time. After about 3-8 weeks, the vinegar will be finished.

Finishing & Bottling

Now the tough question – how do you know when the vinegar is done? For me, it is mostly a matter of taste and smell. Does it smell like vinegar? Yes? Good. To taste it, stick a straw in the container, slide it under the edge of the mother, and see what you think. It’s really a matter of personal taste. The acidity level can have a pretty high range to give you a weaker or stronger vinegar. If it’s too strong, you can always water it down.

What if you let the vinegar go too long? It’ll get stronger – to a point. And then the chemical reactions start backfiring on you and it actually will start converting back to water. This can take a few months or more.

Once you have a vinegar you like, you can filter and bottle the vinegar. First, remove the mother. You can save it for future vinegars. Most of mine get composted. Then filter the vinegar through a cheesecloth and bottle into narrow necked jars. Now you can cap the jars for storage. At this point, you don’t want oxygen contact with the vinegar because you want to stop the fermentation process.

You may find a new mother form in you stored bottles. This is most likely to happen if you don’t bottle it into narrow jars. If it happens, just fish it or strain it out of  there.

Your vinegar will continue to develop flavor as it ages. I have some two year old raspberry vinegar that has wonderfully deep flavor. You can even store the vinegar for three years or more, depending on the vinegar and storage conditions.

Ideas  for Using Vinegar

Obviously, cooking is a great use for flavored vinegars. Homemade vinegar can be used in almost any recipe calling for vinegar – including salad dressings, potato salad, coleslaw, and barbeque sauce. Just don’t use your vinegar in canning recipes that call for 5% vinegar since you don’t know the actual acidity of your vinegar.

If you make up a bunch of apple cider vinegar, you can use it for all sorts of health, cleaning and beauty products. While I do use vinegar in cleaning, I don’t use it for much of the health and beauty stuff myself. If you are interested in this, do a search for uses of apple cider vinegar and you’ll find lots of ideas such as wart remover or a digestive aid. I personally like the ideas for a hair conditioner, but then again I haven’t actually attempted it myself. Although, I will admit to giving the chickens a little apple cider vinegar in their water as a probiotic.

Along the idea of probiotics, as long as you don’t pasteurize or can your vinegar, it contains natural bacteria that are good for your gut. This is the same reason that yogurt and kiefer are good for us. Even using your homemade vinegar in your salad dressings is a great way to help introduce some additional good bacteria to our systems.

Filed Under: Clatter in the Kitchen Tagged With: fruit, homemade, recipe, scraps, vinegar

Pressure Cooking – Cookbook Reviews

May 11, 2015 by andrea Leave a Comment

Pressure cooking can be so wonderful. It’s a great way to have healthy meals at your fingertips on weeknights. And it can save you from slaving away in the kitchen on your weekends. I just made spare ribs tonight – 20 minutes in the pressure cooker – and then finished them on the grill for extra flavor and crispy charred goodness.

But I think one of the biggest tricks of pressure cooking is finding good cookbooks and recipes. Many recipes that you’ll find are dated or have inaccurate cooking times.

In order to help you along, and save you the time and expense of researching cookbooks, I’ve summarized my favorite cookbooks and websites.

1. Hip Pressure Cooking by Laura D. A. Pazzaglia

www.hippressurecooking.com

This book has more modern recipes. It includes lots of ethnic flavors and it’s best feature is the great timing tables. It covers a lot of pressure cooking basics and has good recipes. The author is not American and some of the basic American style things that you might want to do with a pressure cooker, like baked beans or a simple pot roast are not in this book. This book has timing for both electric and stovetop cookers.


2. The Great Big Pressure Cooker Book by Bruce Weinstein & Mark Scarbrough

This book has tons and tons of recipes. The recipes all cover both electric and stovetop cookers and this is perhaps the best book for electric cooker recipes. The book does not cover the basics of pressure cooking – it jumps right into the recipes. The recipes are well written and most everything I’ve tried so far as been good. I should note that I’m not in love with their method for cooking cheesecakes. So if you are itching to pressure cook a cheesecake, try the next book on this list.

3. Pressure Perfect by Lorna Sass

This book is fairly traditional and does not include a lot of discussion about electric pressure cookers. That being said, the recipes are good and the times are accurate. Lorna Sass is one of the main people who brought pressure cooking back into mainstream culinary discussion in the U.S.


4. www.fagor.com

This is a great starting point for recipes. The recipes are good and it’s FREE! You also get a free little cookbook with your Fagor pressure cooker.


5. Healthy Recipes by Phyllis Stanley & Shirley Heinmets

This book includes a section on pressure cooking in addition to a bunch of great recipes for your Bosch. If you have a Bosch and a pressure cooker, then this is a great book to have in your collection. My favorite cookie recipe is in this book – but it’s not a pressure cooker recipe!. The pressure cooker recipes are all written for a stovetop cooker and include a wide variety of whole grains. The recipes are pretty traditional and are all very good.

Summary

Pick one of the books above based on what you are looking for and get started with your pressure cooker! I’ve found all of the above books at my library and bookstore, with the exception of Healthy Recipes. Healthy Recipes is self-published and is available through me for $24.00.


Filed Under: Clatter in the Kitchen Tagged With: cookbook, pressure cooking

Pickled Asparagus

May 11, 2015 by andrea Leave a Comment

Spring is here and with it I have been getting my garden planted. Which means I’m already thinking ahead to when all the beans, tomatoes and other veggies will be ready to eat and put away for next winter. But I need to enjoy the here and now. And the here and now involves asparagus. And if you are lucky, it involves lots and lots of asparagus. So much asparagus that you don’t know what to do with it all.

Okay, so most of us are not that lucky. I’m not even that lucky. But I am blessed with a really great farmers market and parents with a great asparagus patch. And when you are looking for something else to do with your asparagus, why not try pickling it? So many veggies and fruits can be pickled – don’t limit yourself to cucumbers. If you’ve ever bought fancy pickles at the fancy grocery store – things like marinated mushrooms or … asparagus, then you should think about whether you can do them at home. Because chances are you can.

These asparagus pickles need to be processed in a water bath canner (boiling water method) so they have a nice tender texture. If you’ve never tried canning before, I always tell people that pickles are a great place to start. You don’t have to worry about a jam setting up to the right consistency. You just need a good recipe and spice mixture and then you can focus on the process of canning. Once you get the canning process down, then move on to jams or jellies.

I don’t go into a ton of details in this recipe about the details of processing in a water bath canner. If you’ve never tried it before, get a good basic book on canning or take a class on canning. I recommend the Ball Blue Book of Preserving as a great starter book and as an added bonus, you can find it at almost any local hardware store when you buy your jars. With respect to classes, if you are local to me, I totally recommend my classes (!!!), but you can also contact your local extension office or library to see if they are offering any.

Okay, back to this recipe – it calls for a tablespoon of “pickling spices”. In this case, I mean any combination of the following whole spices  dill seeds, allspice berries, peppercorns, whole coriander seeds, small pieces of mace or nutmeg, or mustard seed. Just don’t use cloves in this recipe. As you can see, if you don’t already have any or all of these spices in your pantry, it can be a little intimidating to approach a pickling recipe. So start with what you have and then add from there if you want. Most people have peppercorns and then maybe add in some dill seed. That easy. My preferred mix is some allspice berries, coriander, mustard and peppercorns.

You can adjust the amount of seasoning up or down as you wish, but don’t mess with the vinegar and water ratio, since that acidity level is necessary for processing the asparagus.

Pickled Asparagus
Recipe Type: canning
Author: Andrea
Prep time: 20 mins
Cook time: 10 mins
Total time: 30 mins
Serves: 3 pints
This is a nice spring pickle that is great on an appetizer tray or with a light lunch.
Ingredients
  • 3 pounds of asparagus, trimmed to fit into pint jars or 12-ounce jars
  • 2 1/2 cups of apple cider vinegar (white wine or white distilled works also) (5%)
  • 2 1/2 cups of water
  • 2 1/2 t pickling salt
  • 2 T sugar
  • 1 T mixed pickling spices (no cloves)
  • 1/2 t hot pepper flakes (optional)
  • 3 large garlic cloves, peeled
Instructions
  1. Wash asparagus well under running water. Trim asparagus to fit into your canning jars – just a little over 1/2 inch shorter than the jars and set aside.
  2. Combine vinegar, water, salt, sugar, spices, and pepper flakes (optional) in a medium non-reactive saucepan. Bring to a low boil and stir to dissolve the salt and sugar.
  3. While the brine is coming to a boil, place one clove of garlic in the bottom of each canning jar and tightly pack the asparagus vertically into clean, hot jars. Asparagus can be heads up or heads down depending on your preference.
  4. Pour boiling hot brine over the spears, leaving 1/2 inch headspace. Remove air bubbles and adjust headspace if needed.
  5. Wipe rims of jars with a dampened clean paper towel.
  6. Adjust lids.
  7. Process 10 minutes in a boiling water bath.
  8. Store the cooled jars in a cool, dry, dark place for at least 3 weeks before eating the asparagus. After opening a jar, store it in the fridge.
3.2.2929


Filed Under: recipes

Pasta & Meat Sauce – Pressure Cooked

April 22, 2015 by andrea Leave a Comment

Pasta & Meat Sauce - Pressure Cooked

Pasta & Meat Sauce – Pressure Cooked

I have to admit, I was a little hesitant to try pressure cooking pasta. But then I spoke with a friend and he gave me a great recipe to get started with. I’ve modified his recipe a little to make it my own and to work for our family. Including prep time, this recipe can be started and onto to the table in about 30 minutes.

I’ve made it in the electric pressure cooker one night when the babysitter was here. I got it going before I left and the cooker went to keep warm mode until she was ready to feed the crew. Its the perfect alternative to feeding them hot dogs again!

The trick to making pasta in your pressure cooker is to stick with bigger noddle like penne or even bow ties. Spaghetti or fettuccini won’t work in the pressure cooker – it will just end up a gloppy mess!

Pasta & Meat Sauce
Recipe Type: Pressure Cooker
Author: Andrea
Prep time: 15 mins
Cook time: 7 mins
Total time: 22 mins
Serves: 6
Pasta and sauce in under 30 minutes? It’s possible because of the pressure cooker. This is a great weeknight meal.
Ingredients
  • 1 T olive oil
  • 1 lb of hamburger or ground Italian sausage
  • 1 onion, chopped
  • 2 cloves of garlic, finely chopped
  • 2 cups of sliced mushrooms, canned or fresh
  • 1 cup of chopped red pepper
  • 28 oz of crushed tomatoes
  • 4 cups of water
  • 1 T Italian seasoning
  • 1/8 t red pepper flakes
  • 16 oz of penne or cavatappi pasta
  • shredded mozzarella cheese (for serving)
Instructions
  1. If using an electric pressure cooker, turn to brown setting. If using a stovetop cooker, preheat pan to medium high heat. Add oil to warm pan. When oil is warm, brown meat. When meat is almost brown, add onion and garlic and saute until onion is translucent and meat is cooked through (no pink remaining). Drain extra fat from pan (I use a paper towel to soak it up).
  2. Add remaining ingredients. Give the pan a stir.
  3. Place lid on cooker, lock lid and bring to high pressure. If using an electric cooker, set for 5 minutes. If using a stovetop cooker, set for 7 minutes.
  4. Let pressure release naturally.
  5. Top with mozzarella cheese and serve.
3.2.2929


Filed Under: Uncategorized Tagged With: meat, pasta, pressure cooker

Sourdough Beer Pizza Crust

April 18, 2015 by andrea 6 Comments

Sourdough Beer Pizza Crust

Sourdough Beer Pizza Crust

Pizza is one of the best yeast breads for beginning bread maker. Since pizza crusts can be thin, thick, crispy or chewy, there is a lot of error in making pizza dough. So, if you’re just starting out with yeast breads, pizza is a good place to start.

This recipe calls for durum wheat flour. If you’ve never tried durum or semolina flour, it has a courser texture than most flours. It will give your crust a little extra bite or chewiness.  But don’t skip this recipe just because  you don’t have durum flour, substitute it with whole wheat flour and you’ll still end up with a great pizza crust.

This recipe is a little unique by callinpizza ingredientsg for beer as the liquid. But here’s the thing, you can’t really taste the beer in the final pizza crust. So use the cheap beer in the recipe and save the good stuff for drinking. That being said, I do try to use the good olive oil when I’m baking.


Sourdough Beer Pizza Crust
Recipe Type: bread
Author: Andrea
Prep time: 10 mins
Cook time: 12 mins
Total time: 22 mins
Serves: 2-4 pizzas
If you don’t have durum wheat flour, just substitute it with whole wheat flour.
Ingredients
  • 1 cup sourdough starter, fed or unfed
  • 1 1/2 cups of room temperature beer
  • 2 t instant yeast
  • 1 t baking powder
  • 1 1/2 t salt
  • 2 T olive oil
  • 2 1/2 cups (11 oz) of whole wheat flour, I use freshly milled flour
  • 1 1/2 cups (6.7 oz) of durum wheat flour, I use freshly milled flour
Instructions
  1. Combine the sourdough starter and beer in the bowl of a stand mixer or mixing bowl. Stir until starter is dissolved.
  2. Add yeast, baking powder, salt and olive oil to the beer mixture.
  3. Add flours to remaining ingredients to make a slightly sticky dough. Adjust the flour or add water to make a nice, sticky consistency.
  4. Knead dough until it is smooth, but still a little sticky. Add as little extra flour during the kneading as possible so that the dough stays sticky. Using a stand mixer will help with the kneading.
  5. Let dough rest 2-4 hours on the countertop.
  6. When ready to bake, preheat oven to 450 degrees for about 30 minutes. If you have a baking stone, preheat it in the oven.
  7. Divide dough into 2 to 4 round and shape each round into a pizza. I shape mine onto parchment paper.
  8. Use a wooden peel to slide each dough one at a time onto the pizza stone. If you don’t have a pizza stone, bake the dough on a cookie sheet. Bake for 5 minutes until just crisp. Remove from the oven.
  9. Add pizza toppings to the dough and bake another 7 minutes until cheese is melted.
3.2.2929


Filed Under: recipes Tagged With: fresh flour, pizza, sourdough, whole wheat

  • « Previous Page
  • 1
  • …
  • 6
  • 7
  • 8
  • 9
  • Next Page »

Posts

  • Clatter in the Kitchen
  • recipes
  • Uncategorized

Recent Comments

  • andrea on Whole Wheat Bread (small batch)
  • andrea on Sourdough Beer Pizza Crust
  • andrea on Recipe for Holiday Jam
  • andrea on (Sourdough Optional) Carrot Muffins
  • andrea on Lentil and Ham Bone Soup

Recent Comments

  • andrea on Whole Wheat Bread (small batch)
  • andrea on Sourdough Beer Pizza Crust
  • andrea on Recipe for Holiday Jam
  • andrea on (Sourdough Optional) Carrot Muffins
  • andrea on Lentil and Ham Bone Soup

Posts

  • Clatter in the Kitchen
  • recipes
  • Uncategorized
  • Facebook

Copyright © 2025 · Foodie Child Theme by Shay Bocks · Built on the Genesis Framework · Powered by WordPress