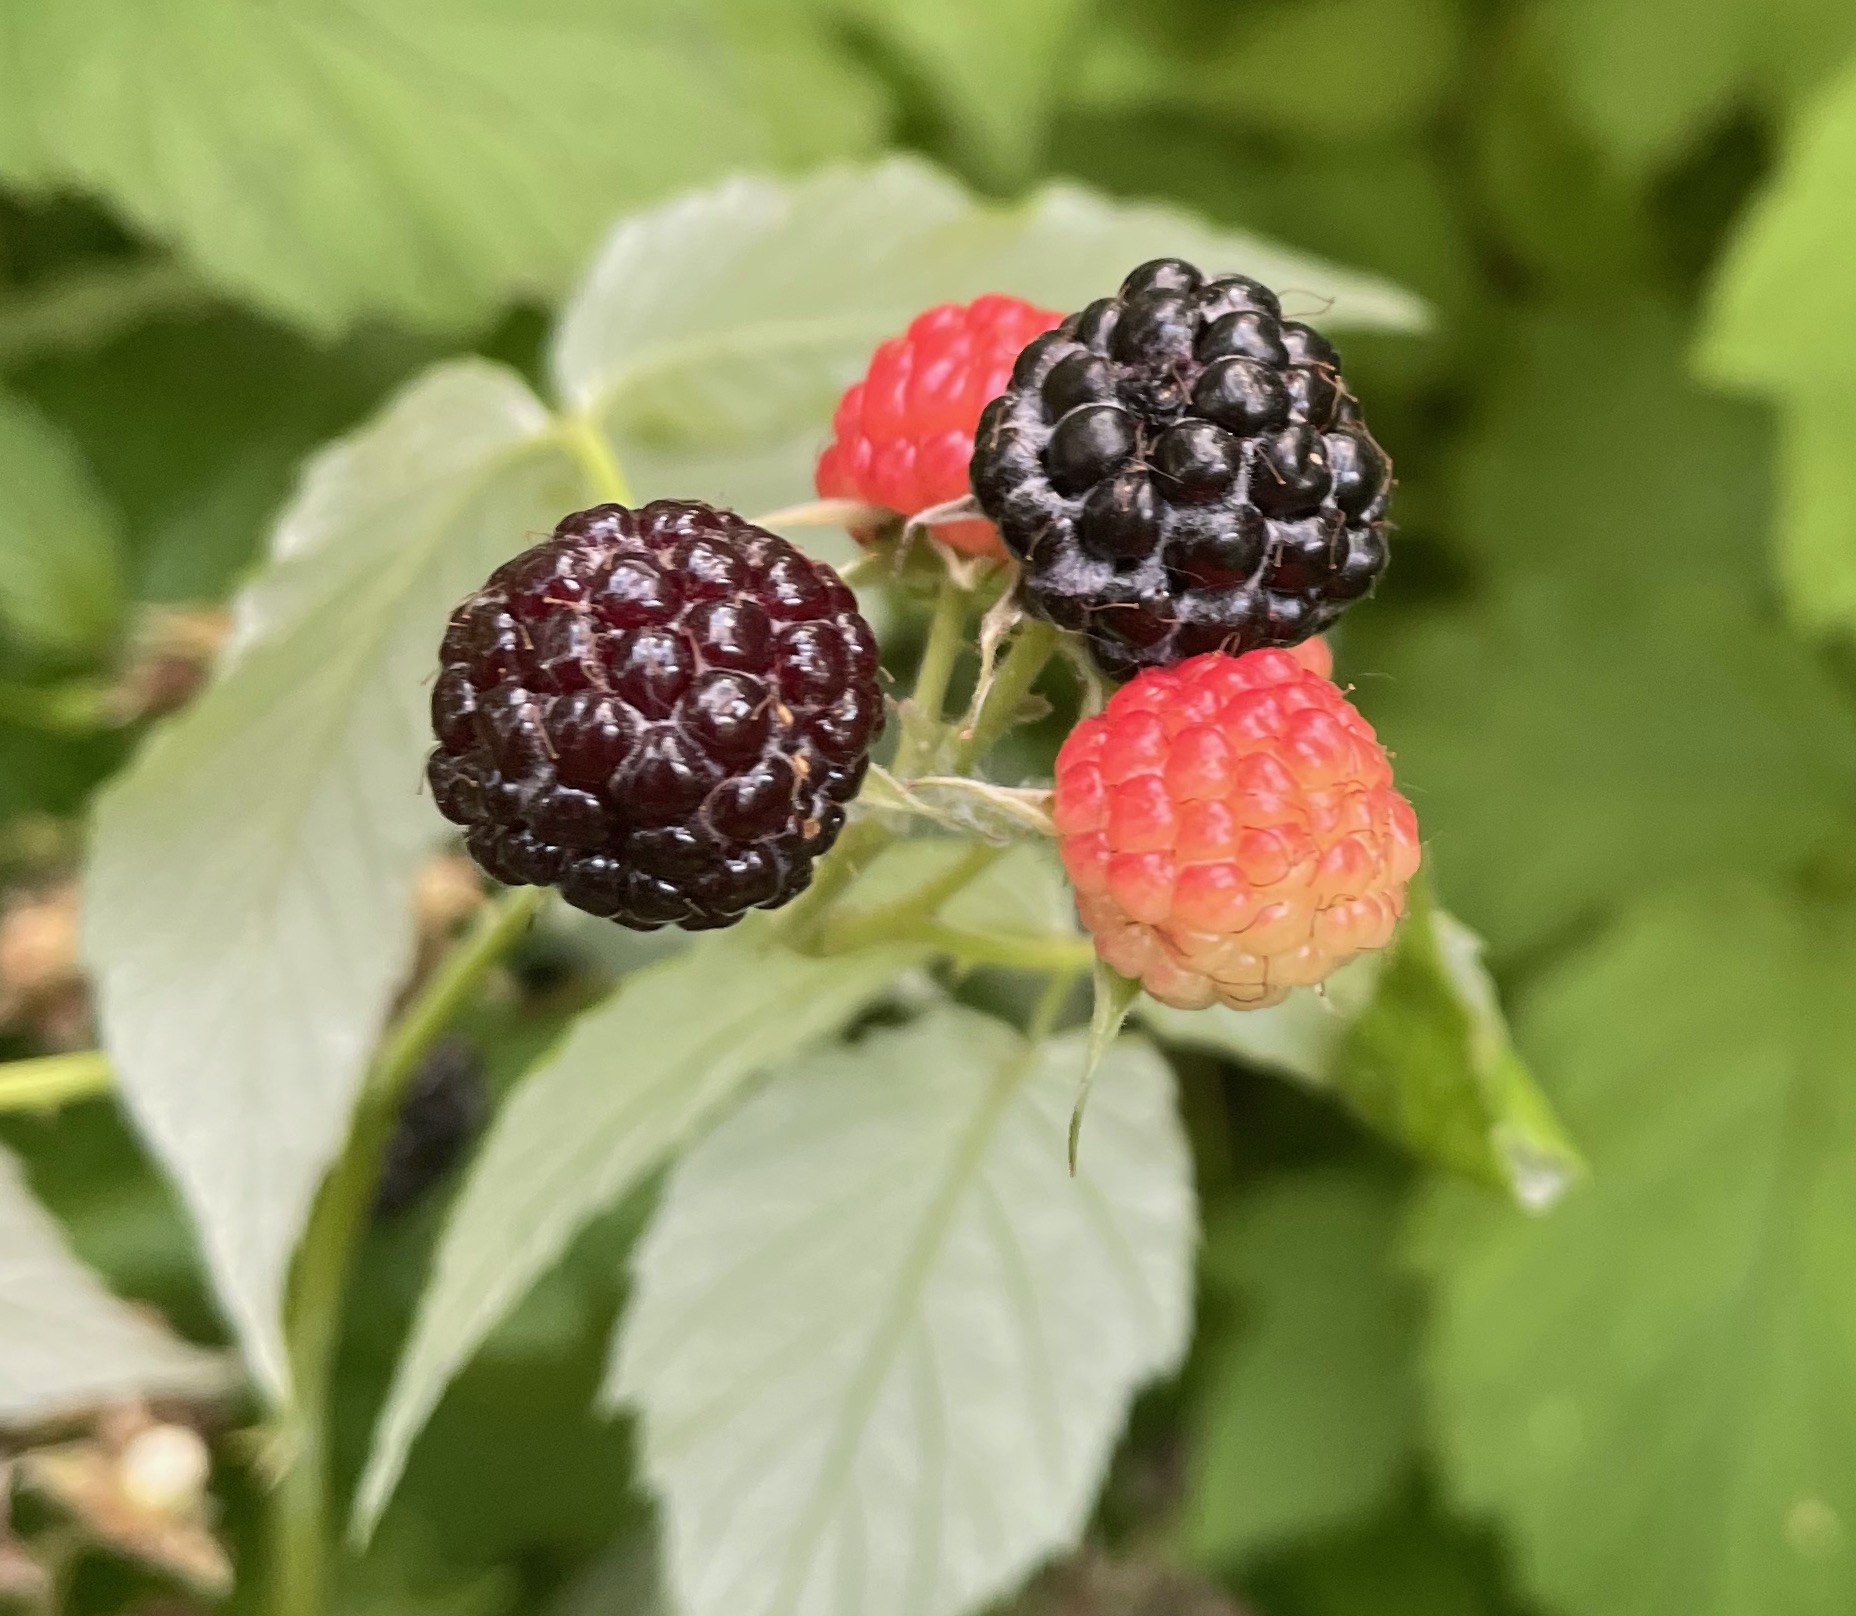
My Kitchen Clatter

Real Food - Real Life

  • About Me
  • Classes
    • Upcoming Classes
    • Baking Classes
    • Pressure Cooking Classes
    • Fermentation Classes
    • Canning Classes
    • Kombucha Classes
  • Equipment
    • Nutrimill Plus Grain Mill
    • Nutrimill Classic Grain Mill
    • Nutrimill Harvest Grain Mill
    • Mockmill Grain Mill Attachment for Kitchenaid Mixer
    • Bosch Universal Mixer
    • Ankarsrum Original Assistant
    • Nutrimill Artiste Kitchen Stand Mixer
    • Filter Pro Dehydrator
  • Grains & Supplies
  • Recipes
  • Clatter in the Kitchen

Müesli

April 4, 2022 by andrea Leave a Comment

Müesli is a wonderful, healthy alternative to granola. And it’s even easier to make than granola, because no oven is involved. Unlike granola, müesli has no added fat or sugar to mess with the goodness of the whole grains, nuts and dried fruits.

For serving, I spoon about 1/2 a cup of müesli over homemade yogurt for my morning breakfast. Add a banana or some berries and you are really set to go for the morning.

And if you are into overnight oats, you can sub müesli for the rolled oats. Just place about 1/2 cup of müesli into a 2 cup mason jar, cover with milk or coconut water, add some yogurt and then top off with your favorite fruit (frozen blueberries are mine). Let sit in the fridge overnight (or two) and you’ve got breakfast ready for the morning.

This recipe really should be considered as a starting point. You can mix and match your grains, nuts, seeds and fruits as you wish. A good rule of thumb to start with is about 80% grains and 20% nuts and dried fruit, but feel free to play with that ratio. I’ve added some warm spices to the mix for a little extra depth of flavor, but they can be left out or played with as you like. Here are some ideas for the ingredients to get you started.

  • Grains: Rolled oats, wheat bran, whole rye, rye flakes, whole barley, sorghum flakes, quinoa flakes, millet puffs, millet flakes, buckwheat groats.
  • Nuts/seeds: Sliced almonds, walnuts, cashews, pecans, pistachios, hazelnuts, sunflower seeds, pepitas, chia seeds, poppy seeds, sesame seeds, unsweetened coconut flakes.
  • Dried fruit: Dried apricots, dried cherries, dried figs, raisins, golden raisins, currants, apple chips, dried blueberries.

Müesli

andrea
Müesli is a healthy, low-sugar alternative to granola. Use this recipe as a starting point to make your favorite combination of grains, nuts, and dried fruits. Serve with milk or yogurt.
Print Recipe Pin Recipe
Prep Time 5 mins
Cook Time 0 mins
Course Breakfast
Servings 12 1/2 cup

Ingredients
  

  • 1/4 cup buckwheat groats
  • 1 3/4 cups rye flakes or rolled oats 
  • 1/4 cup sliced almonds
  • 1/4 cup shelled pistachios, chopped
  • 2 tbsp shelled sunflower seeds
  • 1 tbsp flaxseed
  • 1/4 cup dried cherries
  • 1/4 cup dried apricots, small diced
  • 1/2 teaspoon ground cinnamon
  • 1/4 teaspoon ground cardamom
  • 1/8 teaspoon ground cloves
  • 1/8 teaspoon freshly grated nutmeg
  • 1/4 teaspoon kosher salt

Instructions
 

  • Combine all the ingredients in a large bowl and stir until well combined.  Store in an airtight container at room temperature for up to six months. 

To Serve

  • Serve 1/4 – 1/2 cup of muesli with an equal amount of yogurt or milk, a drizzle of honey, and fresh fruit like a sliced banana or berries. 
  • Müesli also works really well in overnight oats as a substitute for plain rolled oats. 
Keyword breakfast, easy, healthy, oats, whole grains

Filed Under: recipes Tagged With: easy, healthy, homemade, muesli, oatmeal, recipe, whole grain

Sourdough Chocolate Chip Cookies

March 5, 2022 by andrea Leave a Comment

I like my cookies to have a nice chewy bite, be soft in the middle, and have crispy edges. Oh, who am I kidding? I like my cookies in any form as long as they are fresh out of the oven. I pretty much have zero standards for cookies other than that they be homemade. All that said, this cookie comes out soft in the middle with crispy edges. It’s pretty darn great. It’s not overly sweet or difficult to make.

A little about sourdough starter…

I wrote this recipe specifically to use up extra sourdough starter. I think the starter helps to give the cookie its excellent crumb and softness. Your starter can be well fed or just your discard. The recipe does call for a full cup of starter, but it can easily be divided in half, depending on how much starter you have available.

And some words on flour…

Whole grain flours really make this cookie. If you only have all-purpose flour on hand, go ahead and use it. But if you’d like to increase the flavor, fiber and nutrients of your baked goods, be sure to give these a try with your favorite whole grain flour. My standard go-to for this cookie is normally a soft white wheat or a spelt flour. Both will make a chocolate chip cookie that has a nice mild flavor with slightly more depth than you’d find using all-purpose flour. But honestly, try this with any flour you have on hand. My favorite flour that I’ve tried with these cookies was buckwheat flour. Let me know in the comments what flours you try them with.

Sour Dough Chocolate Chip Cookies

Serving Size:
4-5 dozen cookies
Time:
20 minutes, plus rest & baking
Difficulty:
Easy

Ingredients

  • 3 cups + 2 tablespoons (380 g) of soft white whole grain wheat flour or all-purpose flour
  • 1 teaspoon baking powder
  • 1 teaspoon baking soda
  • 1/2 teaspoon fine sea salt or table salt
  • 16 tablespoons (2 sticks) of unsalted butter, room temperature or softer
  • 3/4 cup (180 g) granulated sugar
  • 1/2 cup (120 g) light brown sugar
  • 2 eggs
  • 1 cup (240 g) sour dough starter discard
  • 1 teaspoon vanilla extract
  • 2 cups chocolate chips

Directions

  1. Combine the dry ingredients (flour through salt) in a medium sized bowl. Whisk to combine.
  2. Combine the butter and both sugars in the bowl of a stand mixer and beat on high speed for 3-4 minutes. The sugar butter mixture should be light colored and fluffy.
  3. Add the eggs, on at a time to the butter mixture and mix until combined.
  4. Add the sour dough starter and the vanilla extract to the butter mixture and beat for 2-3 minutes until well combined.
  5. Add the flour mixture to the stand mixer. Combine on low speed, just until the flour is incorporated.
  6. Add the chocolate chips to the dough and mix until just combined.
  7. The dough can be baked right away, but it benefits from at least 30 minutes rest in the fridge. Wrap the dough in parchment paper and rest in fridge for 30 minutes or up to 2 days.
  8. Preheat the oven to 350 degrees. Line a cookie sheet with parchment paper. Drop heaping tablespoons on dough on the pan and bake for 10-12 minutes. Allow to cool on the pan for 3-4 minutes before transferring to a cooling rack.

Filed Under: recipes Tagged With: buckwheat, chocolate, cookie, homemade, snack, sourdough, whole grain

Spaghetti & Meatballs – Instant Pot

February 3, 2022 by andrea Leave a Comment

Spaghetti and meatballs - five ingredients!

Let me introduce you to one of my absolute favorite go-to weeknight meals. I always have the ingredients for spaghetti in the pantry, but learning how to make spaghetti and meatballs in the pressure changer is so much simpler than the stovetop. I’ve had a recipe for Pasta and Meat Sauce on my site for a while, but I love incorporating the pasta into the cooking. This recipe is one that I pull out on nights where I really want to order carry-out, but I know it would be quicker to cook at home. If you’re looking for other ideas for quick week-night meals, we also love my recipes for Cheesy Chili Mac and Instant Pot Sloppy Joes.

A couple thoughts on this recipe. I save lots of time and energy by using frozen Italian meatballs from Costco. Find your favorite brand and just go with it. I usually dump in about a pound and a half of meatballs to feed the six of us. That’s thirty-six meatballs – yes, I count them – meatball fights are a real thing at our table. Feel free to adjust the meatball amount to what you need – the cooking time remains the same.

This really does seem to serve the six of us with a few leftovers. We typically add a salad and bread. If you want to use a whole package of spaghetti, you should add an extra cup of water and your sauce will be a bit thinner.

Instant Pot Spagetti & Meatballs

Serving Size:
serves 6
Time:
total time 30 minutes
Difficulty:
easy peasy

Ingredients

  • 1-2 lb frozen meatballs, homemade or frozen from a bag
  • 12 oz uncooked spaghetti noodles
  • 1 T olive oil
  • 32 oz pasta sauce
  • 3 cups water
  • parmesan cheese for serving

Directions

  1. Toss the meatballs into the bottom of your instant pot.
  2. Break the spaghetti noodles in half and scatter over top of the meatballs.
  3. Drizzle the olive oil on top of the spaghetti. Pour in the pasta sauce and water on top of the spaghetti. Add a little extra water if you need to make sure the spaghetti is covered with liquid. Don’t stir!
  4. Place the lid on the pressure cooker and set the time to 8 minutes. When the timer is up, release the pressure using a quick release method. Open the lid, stir, and serve.

Filed Under: recipes, Uncategorized Tagged With: dinner, easy, Instant Pot, pressure cooking

Fermented Carrot Sticks

December 21, 2021 by andrea Leave a Comment

Bump up the health benefits of your carrots by fermenting them. The kids won’t even know what hit them.

Keep these carrots in a visible spot of your fridge. Put the jar smack in the middle of your sight when you open the fridge door. That way you’ll be more likely to choose the carrots as a healthy snack!

Fermented Carrot Sticks

Serving Size:
2 cups
Time:
10 minutes prep time
5-7 days ferment
Difficulty:
easy

Ingredients

  • 1 T Fine salt (iodine free – no additives)
  • 2 cups chlorine free water
  • Carrots (approximately 4 medium sized), washed well, cut into sticks (peeling is optional)
  • 1 inch ginger, cut into rounds (optional)
  • Other optional ingredients include garlic, onion, dill, turmeric, or jalapeños (pick one of the optional ingredients. 

Directions

  1. Make the brine. Combine the water and salt. Stir to dissolve the salt. 
  2. Pack the carrot sticks along with any flavorings into the jar. Pack them in tight. Allow about an inch of space between the top of the carrots and the top of the jar. 
  3. Pour the brine over the carrots.
  4. Place a weight on top of the sticks, if you have one. You can use a plastic ziplock filled with water as a weight. 
  5. Place an airlock on the top of the jar. If you don’t have an airlock, you can put the mason jar lid back on the jar and just burp (loosen) the lid once a day to release any built up gases. 
  6. Allow to ferment on the counter for 5-7 days. Start tasting after 4-5 days and when the carrots taste good to you, they can go in the fridge. 

Filed Under: recipes Tagged With: carrot, ferment, fermentation, healthy, snack

Kraut with Carrot and Peppers

December 21, 2021 by andrea Leave a Comment

This is a traditionally fermented sauerkraut with the happy addition of carrots and some hot peppers. If you have a turnip or radish lying around in the fridge, feel free to add it in. This recipe is a great introduction to how easy it can be to make fermented foods. I encourage you to have fun and experiment with the recipe – there is really no way to go wrong with this one.

Kraut with Carrots & Peppers

Serving Size:
1 quart
Time:
10 minutes hands on
Difficulty:
easy

Ingredients

  • 1 medium head of green cabbage (about 2 pounds)
  • 2 medium carrots
  • 1 small turnip (optional)
  • 2 jalapeños or other pepper (optional)
  • Other optional ingredients include juniper berries, an apple, red onion

Directions

  1. Reserve an outer leaf of the cabbage. Shred the veggies and combine with any seasonings in a large bowl. Add salt to taste. Add a little less salt than you think you’ll need. Massage the veggies and salt for a few minutes. The veggies should start releasing a little liquid when you squeeze them. If there is little liquid, allow the vegetables to rest for 30 minutes then check again. 
  2. Pack the vegetables tightly in the jar – pressing out any air spaces. Allow about an inch of space between the top of the veggies and the top of the jar. 
  3. Place a weight or folded cabbage leaf on top of the veggies. Alternatively, you can use a plastic ziplock filled with water as a weight. 
  4. Place an airlock on the top of the jar. If you don’t have an airlock, you can put the mason jar lid back on the jar and just burp (loosen) the lid once a day to release any built up gases. 
  5. Allow to ferment on the counter for7-10 days. Start tasting after 5 days and when the kraut tastes good to you, it can go in the fridge to slow down the fermentation.

Filed Under: recipes Tagged With: cabbage, carrot, ferment, fermentation

Cinnamon Star Bread

December 10, 2021 by andrea Leave a Comment

Cinnamon Star Bread

Serving Size:
8-16
Time:
4 hours total
Difficulty:
Medium

Ingredients – Dough

  • 2 cups (240 g) of unbleached all-purpose flour (such as King Arthur Flour in the red bag)
  • 3/4 cup (184 g) of milk (preferably whole)
  • 4 T (57 g) of unsalted butter, at room temperature
  • 1 t vanilla extract
  • 2 t instant yeast
  • 2 T (25 g) sugar
  • 1 t salt

Ingredients – Filling (and Egg Wash)

  • 1 large egg, room temperature
  • 1/2 cup (99 g) sugar
  • 1 T cinnamon

Directions

  1. Heat the milk to about 110 degrees – it should be lukewarm. I heat mine 1 minute in the microwave.
  2. Combine the milk, 1 cup of flour, butter, vanilla, yeast and sugar in the bowl of your stand mixer or in a large bowl, if you are mixing by hand. Slowly add the salt and enough of the remaining flour to form a shaggy dough that forms a ball. 
  3. Knead the dough for 6-8 minutes until it forms a smooth ball. The dough should be soft but not sticky. 
  4. Oil a large bowl (I use canola or another neutral flavored oil) and place the dough in the bowl. Roll the dough in the oil. Cover with a towel and place in a warm, draft free spot such as a slightly heated oven. Allow to rise about an hour until the dough has about doubled.
  5. After the dough has risen, remove from the bowl and gently deflate. Divide into four equal portions. Shape each quarter into a ball and allow to rest 10 minutes.
  6. While the dough is resting, prepare the filling. Beat the egg in a small bowl and combine the sugar and cinnamon in a separate bowl.
  7. Prepare a baking sheet by lining with a sheet of parchment or silicon baking mat.
  8. After the dough portions have rested, take one portion and roll out into a 10-inch circle. Gently move the circle onto the prepared baking sheet. Brush the dough with the egg and then sprinkle with about 1/3 of the cinnamon sugar. Roll a second dough, and lay it on top of the first circle. Repeat with egg and cinnamon sugar until all of the doughs are layered. The top dough does not get egg and cinnamon sugar treatment. 
  9. Set a glass or other circle with about a 3-inch diameter in the center of the dough. This will act as a template so you don’t cut too far into the center.
  10. Using scissors or a bench knife, cut the circle into 16 even sections – stopping at the center circle marker. Remove the center circle marker.
  11. Take two strips of dough next to each other in each hand and twist away from each other two times, then pinch the strips together at the end. Repeat around the circle so that you have eight twists. 
  12. Allow the dough to rise in a warm spot again for about 45 minutes. It should be puffy at the end of this rise. 
  13. While the dough is rising, heat the oven to 400 degrees.
  14. At the end of the rise, gently brush a light layer of the egg over the top of the dough. 
  15. Bake for 15-18 minutes until the bread is golden with dark cinnamon streaks. The center should register 200 degrees F on a digital thermometer. 
  16. 16.Remove from oven and allow to rest about 10 minutes before serving. Dust with confectioner’s sugar and serve warm or at room temperature. 
  17. You can also allow it to cool completely at this point and wrap in tin foil or freezer paper and freeze. To serve from frozen, allow to come to room temperature overnight (either in the fridge or on the counter) and then heat (covered loosely with tin foil in a 325 degree oven for about 10-15 minutes. 

Filed Under: recipes Tagged With: bread, cinnamon, holiday, holiday baking

Cinnamon Rolls – Tangzhong method

November 8, 2021 by andrea 2 Comments

This recipe uses the tangzhong method of heating a small portion of the liquid and flour together to form a paste. This simple step allows the starches in the flour to gelatinize and gives the bread dough a little different texture than a typical dough. I feel the tangzhong method allows you to work with a slightly wetter dough than normal, which creates a softer end dough. Because of the tangzhong method, the final bread will have a slightly higher rise and better shelf life.

Let’s talk a bit about flour. This recipe calls for bread flour – but if you don’t have that handy, you can use a good strong all purpose flour. King Arthur’s all-purpose flour (in the red bag) works well in this recipe. Be aware that not all flours are created equal – some all purpose flours will have a lower protein level which result in less rise of the final dough. If you find yourself disappointed in the final results of any bread recipe, I always recommend looking at the flour you are baking with.

Most of you know by now that I really like a little flavor in my breads. Even with cinnamon rolls, I find that substituting a small portion of the white flour with a good whole grain flour adds a beautiful amount of flavor to otherwise bland white bread. About 10-20% of the white flour can be substituted with spelt or a whole wheat flour. For these cinnamon rolls, I often use 50 grams of spelt flour and 250 grams of white flour in the main dough.

And my final comment on flour – if you are measuring by volume, use the stir and scoop method to measure the flour. With a large spoon, stir your flour in it’s container. Then, using the spoon, scoop it gently into the measuring cup until the measuring cup is overfull. Then, use a straight edge to level off the top of the measuring cup.

This dough will be very wet. You will be tempted to add more flour. Don’t do it. Trust me. The dough will come together as it is kneaded. If kneading by hand, you may need to use a bench knife to scrape the dough off of the board and back into the dough mass. A slap and fold technique is probably the best way to knead this dough together. If this is a new kneading technique to you, there are lots of YouTube videos out there with demonstrations – this one from Richard Bertinet is one that I like. His method is not exactly the same as mine, but the idea is the same. At around 3 minutes, this YouTube video from Chew-y Bakes shows a similar method to the one I use.

Homemade Cinnamon Rolls – Tangzhong Method

Serving Size:
10-12
Time:
2-4 hours total
Difficulty:
Medium

Ingredients – Tangzhong

  • 113 g (1/2 cup) whole milk
  • 23 g (3 T) bread flour (or all-purpose flour)

Ingredients – Dough

  • 151 g (3/4 cup) whole milk (cold from fridge, is fine)
  • 28 g (2 tablespoons) butter, unsalted
  • 63 g (3 tablespoons) honey
  • 6 g (2 teaspoons) instant yeast)
  • 300 g (2 1/2 cups) bread flour (or all-purpose flour)
  • 8 g (1 1/2 teaspoons) fine table or sea salt

Ingredients – Filling

  • 84 g (6 tablespoons) softened butter, unsalted
  • 107 g (1/2 cup) brown sugar
  • 8-10 g (3-4 teaspoons) cinnamon

Ingredients – Frosting

  • 2 cups powdered sugar
  • 1 teaspoon butter, softened
  • 2-4 tablespoons Half and half or whole milk
  • 1/2 teaspoon vanilla extract
  • dash of almond extract, optional

Directions

  1. Combine the tangzhong ingredients in a small saucepan. Whisk so no lumps remain. Heat over medium heat, stirring constantly until it thickens and your spoon leaves a trail through the mixture. Remove from saucepan and put into the bottom of your mixing bowl or stand mixer.
  2. Add remaining dough ingredients to the stand mixer in the order listed. The warmth of the heated flour & milk mixture will heat the cold milk and dough. 
  3. Stir the ingredients together to form a shaggy mass. If you are using a stand mixer, turn the mixer to low and allow to knead for 6-8 minutes. If you are kneading by hand, turn the dough onto the counter and knead for about 10 minutes. The dough will be wet and will seem like it needs more flour. Don’t add more flour – it will come together as it is kneaded. If kneading by hand, you may need to use a bench knife to scrape the dough off of the board and back into the dough mass. A slap and fold technique is probably the best way to knead this dough together. Once the dough forms a smooth ball and passes the window pane test, it is ready for the first rise.
  4. Oil the dough and place in a warm (80 degrees F), draft free spot for about 90 minutes until it is almost doubled in size. This is a slow rising dough. It may take longer to rise. If you are tight on time, you can put the dough into the fridge at this point (before it has risen completely) and hold it up to 24 hours. Then continue with the rest of the recipe.
  5. While the dough is rising, combine the filling ingredients in a small bowl – butter, brown sugar and cinnamon to make a crumbly paste.  When the dough is finished rising, gently turn out the dough onto your work surface. You may oil the work surface, but avoid flouring the surface. Shape the dough into a large rectangle about 12 inches by 18 inches with the long side facing you. Sprinkle the filling all over the dough, leaving about an inch along the long edge (towards you) free of filling – this is to allow you to seal the dough together in the next step.
  6. Starting from the long edge away from you, roll the dough gently towards you. When the dough is fully rolled, seal the edge (this should be the edge with no filling) to the roll by gently pinching. Using a bread knife or a long piece of string, slice the dough into rolls. 8 rolls will produce nice large cinnamon rolls, but you can make smaller ones if you like (I usually make 12 smaller rolls). Place the rolls onto a baking sheet lined with parchment. Tuck the tails of the rolls under the roll so they don’t pop out when they bake. You can also place them into a cake pan, if you prefer – this will make pull apart rolls (expect these rolls to need a little extra cooking time). If you would like to bake the rolls the next day, or in the morning, you can cover the rolls at this point and place in the refrigerator for up to 12 hours. They will be ready to go into the oven when you pull them from the fridge.
  7. Cover lightly with a clean kitchen towel or oiled plastic wrap. Place in a warm spot to rise. Rolls will take about 20-30 minutes to rise. About 15 minutes before you expect the dough to be finished rising, preheat the oven to 375 degrees. When the dough is risen, you’ll be able to gently push your finger into the dough, it will leave an imprint and the imprint will slowly bounce back.
  8. Bake in a 375 degree oven. 15-20 minutes for rolls baked on a baking sheet. Rolls baked in a cake pan will take about 30 minutes to bake. When done, the rolls will be golden brown. If you have an instant read thermometer (I use a Thermapen brand), it should read about 190 in the center of the pan of rolls. 
  9. Combine the all frosting ingredients except the milk. Sifting the powdered sugar and using very soft butter will help reduce lumps. Whisk together and slowly add the milk one tablespoon at a time until you have a consistency that you like. Frost the rolls when they are warm or cooled. 
  10. Enjoy!

Filed Under: recipes Tagged With: bread

Pumpkin Spice Bagels

September 24, 2021 by andrea Leave a Comment

I have lots of things to say about these pumpkin spice bagels, but lets start with – they are AMAZING and EASY. I hope you give them a try.

Quick & Easy – Start to Finish in under 3 hours

First off, this recipe is quick and easy as far as yeast breads and bagels go. My go-to standard bagel recipe uses a sponge and an overnight proof in the refrigerator – these things help develop flavor, which is necessary when we are working with so much white flour. But here, with these pumpkin spice bagels, we have added flavor in the pumpkin and spices. So, we are going to skip the long proof and make these bagels in a morning. From start to finish, you can have a hot bagel in your mouth in under 3 hours.

That being said, you can still choose to make the dough the night before. Just follow the recipe up to the point where you let the dough rise at room temperature for an hour. Instead of doing the the room temperature rise, pop the dough into an oiled bowl, cover, and put it in the fridge overnight. In the morning, pull the dough out and follow the shaping and cooking instructions.

Mix by hand or with a Stand Mixer

Bagel dough should be a tight dough. The dough should be soft, but not sticky. It is a lower hydration dough, which helps give a nice dense texture to the bagel. You will want to add as much flour into the dough as possible without drying out the dough. The easiest way to mix bagel dough is to use a stand mixer and let the dough knead for about 8 minutes. If you are kneading by hand, you’ll want to knead the dough for about 15 minutes. Expect to get a good shoulder workout if you are kneading by hand. You are looking for the dough to be smooth, and not sticky.

I use homemade pumpkin puree in this recipe. Sometimes the moisture content varies in the puree, so it’s important to adjust the flour accordingly. If you are using canned pumpkin, your moisture content will be a bit lower, and you’ll use a little less flour in the recipe.

Some other tips

  • This recipe calls for bread flour. I like King Arthur’s bread flour with a 12.7% protein content. This helps to give a nice chewy bite to the bagel. If you don’t have bread flour, substitute with King Arthur’s all-purpose flour. I recommend King Arthur’s flours because they have high protein content, which helps with successful and consistent yeast breads. Feel free to substitute whatever flour you can access, but be aware of the difference that protein content can make in yeast breads.
  • This recipe makes 10-12 nice medium-sized bagels. You can make them larger or smaller as you wish. If you are using a scale: 4.5 ounces makes a large bagel, 3.5 makes a medium, and 2.5 makes a smaller bagel. Boiling and baking times are the same no matter the size.
  • Shaping the bagels takes practice. Don’t stress out if you don’t get it right away. I recommend pre-shaping them into balls, letting them rest 10 minutes, and then shaping the bagels by poking a hole in the middle and rolling the bagel around your fingers. The pre-shaping into balls helps get a round shape. You make the balls by pinching the dough to a point, making a smooth ball, sort of like a dumpling. With the pinched part on the counter and your hand cupped over the ball like a claw, give it some movement with your hand to seal the pinched part closed. Once you have the balls made, cover them and let rest for ten minutes. The rest allows the dough to relax so it will shape nicely into the final bagel shape. After resting, I just poke my finger into the middle of the ball and start rolling the dough around my fingers. Make the hole larger than you think you need, because it will shrink during the cooking.
  • We boil these bagels in a baking soda mixture before baking. This helps with creating a chewy crust and a traditional style bagel. Don’t skip this step. The bagels will puff up while boiling and it’s a lot of fun to watch.
  • Any bagels that we don’t eat right away, go into the freezer. I hate stale bread. Some people will be fine with letting these sit on the counter for a couple days, but anything longer than that should go in the freezer. Just pull them out one by one, thaw in the microwave for a few seconds, slice and toast. Perfect.
Bagels after the boiling step, but before baking.

Pumpkin Spice Bagels

Serving Size:
10-12 medium bagels
Time:
3 hours
Difficulty:
Medium

Ingredients

  • 1 cup water, room temperature
  • 1 cup pumpkin puree
  • 1 1/2 t instant yeast
  • 3 3/4 cup (15 ounce) + 1 cup (4.5 ounce) bread flour
  • 1 1/2 t salt
  • 1/2 t cinnamon
  • 1/4 t nutmeg
  • 1/4 t allspice
  • 1/8 t cloves, ground
  • 1 T brown sugar
For Boiling Waterbath
  • 2 T baking soda

Directions

  1. Combine all ingredients except flour in the bowl of a stand mixer or large bowl, if you are mixing by hand. Add in 2 cups of your flour and stir. Continue adding remaining 1 3/4 cup of flour until dough is formed. If your dough is still sticky and not forming a ball, then add remaining 1 cup of flour, 1/4 cup at time until the dough comes together in a ball. It may still be sticky, but it should form a ball. Knead for 8 minutes by machine or 15 minutes by hand. While you are kneading, the dough should come together in a smooth, soft ball and not be sticky to the touch.
  2. Cover the dough, and allow to rise at room temperature for about an hour and a half until the dough has almost doubled in size. At this point, instead of rising at room temperature, you could cover the dough and refrigerate up to 12 hours until you are ready to bake.
  3. When the dough has risen, gently turn out onto an oiled surface and divide into about 12 pieces for medium sized bagels.
  4. Preshape the dough into balls. To do this, form each piece into a ball by pinching the ends together at the bottom (like a little dumpling) and then rolling the pinched part on the counter to seal the bottom. Cover balls and allow to rest 10 minutes.
  5. Shape the balls into bagels by poking a hole through the middle of each ball and rolling the dough around two fingers until a large hold is formed in the middle. The hole will shrink while baking.
  6. Cover the shaped bagels and allow to rest for about 30 minutes.
  7. While the bagels are resting, preheat the oven to 400 degrees and bring a large pot of water to a boil. An ideal pot should be wide to fit 4 or 5 bagels, but the water depth only needs to be a couple inches deep. Prepare two baking sheets by oiling or lining with oiled parchment or silicon baking sheets.
  8. After the bagels have rested, with the water boiling, add 2 Tablespoons of baking soda to the water. It will foam up temporarily.
  9. Gently slide a bagel into the boiling water. It will float. You can boil as many bagels at a time that will fit comfortably into your pot – usually 3 to 5. After 30 seconds, turn each bagel. After another 30 seconds, pull each bagel out with a slotted spoon. Place bagels onto prepared pan. Continue to boil all the bagels.
  10. Bake the bagels about 15 minutes until they are lightly browned on the top, rotating pans halfway through the baking time.
  11. Serve with cream cheese or use for sandwiches. Extras that don’t get eaten right away should be cooled and frozen. They will keep about 3 days at room temperature or up to 3 months frozen.
The bagels should float while they boil.

Filed Under: recipes Tagged With: bread, pumpkin, yeast

Wheat Berry Salad

July 13, 2021 by andrea Leave a Comment

This is my go-to summer salad because it is easy, healthy and super flexible. And by super-flexible, I mean that I can usually pull off making it without an extra trip to the grocery store. I often find myself emptying out lots of odds and ends of vegetables or cheese into this salad. And it always turns out great. I think the secret is in the salad dressing.

A Bit About Wheat Berries

Wheat berries are the unprocessed wheat kernel which includes the bran, endosperm and germ. They are most often milled to make flour, but in this recipe we are going to cook and use the whole wheat berries. If you are a person such as I who mills their own flour, then you most likely already have wheat berries around the pantry. For the rest of you, you will need to search out wheat berries or another whole grain at the grocery store. The wheat berries can be substituted in this recipe with farro, spelt, kamut, or barley. If your grocery store carries Bobs Red Mill Grains or if they have a bulk food section, you will find one of these grains in those sections.

Step one is cooking up your wheat berries. I use my pressure cooker to cook the wheat berries for about 35 minutes. If you don’t have a pressure cooker, they can be cooked on the stovetop for about 60 minutes. Either way, I usually plan for about an hour of cooking time for the wheat berries before assembling the salad.

About the Dressing

I use my favorite homemade vinaigrette, Green Herby Dressing, to make this salad. This dressing is pretty simple and only uses olive oil, apple cider vinegar, garlic and fresh herbs. You can assemble the dressing as the wheat berries are cooking.

If Green Herby Dressing isn’t happening for you, you can substitute it with a fresh pesto.

About the Rest of the Salad

Once you have the wheat berries and the dressing figured out, the rest of the salad is pretty flexible. I like to add:

  • lots of fresh veggies such as chopped cucumbers, snap peas, fava beans, celery, sliced fennel, and sliced onion.
  • chopped greens such as spinach, radicchio, or kale,
  • a handful of dried fruit such as dried cherries, cranberries, raisins, or blueberries,
  • a bit of cheese such as feta, goat cheese

The wheat berries on their own can be a bit heavy, so I usually add enough veggies and greens to lighten the salad up quite a bit.

Wheat Berry Salad

Serving Size:
4-6
Time:
75 minutes total
Difficulty:
easy

Ingredients

  • 1 cup of wheat berries or other whole grain such as farro, Kamut, spelt or barley
  • 4 cups of water
  • Green Herby Dressing or a 1/2 cup of pesto
  • 4 cups of chopped greens such as kale, spinach or radicchio
  • 2 cups of fresh vegetables such as snap peas, celery, sliced fennel, cucumber
  • 1 cup of dried fruit such as cherries, blueberries, or raisins
  • 1/2 cup of crumbly cheese such as goat cheese, feta, or blue cheese

Directions

  1. Cook the wheat berries in four cups of water. If using a pressure cooker, cook 35 minutes on high pressure with a 10 minute natural release. If using a stovetop, simmer covered for 60 minutes, stirring occasionally.
  2. While the wheat berries are cooking, prepare the Green Herby dressing or pesto. Prepare the vegetables and greens by chopping into bite size pieces.
  3. Once the wheat berries are done cooking, drain the extra liquid off and place the wheat berries into a large bowl. Toss the warm wheat berries with the dressing. Add the kale and any hardy veggies while the berries are warm.
  4. Toss the cheese into the salad before serving.
  5. This salad can be served at room temperature or cold from the refrigerator.

Filed Under: recipes Tagged With: homemade, salad, wheat berry

Green Herby Dressing

July 13, 2021 by andrea Leave a Comment

This is a recipe of sorts for my favorite salad dressing – one I have lovingly nicknamed Green Herby Dressing. In case you are wondering, in my head, I pronounce Herby with a hard H. It just makes me want to sing and dance around the kitchen…

Back to salad dressings, if you follow a couple basic rules of thumb, you can be creative with most of the recipe. That being said, I’ve written this recipe for Green Herby Dressing as I currently make it.

I use this recipe as my potato salad dressing and as a dressing for my wheat berry salad. I toss it on those salads while they are warm so the vinaigrette can infuse a bit with the salad. Green Herby would also be good on a kale salad.

All of the herbs in this dressing would make Green Herby a little strong for a lighter salad such as one based with spring greens. If you want a lighter vinaigrette for spring greens, just back off on the fresh herbs or eliminate them all together.

Vinaigrette Basics

So… lets start with the basics of making homemade salad dressings. We are going to be focusing on vinaigrettes with this post. I’m going to save creamy dressings like ranch and blue cheese for another day.

The trick here is to remember to keep it simple. A few ingredients and a quick spin with the immersion blender. Don’t get bogged down with the fact that you are MAKING YOUR OWN DRESSING! It is actually really easy to do and lots healthier that the store bought stuff. I also usually make just a small batch. Usually enough for the salad I’m making or maybe enough for a week or maybe two. It won’t last in the fridge much longer than that, anyway.

The base for vinaigrettes is usually olive oil. After that, you add a touch of vinegar and seasonings to test. I find it helpful to remember that the rule of thumb for the ratio of oil to vinegar is 3:1. So that means 3 tablespoons of olive oil and 1 tablespoon of vinegar. Don’t get these swapped around or you’ll need to start over – ask me sometime how I know that! Anyway, three tablespoons of oil and one tablespoon of vinegar.

To mix the ingredients together, I use my handy dandy immersion blender and the tall beaker that came with it. The immersion blender does most of the chopping and emulsifying for me. I also use the beaker to measure the oil and vinegar as I pour them in. If you don’t have an immersion blender, you can pull this off with a regular blender or a little whisking and chopping. Note that for this particular recipe of Green Herby Dressing, there is a lot of chopping of herbs involved.

Vinaigrette Ingredients:

  • Oil for the vinaigrette base. Usually this will be olive oil.
  • Vinegar of choice, this will add a little acid and kick to the vinaigrette.
  • Dijon mustard adds a little creaminess and flavor, but it is optional.
  • Sweetener such as honey or maple syrup. This is also optional, but you can use it to balance out the vinegar if you added too much.
  • Garlic gives a good flavor, but it can be substituted with a shallot or left out completely.
  • Salt and pepper.
  • Other additional ingredients include fresh or dried herbs.

Green Herby Dressing

Serving Size:
1/2 cup
Time:
5 min
Difficulty:
easy

Ingredients

  • 6 T olive oil
  • 2 T apple cider vinegar
  • 1 garlic clove, sliced or chopped
  • 1 large bunch of herbs of your choice (parsley, dill, cilantro, basil, oregano, chives, etc)
  • Salt & Pepper to taste

Directions

  1. Remove stems of the herbs.
  2. If you are using an immersion blender or blender, combine all ingredients except the salt and pepper in the blender or a small bowl. Blend until combined and the herbs are finely chopped.
  3. If you are not using an immersion blender or blender, finely chop the herbs and garlic. In a small bowl, whisk together the olive oil, vinegar, chopped garlic and herbs.
  4. Taste and season with salt and pepper. You may also add a touch more vinegar to taste.

Filed Under: recipes Tagged With: herb, homemade, vinaigrette

  • 1
  • 2
  • 3
  • …
  • 8
  • Next Page »

Posts

  • Clatter in the Kitchen
  • recipes
  • Uncategorized

Recent Comments

  • andrea on Hot Cross Buns
  • Susan Toth on Hot Cross Buns
  • andrea on Cinnamon Rolls – Tangzhong method
  • andrea on Recipe for Holiday Jam
  • Kathleen Herbach on Cinnamon Rolls – Tangzhong method
  • Facebook

Join My Newsleter

Copyright © 2022 · Foodie Child Theme by Shay Bocks · Built on the Genesis Framework · Powered by WordPress