My Kitchen Clatter

Real Food - Real Life

  • About Me
  • Classes
    • Upcoming Classes
    • Baking Classes
    • Pressure Cooking Classes
    • Fermentation Classes
    • Canning Classes
    • Kombucha Classes
  • Equipment
    • Nutrimill Plus Grain Mill
    • Nutrimill Classic Grain Mill
    • Nutrimill Harvest Grain Mill
    • Bosch Universal Mixer
    • Ankarsrum Original Assistant
    • Filter Pro Dehydrator
  • Grains & Supplies
  • Recipes
  • Clatter in the Kitchen

Cinnamon Star Bread

December 10, 2021 by andrea Leave a Comment

Cinnamon Star Bread

Serving Size:
8-16
Time:
4 hours total
Difficulty:
Medium

Ingredients – Dough

  • 2 cups (240 g) of unbleached all-purpose flour (such as King Arthur Flour in the red bag)
  • 3/4 cup (184 g) of milk (preferably whole)
  • 4 T (57 g) of unsalted butter, at room temperature
  • 1 t vanilla extract
  • 2 t instant yeast
  • 2 T (25 g) sugar
  • 1 t salt

Ingredients – Filling (and Egg Wash)

  • 1 large egg, room temperature
  • 1/2 cup (99 g) sugar
  • 1 T cinnamon

Directions

  1. Heat the milk to about 110 degrees – it should be lukewarm. I heat mine 1 minute in the microwave.
  2. Combine the milk, 1 cup of flour, butter, vanilla, yeast and sugar in the bowl of your stand mixer or in a large bowl, if you are mixing by hand. Slowly add the salt and enough of the remaining flour to form a shaggy dough that forms a ball. 
  3. Knead the dough for 6-8 minutes until it forms a smooth ball. The dough should be soft but not sticky. 
  4. Oil a large bowl (I use canola or another neutral flavored oil) and place the dough in the bowl. Roll the dough in the oil. Cover with a towel and place in a warm, draft free spot such as a slightly heated oven. Allow to rise about an hour until the dough has about doubled.
  5. After the dough has risen, remove from the bowl and gently deflate. Divide into four equal portions. Shape each quarter into a ball and allow to rest 10 minutes.
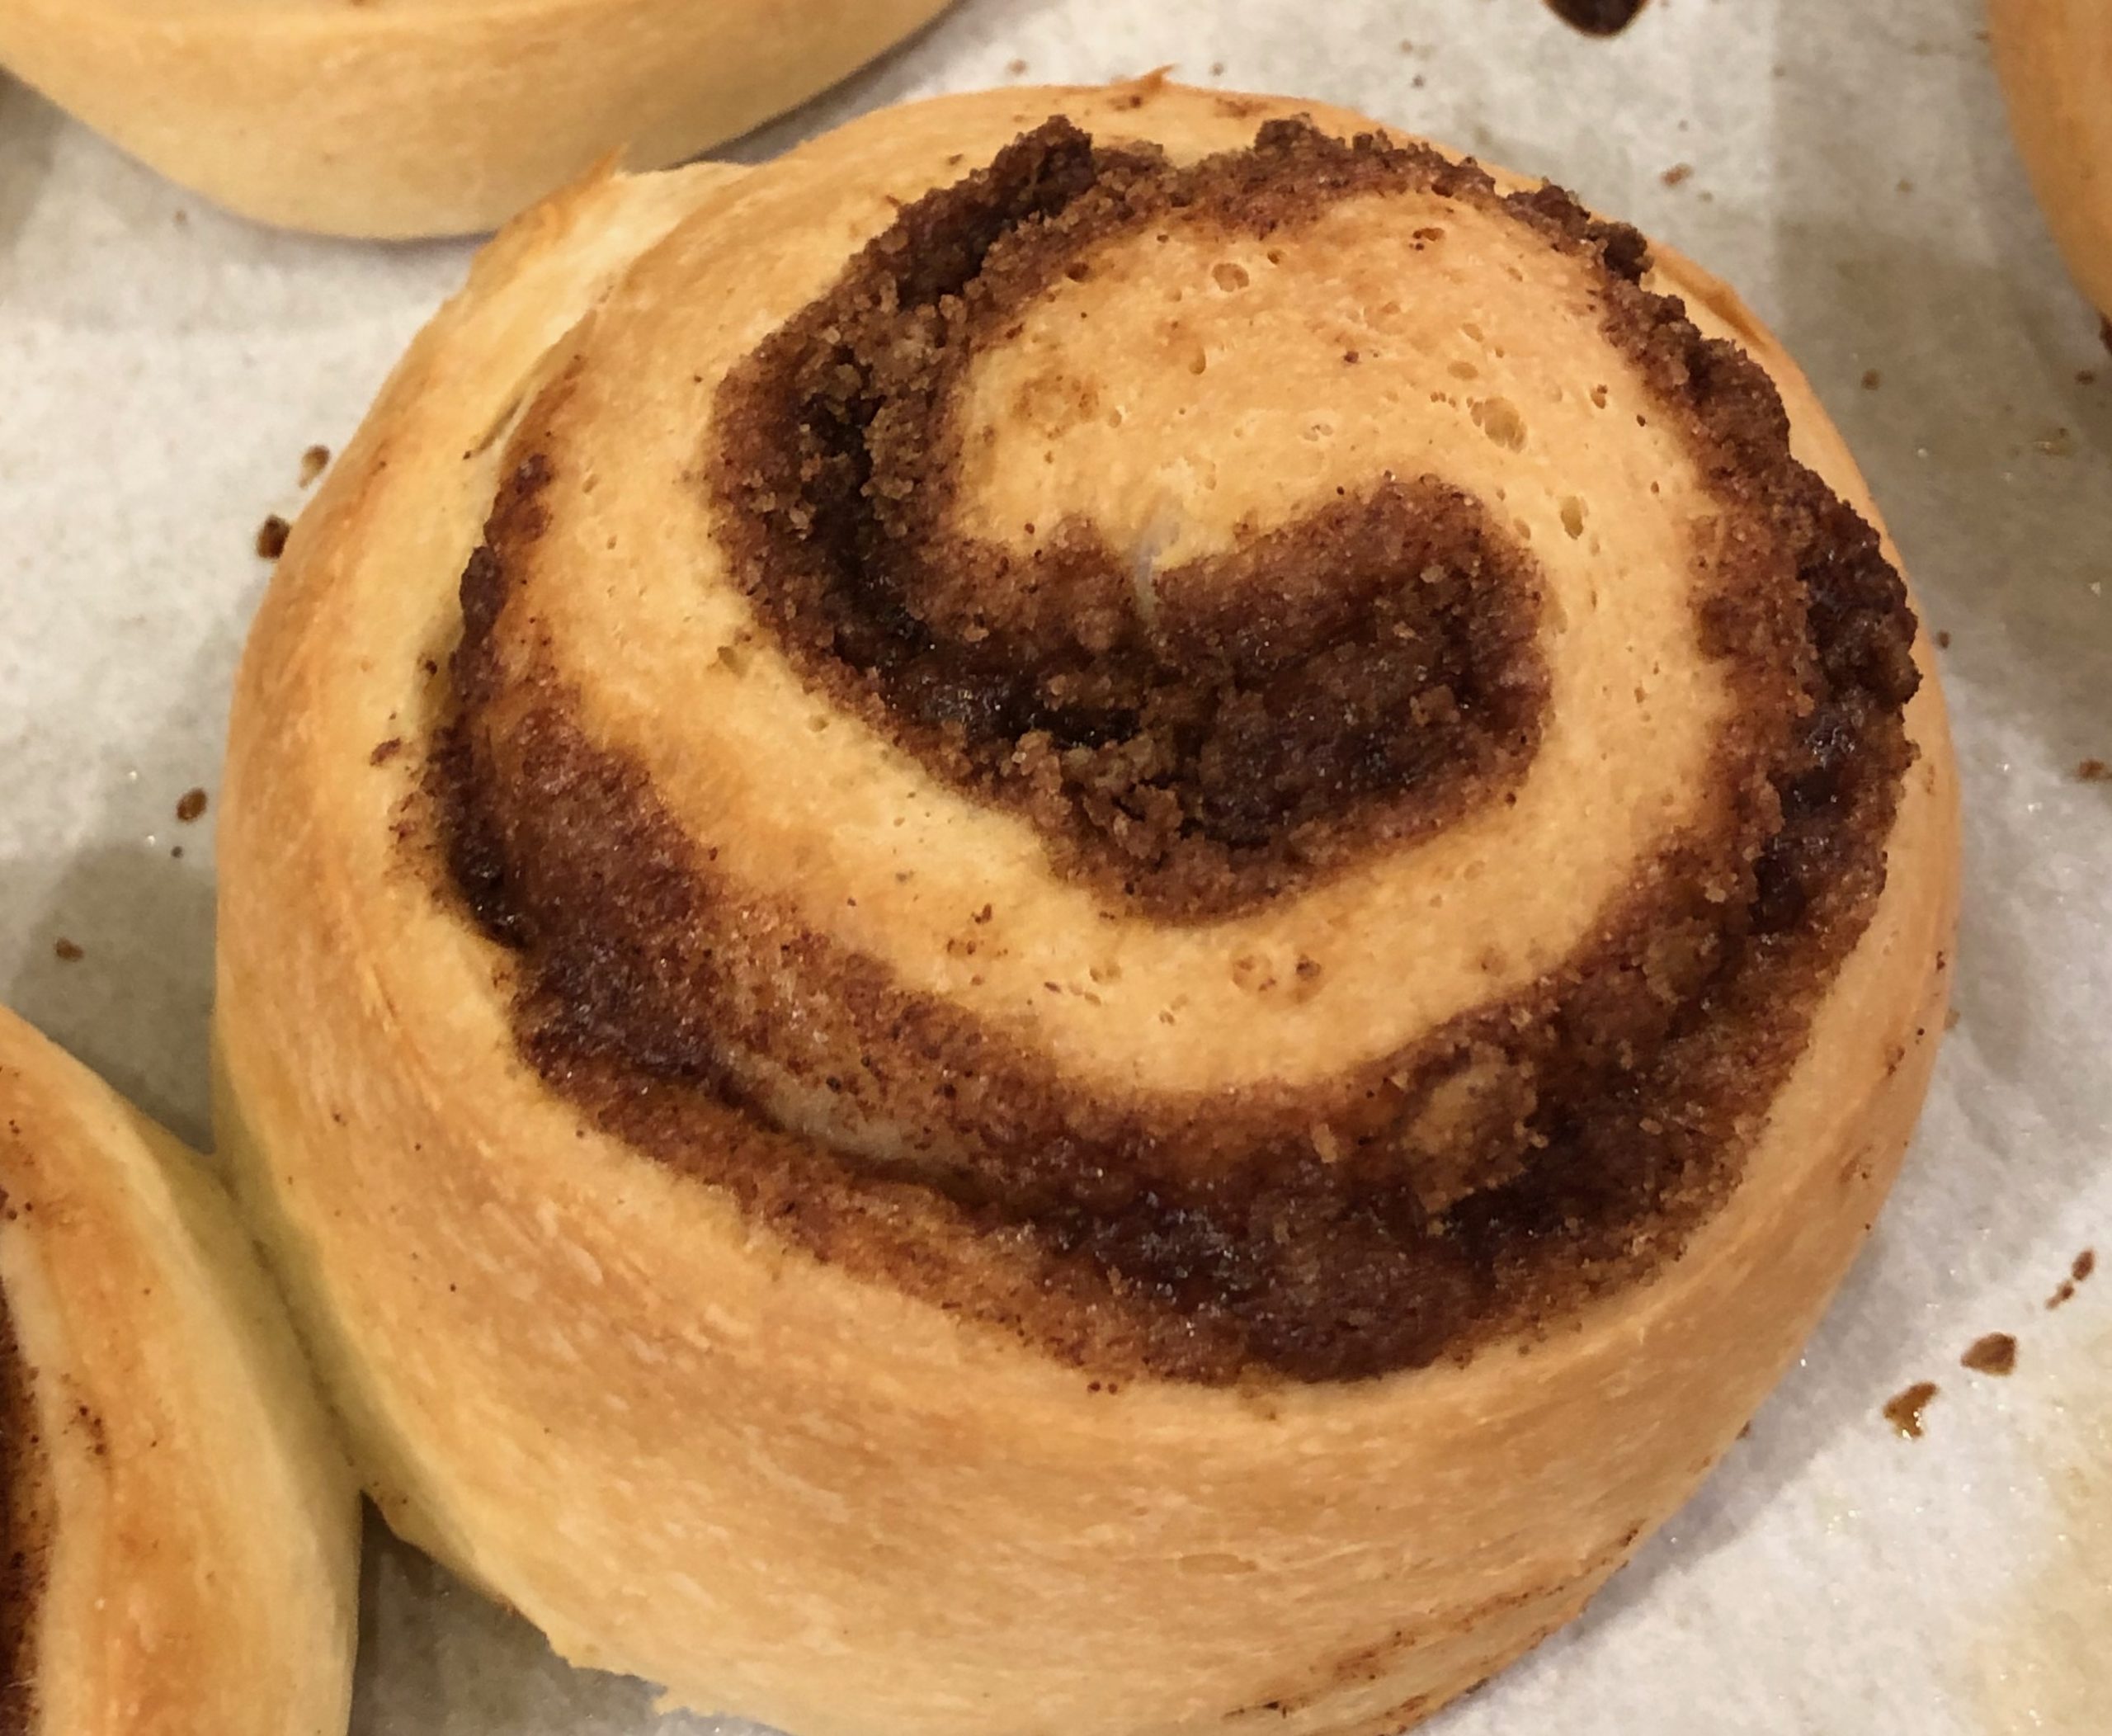
  6. While the dough is resting, prepare the filling. Beat the egg in a small bowl and combine the sugar and cinnamon in a separate bowl.
  7. Prepare a baking sheet by lining with a sheet of parchment or silicon baking mat.
  8. After the dough portions have rested, take one portion and roll out into a 10-inch circle. Gently move the circle onto the prepared baking sheet. Brush the dough with the egg and then sprinkle with about 1/3 of the cinnamon sugar. Roll a second dough, and lay it on top of the first circle. Repeat with egg and cinnamon sugar until all of the doughs are layered. The top dough does not get egg and cinnamon sugar treatment. 
  9. Set a glass or other circle with about a 3-inch diameter in the center of the dough. This will act as a template so you don’t cut too far into the center.
  10. Using scissors or a bench knife, cut the circle into 16 even sections – stopping at the center circle marker. Remove the center circle marker.
  11. Take two strips of dough next to each other in each hand and twist away from each other two times, then pinch the strips together at the end. Repeat around the circle so that you have eight twists. 
  12. Allow the dough to rise in a warm spot again for about 45 minutes. It should be puffy at the end of this rise. 
  13. While the dough is rising, heat the oven to 400 degrees.
  14. At the end of the rise, gently brush a light layer of the egg over the top of the dough. 
  15. Bake for 15-18 minutes until the bread is golden with dark cinnamon streaks. The center should register 200 degrees F on a digital thermometer. 
  16. 16.Remove from oven and allow to rest about 10 minutes before serving. Dust with confectioner’s sugar and serve warm or at room temperature. 
  17. You can also allow it to cool completely at this point and wrap in tin foil or freezer paper and freeze. To serve from frozen, allow to come to room temperature overnight (either in the fridge or on the counter) and then heat (covered loosely with tin foil in a 325 degree oven for about 10-15 minutes. 

Filed Under: recipes Tagged With: bread, cinnamon, holiday, holiday baking

Cinnamon Rolls – Tangzhong method

November 8, 2021 by andrea 4 Comments

This recipe uses the tangzhong method of heating a small portion of the liquid and flour together to form a paste. This simple step allows the starches in the flour to gelatinize and gives the bread dough a little different texture than a typical dough. I feel the tangzhong method allows you to work with a slightly wetter dough than normal, which creates a softer end dough. Because of the tangzhong method, the final bread will have a slightly higher rise and better shelf life.

Let’s talk a bit about flour. This recipe calls for bread flour – but if you don’t have that handy, you can use a good strong all purpose flour. King Arthur’s all-purpose flour (in the red bag) works well in this recipe. Be aware that not all flours are created equal – some all purpose flours will have a lower protein level which result in less rise of the final dough. If you find yourself disappointed in the final results of any bread recipe, I always recommend looking at the flour you are baking with.

Most of you know by now that I really like a little flavor in my breads. Even with cinnamon rolls, I find that substituting a small portion of the white flour with a good whole grain flour adds a beautiful amount of flavor to otherwise bland white bread. About 10-20% of the white flour can be substituted with spelt or a whole wheat flour. For these cinnamon rolls, I often use 50 grams of spelt flour and 250 grams of white flour in the main dough.

And my final comment on flour – if you are measuring by volume, use the stir and scoop method to measure the flour. With a large spoon, stir your flour in it’s container. Then, using the spoon, scoop it gently into the measuring cup until the measuring cup is overfull. Then, use a straight edge to level off the top of the measuring cup.

This dough will be very wet. You will be tempted to add more flour. Don’t do it. Trust me. The dough will come together as it is kneaded. If kneading by hand, you may need to use a bench knife to scrape the dough off of the board and back into the dough mass. A slap and fold technique is probably the best way to knead this dough together. If this is a new kneading technique to you, there are lots of YouTube videos out there with demonstrations – this one from Richard Bertinet is one that I like. His method is not exactly the same as mine, but the idea is the same. At around 3 minutes, this YouTube video from Chew-y Bakes shows a similar method to the one I use.

Homemade Cinnamon Rolls – Tangzhong Method

Serving Size:
10-12
Time:
2-4 hours total
Difficulty:
Medium

Ingredients – Tangzhong

  • 113 g (1/2 cup) whole milk
  • 23 g (3 T) bread flour (or all-purpose flour)

Ingredients – Dough

  • 151 g (3/4 cup) whole milk (cold from fridge, is fine)
  • 28 g (2 tablespoons) butter, unsalted
  • 63 g (3 tablespoons) honey
  • 6 g (2 teaspoons) instant yeast)
  • 300 g (2 1/2 cups) bread flour (or all-purpose flour)
  • 8 g (1 1/2 teaspoons) fine table or sea salt

Ingredients – Filling

  • 84 g (6 tablespoons) softened butter, unsalted
  • 107 g (1/2 cup) brown sugar
  • 8-10 g (3-4 teaspoons) cinnamon

Ingredients – Frosting

  • 2 cups powdered sugar
  • 1 teaspoon butter, softened
  • 2-4 tablespoons Half and half or whole milk
  • 1/2 teaspoon vanilla extract
  • dash of almond extract, optional

Directions

  1. Combine the tangzhong ingredients in a small saucepan. Whisk so no lumps remain. Heat over medium heat, stirring constantly until it thickens and your spoon leaves a trail through the mixture. Remove from saucepan and put into the bottom of your mixing bowl or stand mixer.
  2. Add remaining dough ingredients to the stand mixer in the order listed. The warmth of the heated flour & milk mixture will heat the cold milk and dough. 
  3. Stir the ingredients together to form a shaggy mass. If you are using a stand mixer, turn the mixer to low and allow to knead for 6-8 minutes. If you are kneading by hand, turn the dough onto the counter and knead for about 10 minutes. The dough will be wet and will seem like it needs more flour. Don’t add more flour – it will come together as it is kneaded. If kneading by hand, you may need to use a bench knife to scrape the dough off of the board and back into the dough mass. A slap and fold technique is probably the best way to knead this dough together. Once the dough forms a smooth ball and passes the window pane test, it is ready for the first rise.
  4. Oil the dough and place in a warm (80 degrees F), draft free spot for about 90 minutes until it is almost doubled in size. This is a slow rising dough. It may take longer to rise. If you are tight on time, you can put the dough into the fridge at this point (before it has risen completely) and hold it up to 24 hours. Then continue with the rest of the recipe.
  5. While the dough is rising, combine the filling ingredients in a small bowl – butter, brown sugar and cinnamon to make a crumbly paste.  When the dough is finished rising, gently turn out the dough onto your work surface. You may oil the work surface, but avoid flouring the surface. Shape the dough into a large rectangle about 12 inches by 18 inches with the long side facing you. Sprinkle the filling all over the dough, leaving about an inch along the long edge (towards you) free of filling – this is to allow you to seal the dough together in the next step.
  6. Starting from the long edge away from you, roll the dough gently towards you. When the dough is fully rolled, seal the edge (this should be the edge with no filling) to the roll by gently pinching. Using a bread knife or a long piece of string, slice the dough into rolls. 8 rolls will produce nice large cinnamon rolls, but you can make smaller ones if you like (I usually make 12 smaller rolls). Place the rolls onto a baking sheet lined with parchment. Tuck the tails of the rolls under the roll so they don’t pop out when they bake. You can also place them into a cake pan, if you prefer – this will make pull apart rolls (expect these rolls to need a little extra cooking time). If you would like to bake the rolls the next day, or in the morning, you can cover the rolls at this point and place in the refrigerator for up to 12 hours. They will be ready to go into the oven when you pull them from the fridge.
  7. Cover lightly with a clean kitchen towel or oiled plastic wrap. Place in a warm spot to rise. Rolls will take about 20-30 minutes to rise. About 15 minutes before you expect the dough to be finished rising, preheat the oven to 375 degrees. When the dough is risen, you’ll be able to gently push your finger into the dough, it will leave an imprint and the imprint will slowly bounce back.
  8. Bake in a 375 degree oven. 15-20 minutes for rolls baked on a baking sheet. Rolls baked in a cake pan will take about 30 minutes to bake. When done, the rolls will be golden brown. If you have an instant read thermometer (I use a Thermapen brand), it should read about 190 in the center of the pan of rolls. 
  9. Combine the all frosting ingredients except the milk. Sifting the powdered sugar and using very soft butter will help reduce lumps. Whisk together and slowly add the milk one tablespoon at a time until you have a consistency that you like. Frost the rolls when they are warm or cooled. 
  10. Enjoy!

Filed Under: recipes Tagged With: bread

Pumpkin Spice Bagels

September 24, 2021 by andrea Leave a Comment

I have lots of things to say about these pumpkin spice bagels, but lets start with – they are AMAZING and EASY. I hope you give them a try.

Quick & Easy – Start to Finish in under 3 hours

First off, this recipe is quick and easy as far as yeast breads and bagels go. My go-to standard bagel recipe uses a sponge and an overnight proof in the refrigerator – these things help develop flavor, which is necessary when we are working with so much white flour. But here, with these pumpkin spice bagels, we have added flavor in the pumpkin and spices. So, we are going to skip the long proof and make these bagels in a morning. From start to finish, you can have a hot bagel in your mouth in under 3 hours.

That being said, you can still choose to make the dough the night before. Just follow the recipe up to the point where you let the dough rise at room temperature for an hour. Instead of doing the the room temperature rise, pop the dough into an oiled bowl, cover, and put it in the fridge overnight. In the morning, pull the dough out and follow the shaping and cooking instructions.

Mix by hand or with a Stand Mixer

Bagel dough should be a tight dough. The dough should be soft, but not sticky. It is a lower hydration dough, which helps give a nice dense texture to the bagel. You will want to add as much flour into the dough as possible without drying out the dough. The easiest way to mix bagel dough is to use a stand mixer and let the dough knead for about 8 minutes. If you are kneading by hand, you’ll want to knead the dough for about 15 minutes. Expect to get a good shoulder workout if you are kneading by hand. You are looking for the dough to be smooth, and not sticky.

I use homemade pumpkin puree in this recipe. Sometimes the moisture content varies in the puree, so it’s important to adjust the flour accordingly. If you are using canned pumpkin, your moisture content will be a bit lower, and you’ll use a little less flour in the recipe.

Some other tips

  • This recipe calls for bread flour. I like King Arthur’s bread flour with a 12.7% protein content. This helps to give a nice chewy bite to the bagel. If you don’t have bread flour, substitute with King Arthur’s all-purpose flour. I recommend King Arthur’s flours because they have high protein content, which helps with successful and consistent yeast breads. Feel free to substitute whatever flour you can access, but be aware of the difference that protein content can make in yeast breads.
  • This recipe makes 10-12 nice medium-sized bagels. You can make them larger or smaller as you wish. If you are using a scale: 4.5 ounces makes a large bagel, 3.5 makes a medium, and 2.5 makes a smaller bagel. Boiling and baking times are the same no matter the size.
  • Shaping the bagels takes practice. Don’t stress out if you don’t get it right away. I recommend pre-shaping them into balls, letting them rest 10 minutes, and then shaping the bagels by poking a hole in the middle and rolling the bagel around your fingers. The pre-shaping into balls helps get a round shape. You make the balls by pinching the dough to a point, making a smooth ball, sort of like a dumpling. With the pinched part on the counter and your hand cupped over the ball like a claw, give it some movement with your hand to seal the pinched part closed. Once you have the balls made, cover them and let rest for ten minutes. The rest allows the dough to relax so it will shape nicely into the final bagel shape. After resting, I just poke my finger into the middle of the ball and start rolling the dough around my fingers. Make the hole larger than you think you need, because it will shrink during the cooking.
  • We boil these bagels in a baking soda mixture before baking. This helps with creating a chewy crust and a traditional style bagel. Don’t skip this step. The bagels will puff up while boiling and it’s a lot of fun to watch.
  • Any bagels that we don’t eat right away, go into the freezer. I hate stale bread. Some people will be fine with letting these sit on the counter for a couple days, but anything longer than that should go in the freezer. Just pull them out one by one, thaw in the microwave for a few seconds, slice and toast. Perfect.
Bagels after the boiling step, but before baking.

Pumpkin Spice Bagels

Serving Size:
10-12 medium bagels
Time:
3 hours
Difficulty:
Medium

Ingredients

  • 1 cup water, room temperature
  • 1 cup pumpkin puree
  • 1 1/2 t instant yeast
  • 3 3/4 cup (15 ounce) + 1 cup (4.5 ounce) bread flour
  • 1 1/2 t salt
  • 1/2 t cinnamon
  • 1/4 t nutmeg
  • 1/4 t allspice
  • 1/8 t cloves, ground
  • 1 T brown sugar
For Boiling Waterbath
  • 2 T baking soda

Directions

  1. Combine all ingredients except flour in the bowl of a stand mixer or large bowl, if you are mixing by hand. Add in 2 cups of your flour and stir. Continue adding remaining 1 3/4 cup of flour until dough is formed. If your dough is still sticky and not forming a ball, then add remaining 1 cup of flour, 1/4 cup at time until the dough comes together in a ball. It may still be sticky, but it should form a ball. Knead for 8 minutes by machine or 15 minutes by hand. While you are kneading, the dough should come together in a smooth, soft ball and not be sticky to the touch.
  2. Cover the dough, and allow to rise at room temperature for about an hour and a half until the dough has almost doubled in size. At this point, instead of rising at room temperature, you could cover the dough and refrigerate up to 12 hours until you are ready to bake.
  3. When the dough has risen, gently turn out onto an oiled surface and divide into about 12 pieces for medium sized bagels.
  4. Preshape the dough into balls. To do this, form each piece into a ball by pinching the ends together at the bottom (like a little dumpling) and then rolling the pinched part on the counter to seal the bottom. Cover balls and allow to rest 10 minutes.
  5. Shape the balls into bagels by poking a hole through the middle of each ball and rolling the dough around two fingers until a large hold is formed in the middle. The hole will shrink while baking.
  6. Cover the shaped bagels and allow to rest for about 30 minutes.
  7. While the bagels are resting, preheat the oven to 400 degrees and bring a large pot of water to a boil. An ideal pot should be wide to fit 4 or 5 bagels, but the water depth only needs to be a couple inches deep. Prepare two baking sheets by oiling or lining with oiled parchment or silicon baking sheets.
  8. After the bagels have rested, with the water boiling, add 2 Tablespoons of baking soda to the water. It will foam up temporarily.
  9. Gently slide a bagel into the boiling water. It will float. You can boil as many bagels at a time that will fit comfortably into your pot – usually 3 to 5. After 30 seconds, turn each bagel. After another 30 seconds, pull each bagel out with a slotted spoon. Place bagels onto prepared pan. Continue to boil all the bagels.
  10. Bake the bagels about 15 minutes until they are lightly browned on the top, rotating pans halfway through the baking time.
  11. Serve with cream cheese or use for sandwiches. Extras that don’t get eaten right away should be cooled and frozen. They will keep about 3 days at room temperature or up to 3 months frozen.
The bagels should float while they boil.

Filed Under: recipes Tagged With: bread, pumpkin, yeast

Homemade Burger Buns

April 26, 2021 by andrea Leave a Comment

These are the absolute favorite burger buns around our house. I’ve tried others – brioche buns, pretzel buns, you name it – but I keep coming back to these. They have a touch of whole wheat flour in them for great flavor, but you can make them with all white flour if that’s what you have around the house.

I recommend trying these with barbecue pulled chicken or pulled pork.

I hope you enjoy them as much as we do.

Homemade Burger Buns

Serving Size:
12
Time:
3 hours start to finish
Difficulty:
medium

Ingredients

  • 1 cup (120 grams) whole grain flour (home ground, if you have it) or sub with all-purpose flour
  • 2 1/2 cups (300 grams) all-purpose flour (such as King Arthur all-purpose)
  • 1 cup (8 ounces) lukewarm water
  • 2 Tablespoons unsalted butter, at room temperature
  • 1 large egg
  • 2 Tablespoons sugar
  • 1 1/4 teaspoons finely ground salt
  • 2 teaspoons instant or active dry yeast

For Topping

  • 1 large egg, beaten with 1 Tablespoon of water for the egg wash
  • Sesame seeds, poppy seeds, or Everything Bagel Topping, for sprinkling on the top

Directions

  1. Add the water to a large mixing bowl or to the bowl of your mixer. Set aside about 1/2 cup of the all-purpose flour. Add the remaining flour (whole wheat and all-purpose), the butter, egg, sugar, salt and yeast to the water and stir until combined. Add additional flour until the dough forms a ball. Mix and knead until you have a soft, smooth dough. This should take 6-12 minutes depending on your mixer or kneading method.
  2. Place the dough into a lightly oiled bowl and cover. Place in a warm (around 75-80 F), draft free spot and allow to rise for 1-2 hours, or until it is nearly doubled in size.
  3. Gently deflate the dough, and divide into 12 pieces about 60-65 grams each. Shape each piece into a smooth ball and gently flatten out between the palms of your hands. Place onto one or two parchment or silpat lined baking trays. Gently cover the buns (oiled plastic wrap or a large bag works well) and allow them to rise for about an hour, until they are nice and puffy.
  4. While the buns are rising, prepare the egg wash. In a small bowl, beat an egg with a tablespoon of water.
  5. Preheat the oven to 375 F.
  6. When the buns are risen, brush the tops gently with the egg wash and sprinkle with whatever seeds you are using.
  7. Bake the buns in the pre-heated oven for 14-18 minutes until golden brown. Remove them from the oven and cool on a rack.
  8. Extra buns can be frozen when cooled. They will keep for up to three months in a freezer bag. Thaw at room temp for a couple hours (or use a microwave to speed the process) before slicing. They can be warmed, covered, in a 300 F oven.
Look at that bun in action!

Filed Under: recipes Tagged With: bread, buns, whole grain

Pumpkin Sourdough Yeast Bread

October 19, 2020 by andrea Leave a Comment

This bread is one I came across in an old cookbook years ago. Over the years, I’ve adjusted it to my preferences. The bread seems a little unique because it combines pumpkin into a yeast bread, but the combination works really well. It’s one of my favorite breads to make in the fall. You can think of it like a fancy sort of cinnamon raisin bread.

I usually make a big batch of this bread in my Bosch Universal and I share extra loaves with my favorite neighbors. But in the interest of normality, I’ve broken the recipe down here so it will make one large loaf or two smaller loaves. The final batch size may be dependent on your hydration of your sourdough starter and on the moisture content of your pumpkin puree. To adjust for this, you may need to flexible with the amount of flour added at the end – which is just a good practice with bread making anyway. If you end up with extra dough – and I hope you do – shape it into a tiny loaf of bread or make a couple quick cinnamon rolls with it.

And a quick note on the sourdough. IF you don’t have sourdough starter on hand, then you can skip that ingredient and move on with baking this bread. BUT, you should consider getting yourself going with sourdough. It may be Covid trendy, but it is still a wonderfully pleasant kitchen activity. If you need more info on sourdough, reach out to me and I’ll see what I can do to get you started.

This bread is excellent toasted with butter, cream cheese, or apple or pumpkin butter.

I hope you enjoy it!

Pumpkin Sourdough Yeast Bread
Recipe Type: bread
Author: Andrea
Prep time: 20 mins
Cook time: 35 mins
Total time: 55 mins
Serves: 2
This a great bread for those fall days. It is wonderful toasted with butter or cream cheese.
Ingredients
  • 1/2 c sourdough starter
  • 1/2 c pumpkin puree
  • 1 cup of hot water (110 degrees, or baby bath temperature)
  • 1/4 c oil (I like sunflower or something with a light flavor)
  • 1/4 c brown sugar
  • 1/2 t cloves, ground
  • 1 t ginger
  • 2 t cinnamon
  • 1 T dough enhancer (optional, if you have it – otherwise substitute apple cider vinegar)
  • 1 cup white flour (King Arthur all purpose in the red bag is great)
  • 4-5 cups of freshly ground hard white wheat flour (if you don’t have freshly ground, substitute white flour)
  • 1 T SAF or other instant yeast
  • 1 t salt
  • 1/2 cup dried cranberries
  • 1/3 cup pepitas
Instructions
  1. Combine sourdough starter, pumpkin puree, hot water, oil, sugar, clovers, ginger, cinnamon, dough enhancer, white flour, and 1/2 of the whole wheat flour into the bowl of your mixer. Add the yeast on top of the flour. Stir until it is just combined. It should be the thickness of pancake batter.
  2. Allow the batter to rest 10-30 minutes. This lets the gluten in the flour relax and creates a better dough structure.
  3. Add another cup of flour and the salt to the dough and mixer.
  4. With the mixer running, add remaining flour 1/2 a cup at a time until the dough has formed. If you are using a Bosch mixer, this will be when the dough cleans the sides of the bowl. If you are using an Ankersrum mixer, the dough will quickly form around the kneading arm when you move the arm to the center of the mixer. It’s okay if the dough is a little soft at this stage.
  5. Add the cranberries and pepitas to the dough.
  6. Knead for 6-10 minutes until the dough has formed a good gluten structure. Knead at the number 2 on a Bosch and at about 2:00 or 3:00 with an Ank. The dough should be soft and smooth. If you are using a machine other than a Bosch or Ank, you will probably need to knead several extra minutes to obtain a good dough structure, possibly up to 20 minutes. At this point, my dough is usually very soft to the point that it makes me nervous, but it always seems to turn out fine.
  7. Turn the dough into an oiled bowl. Cover and let rise in a draft free, warm location until almost double – about 30 minutes.
  8. Turn the dough out onto an oiled board, shape into loaves and place in oiled pans. You can also free form loaves or use this dough for cinnamon rolls. I like to use about 1 pound 8 ounce of dough per 4.5 x 8 inch loaf.
  9. Let rise until the dough is about an inch over the edge of your pans. Meanwhile preheat oven to 350 degrees.
  10. Bake for 30-35 minutes until the loaves are golden and brown.
3.5.3251


Filed Under: recipes Tagged With: Ankersrum, bosch mixer, bread, breakfast, neighbors, pumpkin, sourdough, yeast

Whole Wheat Bread – Single Loaf

February 6, 2020 by andrea 1 Comment

This is my go-to daily sandwich bread recipe. I normally make it in a large batch so I only have to bake bread once a week, but I know that approach isn’t necessary for everyone. Over the years of baking this bread, my technique has slowly morphed into the recipe that follows. If you’ve taken a class with me in the past, you may notice a few small differences between this recipe and the one you learned in class, but the essentials are the same. Likewise, I suspect that many of you have modified that first recipe to make it fit your kitchen and needs. The search for perfect bread is a long one, but this loaf comes pretty darn close, in my book.

Whole Wheat Bread – Single Loaf
Recipe Type: bread
Author: Andrea
Prep time: 90 mins
Cook time: 30 mins
Total time: 2 hours
Serves: 1 loaf
This recipe is my basic go-to sandwich bread in a single loaf recipe size. Search my site for a 2-loaf recipe and a 6-loaf recipe. The flavor and taste of this bread depend greatly on the quality of the whole wheat flour – use freshly ground if you can find it.
Ingredients
  • 1 cup of warm water (baby bath temperature)
  • 2 T oil (I like coconut oil or olive oil)
  • 2 T sugar (I use honey)
  • .5 cups of high protein white flour (such as King Arthur flour – red bag)
  • 2.5 cups of freshly milled whole wheat flour – divided (If you can’t find freshly ground, use 1 cup of bagged whole wheat flour)
  • 2 t instant yeast
  • 2 t salt (fine texture – if you only have course salt, dissolve it into a small bit of the water before adding it to the dough)
Instructions
  1. With the dough hook in your mixer, combine the warm water, honey and oil in the base of your mixer. Add 2 cups of the whole wheat flour and stir until combined. Let rest for 10-30 minutes. This will help strengthen the protein and gluten in the whole wheat flour.
  2. Add the instant yeast to the mixer bowl and pulse to combine.
  3. Add the white flour and the salt to the mixer. Turn the mixer to low speed and let combine. Add enough of the remaining whole wheat flour to the dough until it clears the sides of the bowl and forms a ball. You may not need all of the whole wheat flour. Turn the mixer to low-medium speed and allow it to knead for 6-8 minutes until the dough is soft and pliable.
  4. Roll the dough it a little olive oil (or other cooking oil) and allow to rise in a large, covered bowl in a warm spot for about 45 minutes until it is just doubled in size. You should be able to poke the dough and it will feel soft and you’re finger will leave a slight indent.
  5. Oil your bread pan. Whole wheat breads do best in smaller pans – this loaf should fit nicely in a 4″x6.5″ pan, and weigh about 1 pound 6 ounces uncooked.
  6. Gently deflate the dough and shape it for your loaf pan. Shape by gently patting into a rectangle slightly wider than your pan. Roll the dough along the long length and gently pinch and seal the seam. Tuck the edges under towards the seam and place the loaf, seam side down, into your oiled bread pan.
  7. Oil the top of the loaf. Cover with a kitchen towel and allow to rise in a warm spot for about 30-45 minutes until the top of the dough is about 1 inch above the edge of the pan.
  8. While the dough is rising, preheat your oven to 400 degrees.
  9. When the dough has risen, gently move the pan into the oven and reduce the oven temp to 350. Cook for 30 minutes, until it is golden and sounds hollow when tapped on the outside.
3.5.3251


Filed Under: recipes Tagged With: bread, whole wheat

Whole Wheat Bread – Large Batch

November 9, 2018 by andrea 2 Comments

This is the exact recipe and method that I use at home for my family’s whole wheat sandwich bread. My mom and sister were recently visiting and watched me as a baked a big batch of whole wheat bread. Their comments while we were baking made me realize that it may be useful to write this down for anyone else who needs a refresher.

For this bread, I use a Bosch Mixer and freshly milled flour from my Nutrimill Grain Mill. This recipe is written exactly for this mixer and flour. I make no guarantees about whole wheat bread success if you are using different tools or ingredients. If you have a smaller capacity mixer, you may want to check out my recipe for Small Batch Sandwich Bread.

When I teach classes, I use this same exact method in my classes. If you took a whole wheat bread class from me a while back, it is quite possible that this recipe has evolved slightly since we baked together. The main change being that I now consistently add one cup of white, organic flour (store-bought!) to the batch of bread. I’m still using vital wheat gluten and dough enhancer, but the white flour seems to help greatly with a great rise on the bread.

As my sister, mom and I were baking, we also talked through lots of little techniques that can help with a great loaf of bread. We spoke about bread pan size, oiling the tops of the loaf, and the type of oil that I use. Every time I bake bread with someone, some specific questions come to light – maybe the sugar, type of salt, or oven temperature. Bread baking is also different during every season of the year, it’s one of the challenges that allows the baker a certain amount of pride when the loaves turn out perfectly.

If you want to learn this method in person, or just need a refresher course, give me a call or email me for more information.

Whole Wheat Bread – Large Batch
Recipe Type: Bread
Author: Andrea
Prep time: 1 hour
Cook time: 30 mins
Total time: 1 hour 30 mins
Serves: 6 loaves
This recipe uses a Bosch Mixer and freshly milled flour from a Nutrimill Grain Mill. If you want more information on the equipment or ingredients, let me know – I’m always happy to consult!
Ingredients
  • 6 cups of warm water (think, baby bath water)
  • approximately 16 cups of freshly milled flour using a Nutri Mill Grain Mill
  • 1 cup of organic, white flour
  • 2/3 cup (or 5 ounces) of olive or safflower oil
  • 2/3 cup (or 6 ounces) of honey
  • 2 T Vital Wheat Gluten, L’equip brand
  • 2 T Dough Enhancer, L’equip brand
  • 2 T instant yeast, SAF brand, not quick rising
  • 2 T fine sea salt, I use RealSalt brand
Instructions
  1. Add water to bowl of Bosch Mixer fitted with the dough hook.
  2. Add olive oil, honey, white flour, 8 cups of whole wheat flour, vital wheat gluten, dough enhancer and yeast.
  3. Turn Bosch to speed one and mix until combined, about 30 seconds.
  4. Dough will be very wet, more like a batter consistency. Cover with bowl lid and let rest for 10 minutes. If you are short on time, you can skip this step.
  5. After ten minutes, open lid, add 4 more cups of whole wheat flour, and salt. Pulse a few times until combined.
  6. Turn Bosch to setting one and slowing add remaining flour about 1 cup at a time until the dough just cleans the side of the bowl and pulls away from the center post. For the last cup or so of flour, add it about 1/4 cup at a time. The dough can be slightly wet, as it will continue to absorb liquid as in kneads.
  7. Turn the machine to speed 2, replace lid and knead for 8 minutes.
  8. Remove dough onto a large oiled bread board or counter top. Divide into 6 portions. I measure mine into 1 pound 6 ounce portions. This is the perfect size for the 8.5″x4″ bread pans. Note that bread pans may have a different rise since the whole grain breads seem to rise better in a narrower pan.If you have larger pans, you may need to make 5 loaves or make more dough to make 6 loaves. To make 6 larger loaves, increase water in step one to 7 cups and add about 3 cups of flour to the recipe – everything else can stay the same.
  9. Shape bread and place into oiled pans.
  10. Oil the tops of the bread with olive oil.
  11. Allow to rise in a warm spot, away from drafts, until the bread is about 1 inch above the top of the pan – about 45 minutes.
  12. While the bread is rising, preheat the oven to 350 degrees.
  13. Once the bread is risen, bake for 30 minutes until it is golden brown.
  14. Remove the baked bread from pans immediately and cool on racks.
  15. Allow to cool 3 hours before you bag it. These loaves can be frozen at this point.
3.5.3208

If you are curious, here is short video of my Bosch kneading this recipe.

Video of Bosch kneading 9 lbs bread dough

Filed Under: recipes Tagged With: bread, fresh flour, milling, whole wheat

Peanut Butter Banana Bread with a Chocolate Swirl

May 18, 2016 by andrea Leave a Comment

Check out that chocolate swirl!

Check out that chocolate swirl!

Banana bread is almost a staple in our household. When I married my husband, he came with a banana bread recipe. For years, I’d worry that he’d notice if I’d messed with her recipe. But I have slowly managed the transition to my own recipe. Some of the changes have included switching up to whole wheat flour, reducing the sugar, and adding a little yogurt. But none of those changes compare to the most recent upgrade – adding peanut butter. I was messing around making homemade peanut butter (more about that later) and happened to look over at the brown bananas in the bowl. Suddenly banana bread and peanut butter had merged in my brain. The rest is history.

First, a bit on the bananas. You probably already know you want the brown ones. They are sweeter, have more flavor and mash better. But did you know you can peel and freeze the brown ones and then your banana bread making never needs to be controlled by the bananas again! Just pull out the bananas and give them 5 or 10 minutes to thaw before mashing. And I just use a potato masher to squash the bananas.

As a matter of fact, I usually make this recipe in a bowl and combine it with a wooden spoon, dough hook or rubber spatula – honestly, whatever is closer. The trick being not to over mix once you add the dry ingredients to the wet.

OLYMPUS DIGITAL CAMERA

Making the swirls

The chocolate swirl often seems like a lot of extra work to me. While it does put this bread up a notch, you can skip it and just fold the chocolate chips into the finished batter. Not as dramatic, but it does save time and a couple dirty dishes. And it still tastes great. Along that line, you can also leave the chocolate out completely. I’m not recommending it – but it is theoretically possible.

To make the swirls, spoon the two batters into the bowl in layers. Try to distribute the chocolate batter around the pan and once the batter is all in, use a knife to cut a wave pattern into the batter from one end of the pan to the other. Don’t make it too complicated – it will turn out great no matter how you do it.

And while we are talking about pans – use a larger 9×5 pan for this recipe. And remember to oil the pan. Even in my super non-stick awesome pan, the chocolate parts seemed to stick differently than the non-chocolate and it can make for a messy looking bread.

I hope you enjoy! Let me know how it turns out!

Peanut Butter Banana Bread with a Chocolate Swirl
Author: Andrea
Prep time: 15 mins
Cook time: 75 mins
Total time: 1 hour 30 mins
Serves: 16 slices
A fun take on a classic banana bread!
Ingredients
  • 2 cups of flour – I use freshly ground whole wheat flour for the best taste and nutrition
  • 3/4 t baking soda
  • 1/2 t fine sea salt (if using salted butter, reduce to 1/4 t)
  • 3 ripe bananas
  • 1/4 cup (2 oz) of coconut oil or butter, softened
  • 1/2 cup of sugar
  • 1/2 cup of peanut butter
  • 2 eggs
  • 1/2 cup of plain yogurt
  • 1/2 cup of chocolate chips
Instructions
  1. Preheat oven to 350 and grease a 9×5 bread pan.
  2. Combine flour, baking soda and salt in a small bowl. Whisk to combine.
  3. Peel bananas and mash in a large bowl – I use a potato masher for this!
  4. Add oil, sugar, peanut butter, eggs, and yogurt to the bananas and whisk to combine. You may still have banana lumps in the batter – that’s fine.
  5. Add the dry ingredients to the wet and stir until flour is moistened. Don’t over mix.
  6. Melt the chocolate chips in a small bowl. I heat at high in the microwave for 30 seconds and stir. Add another 30 seconds in microwave and stir until the chips are melted. Let the chips cool for a couple minutes.
  7. Add one cup of the bread batter to the chocolate chips and stir until combined.
  8. Alternately spoon the batters into the prepared bread pan. Swirl with a knife.
  9. Bake for 75 minutes in preheated 350 degree oven, until a toothpick inserted in the center comes out clean. Depending on your oven, you may need to add 10 minutes (or even subtract 10 minutes). If your bread starts getting too brown towards the end of baking, cover with tin foil for the last part of the baking time.
  10. Let bread cool in pan for 10 minutes before turning out onto wire rack to cool completely.
  11. We wrap our uneaten bread in tin foil and store in the fridge. I hear it will keep days like this, but ours never lasts that long!
3.5.3208


Filed Under: recipes Tagged With: banana, bread, chocolate, whole grain, whole wheat

Chocolate Chip Zucchini Bread

August 6, 2015 by andrea Leave a Comment

OLYMPUS DIGITAL CAMERA

CHOCOLATE CHIP ZUCCHINI BREAD

It’s that time of the year again – zucchinis are coming out of my ears. I’m constantly dropping off the extra at friends’ and neighbor’s houses. I’m known as the zucchini fairy in several circles. Late in the season, I start leaving the zucchinis without ringing the doorbells, because I’m pretty sure that everybody else is done with zucchini also.


One Day's Worth of Zucchini Picking

One Day’s Worth of Zucchini Picking

This is a great recipe for zucchini bread. I really like it because it is not overloaded with fat or sugar. Of course, using whole wheat flour makes it even healthier. But it tastes so good, that you wouldn’t even know that it’s a little bit healthy. It also freezes really well. I often make a triple batch and freeze the extra loaves – just wrap them in some tin foil, freeze, and use within a couple months.

A couple tips to make your bread even better. You can peel the zucchini to get rid of the green skin. Also – if your zucchini is a big guy, you can quarter it and slice out the seeds. To shred the squash, use the larger shredder disk on your food processor or shredder attachment on your mixer.

Chocolate Chip Zucchini Bread
Author: Andrea
Prep time: 15 mins
Cook time: 60 mins
Total time: 1 hour 15 mins
Serves: 16
If you don’t like little bits of green in your zucchini bread, just peel the zucchini before you shred it.
Ingredients
  • 1/2 cup sugar
  • 3 tablespoons olive oil, melted butter or coconut oil
  • 2 large eggs
  • 1 cup applesauce
  • 2 cups whole wheat flour – I use freshly milled flour
  • 2 T unsweetened cocoa
  • 1 1/4 t baking soda
  • 1 t ground cinnamon
  • 1/4 t salt
  • 1 1/2 cups finely shredded zucchini (about one medium)
  • 1/2 cup semisweet chocolate chips
Instructions
  1. Preheat oven to 350 degrees. Oil a large 9×5 inch loaf pan.
  2. Combine sugar, oil, and eggs in a large bowl. Combine with a whisk.
  3. Whisk applesauce into sugar mixture.
  4. Combine flour, cocoa, soda, cinnamon, and salt in a separate bowl and add into sugar mixture. Stir until just combined.
  5. Add zucchini and chocolate chips to batter. Don’t overmix.
  6. Pour batter into prepared bread pan.
  7. Bake 50-60 minutes until toothpick inserted into the center comes out clean.
  8. Let cool a few minutes in the pan and then turn out onto a cooling rack.
3.2.2929


Filed Under: recipes Tagged With: bread, chips, chocolate, recipe, zucchini

Whole Wheat Bread (small batch)

February 3, 2015 by andrea 7 Comments

This is essentially the same recipe that I teach in my bread classes, but it is adjusted for a smaller capacity mixer than the Bosch Universal or Ankarsrum.

The real trick to making this 100% whole grain bread work is high quality whole grain flour. If you’ve read much of my site, you know I use home milled flours most of the time. If you aren’t home milling and only have access to store bought flour, make sure to buy high quality whole grain flour – brands such as King Arthur and Bob’s Red Mill will work well. Another option is to source locally grown and milled flours. Check out what is at your local food co-op or order from a local farm. My favorite farm here in Illinois is Janie’s Mill. Check them out and let me know what you think!

This recipe will give you a soft, beautiful loaf – just perfect for sandwiches.  And so much more nutritious than anything you can get from the store.  Enjoy!

Whole Grain Sandwich Bread Small Batch
Recipe Type: Bread
Author: Andrea
Prep time: 20 mins
Rising time: 1-2 hours
Cook time: 30 mins
Total time: 2 to 3 hours
Serves: 2 loaves
This is my favorite sandwich bread, downsized to two loaves. If you have a high capacity mixer, you might be interested in the large batch recipe. For the rest of us, I hope you enjoy this recipe!
Ingredients
  • 2 cups of warm water (bath tub temp)
  • 1/4 cup of honey
  • 1/4 cup of coconut or olive oil
  • 2 t salt
  • 2 t instant yeast
  • 1/2 cup of white flour
  • 6 cups of whole wheat flour, approximate – freshly milled is best
Instructions
  1. Combine water, honey and oil in the bowl of a stand mixer.
  2. Add white flour and 2 and 1/2 cups of whole wheat flour and stir till combined.
  3. Stir in 1 more cup of the flour.
  4. With machine running, add all but 1/2 cup of the remaining flour until the dough is soft and not too sticky. Do not add add all of the whole wheat flour at this step. It should just form a ball and can be a little sticky. You’ll get another chance to add flour in step 6. Flour, especially whole grain flour, can absorb a lot of water during the bread making process.
  5. Cover and allow wet dough to rest for 10 minutes. This allows the flour to hydrate.
  6. Turn your mixer on and add salt and yeast to the dough. Check the dough consistency now. If it is still a little wet and isn’t forming a nice soft ball, then add the remaining 1/2 cup of flour. It should form a soft ball and press in easily with your finger. The softer the dough at this point, the nicer your final loaf of bread will be.
  7. Knead for about 10-12 minutes on the lowest mixer setting, until the dough is smooth and passes the window pane test. Be advised that the window pane test is tougher to achieve with whole grain breads, so if you come close, call it a good day.
  8. Place the dough in an oiled pan and let rise, covered, until about doubled in size. This rise will take about one hour.
  9. Gently deflate dough and shape into two loaves (8.5 x 4 pans work best for whole grain breads), oil tops of loaves with a small amount of olive oil or cover gently with a towel.
  10. Let rise a second time until the dough is about 1 inch above the lip of the pan. Depending on kitchen conditions – this rise will take about 30-45 minutes. To tell if your bread has risen enough, try the “poke test” – when you think it has risen enough, gently press your finger about 1 inch down into the bread – the bread should feel soft and the indent will most remain. That is when the bread is ready.
  11. About 15 minutes before you are going to bake, preheat your oven to 375 degrees.
  12. When the bread is ready for the oven, lower the temp down to 350 degrees. Bake for 30 minutes, until golden brown.
  13. Remove loaves from pans immediately and cool on a cooling rack.
3.5.3208

Filed Under: recipes Tagged With: bread, flour, fresh flour, milling, wheat, whole wheat

  • 1
  • 2
  • Next Page »

Posts

  • Clatter in the Kitchen
  • recipes
  • Uncategorized

Recent Comments

  • andrea on Whole Wheat Bread (small batch)
  • andrea on Sourdough Beer Pizza Crust
  • andrea on Recipe for Holiday Jam
  • andrea on (Sourdough Optional) Carrot Muffins
  • andrea on Lentil and Ham Bone Soup

Recent Comments

  • andrea on Whole Wheat Bread (small batch)
  • andrea on Sourdough Beer Pizza Crust
  • andrea on Recipe for Holiday Jam
  • andrea on (Sourdough Optional) Carrot Muffins
  • andrea on Lentil and Ham Bone Soup

Posts

  • Clatter in the Kitchen
  • recipes
  • Uncategorized
  • Facebook

Copyright © 2025 · Foodie Child Theme by Shay Bocks · Built on the Genesis Framework · Powered by WordPress