My Kitchen Clatter

Real Food - Real Life

  • About Me
  • Classes
    • Upcoming Classes
    • Baking Classes
    • Pressure Cooking Classes
    • Fermentation Classes
    • Canning Classes
    • Kombucha Classes
  • Equipment
    • Nutrimill Plus Grain Mill
    • Nutrimill Classic Grain Mill
    • Nutrimill Harvest Grain Mill
    • Bosch Universal Mixer
    • Ankarsrum Original Assistant
    • Filter Pro Dehydrator
  • Grains & Supplies
  • Recipes
  • Clatter in the Kitchen

Whole Wheat Bread – Large Batch

November 9, 2018 by andrea 2 Comments

This is the exact recipe and method that I use at home for my family’s whole wheat sandwich bread. My mom and sister were recently visiting and watched me as a baked a big batch of whole wheat bread. Their comments while we were baking made me realize that it may be useful to write this down for anyone else who needs a refresher.

For this bread, I use a Bosch Mixer and freshly milled flour from my Nutrimill Grain Mill. This recipe is written exactly for this mixer and flour. I make no guarantees about whole wheat bread success if you are using different tools or ingredients. If you have a smaller capacity mixer, you may want to check out my recipe for Small Batch Sandwich Bread.

When I teach classes, I use this same exact method in my classes. If you took a whole wheat bread class from me a while back, it is quite possible that this recipe has evolved slightly since we baked together. The main change being that I now consistently add one cup of white, organic flour (store-bought!) to the batch of bread. I’m still using vital wheat gluten and dough enhancer, but the white flour seems to help greatly with a great rise on the bread.

As my sister, mom and I were baking, we also talked through lots of little techniques that can help with a great loaf of bread. We spoke about bread pan size, oiling the tops of the loaf, and the type of oil that I use. Every time I bake bread with someone, some specific questions come to light – maybe the sugar, type of salt, or oven temperature. Bread baking is also different during every season of the year, it’s one of the challenges that allows the baker a certain amount of pride when the loaves turn out perfectly.

If you want to learn this method in person, or just need a refresher course, give me a call or email me for more information.

Whole Wheat Bread – Large Batch
Recipe Type: Bread
Author: Andrea
Prep time: 1 hour
Cook time: 30 mins
Total time: 1 hour 30 mins
Serves: 6 loaves
This recipe uses a Bosch Mixer and freshly milled flour from a Nutrimill Grain Mill. If you want more information on the equipment or ingredients, let me know – I’m always happy to consult!
Ingredients
  • 6 cups of warm water (think, baby bath water)
  • approximately 16 cups of freshly milled flour using a Nutri Mill Grain Mill
  • 1 cup of organic, white flour
  • 2/3 cup (or 5 ounces) of olive or safflower oil
  • 2/3 cup (or 6 ounces) of honey
  • 2 T Vital Wheat Gluten, L’equip brand
  • 2 T Dough Enhancer, L’equip brand
  • 2 T instant yeast, SAF brand, not quick rising
  • 2 T fine sea salt, I use RealSalt brand
Instructions
  1. Add water to bowl of Bosch Mixer fitted with the dough hook.
  2. Add olive oil, honey, white flour, 8 cups of whole wheat flour, vital wheat gluten, dough enhancer and yeast.
  3. Turn Bosch to speed one and mix until combined, about 30 seconds.
  4. Dough will be very wet, more like a batter consistency. Cover with bowl lid and let rest for 10 minutes. If you are short on time, you can skip this step.
  5. After ten minutes, open lid, add 4 more cups of whole wheat flour, and salt. Pulse a few times until combined.
  6. Turn Bosch to setting one and slowing add remaining flour about 1 cup at a time until the dough just cleans the side of the bowl and pulls away from the center post. For the last cup or so of flour, add it about 1/4 cup at a time. The dough can be slightly wet, as it will continue to absorb liquid as in kneads.
  7. Turn the machine to speed 2, replace lid and knead for 8 minutes.
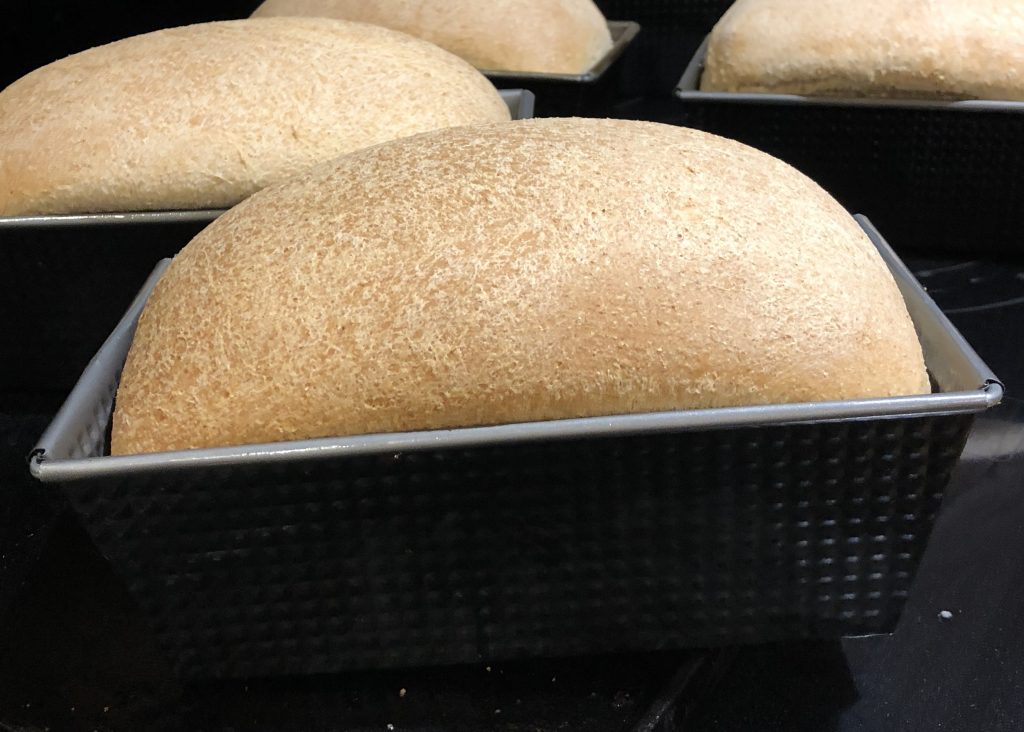
  8. Remove dough onto a large oiled bread board or counter top. Divide into 6 portions. I measure mine into 1 pound 6 ounce portions. This is the perfect size for the 8.5″x4″ bread pans. Note that bread pans may have a different rise since the whole grain breads seem to rise better in a narrower pan.If you have larger pans, you may need to make 5 loaves or make more dough to make 6 loaves. To make 6 larger loaves, increase water in step one to 7 cups and add about 3 cups of flour to the recipe – everything else can stay the same.
  9. Shape bread and place into oiled pans.
  10. Oil the tops of the bread with olive oil.
  11. Allow to rise in a warm spot, away from drafts, until the bread is about 1 inch above the top of the pan – about 45 minutes.
  12. While the bread is rising, preheat the oven to 350 degrees.
  13. Once the bread is risen, bake for 30 minutes until it is golden brown.
  14. Remove the baked bread from pans immediately and cool on racks.
  15. Allow to cool 3 hours before you bag it. These loaves can be frozen at this point.
3.5.3208

If you are curious, here is short video of my Bosch kneading this recipe.

Video of Bosch kneading 9 lbs bread dough

Filed Under: recipes Tagged With: bread, fresh flour, milling, whole wheat

Cinnamon French Toast for the InstantPot

November 8, 2018 by andrea Leave a Comment

Instant Pot French Toast

I’m teaching a pressure cooking class in a few weeks and we are doing a brunch theme on a Saturday morning. Life doesn’t get much better, does it? I am now facing the challenge of fine tuning my recipes and having them ready to share with the class. So here we are, talking about French toast in the pressure cooker.

This French toast is a cross with bread pudding, since in order to make it work in the pressure cooker, you will cube your bread instead of leaving it in slices. The quantity of this recipe leaves me wanting, it serves four nicely. If you have a larger group to serve, you may need to plan to make two or use a larger pressure cooker that can fit a larger cake pan – your cooking time should not change. I will note that it cooked pretty quickly, very little warm up time, and the 5-minute quick release is helpful, also. So, if you cook two in a row, I can see it working out okay for serving them together.

But on to the recipe. In order to make a great French toast, you need to know a couple of things:

  • Use brioche or a lighter, sweet bread. I found a nice loaf of fluffy, slightly crusty French bread at Costco and it worked well. This is not the time to break out the multigrain, sourdough breads. They will just end up being so heavy and dense that you won’t be happy with the end results.
  • Since I bought my bread at Costco, I had a lot of it. I sliced it all up and then froze it cubed. It is ready to go when I want to make the next batch of French toast. Alternatively, it can be made into croutons sometime down the line.
  • There is no long soak needed of the bread in the egg and milk mixture, like you would with traditional French toast or bread pudding. The pressure cooker magically does the work of getting the liquid into the bread.
  • My little cheesecake pan that fits the Instant Pot manages to leak. I put tin foil around the outside, but it only helped to collect the liquid that escaped the pan. Next time, I plan to line the inside of the pan with a bit of parchment paper to keep that eggy goodness where it belongs.
  • Speaking of cheesecake pans, if you don’t have one for your pressure cooker, don’t stress. Find a Pyrex or other oven safe pan that fits and go for it. Some people find they need a few extra minutes when they use a Pyrex, but I have never found that to be the case.
  • When I pulled my French toast out of the InstantPot, the top looked like it needed a little crisping, so I poured a little melted butter over the top and toasted it under the broiler in the oven. This is an optional extra step. Totally optional, but worth it, if you have the time. You can add a little cinnamon and sugar to the top also, but be sure to watch it carefully under the broiler.
  • You can also add fruit to the French toast while it cooks. I’m planning to try adding frozen blueberries in my next batch. Of course, fruit as a final topping is an excellent option, also.

With no further ado, here is the recipe. I hope you enjoy!

Cinnamon French Toast for the Instant Pot
Recipe Type: pressure cooker, breakfast
Cuisine: breakfast
Author: Andrea
Prep time: 10 mins
Cook time: 15 mins
Total time: 25 mins
Serves: 4 servings
This is a quick, delicious breakfast for when you need something a little sweet and special without a lot of work! Think of it as a breakfast bread pudding.
Ingredients
  • 4 – 5 cups of cubed bread, use a brioche or other sweet, sturdy bread, see recipe for instruction on amount of bread
  • 1 cup of milk, use whole if you have it but anything will work
  • 2 eggs
  • 2 T brown sugar
  • 2 t vanilla
  • 1 t cinnamon
  • 1/2 cup of raisins, blueberries or chocolate chips (optional)
  • 1 T butter melted (optional)
  • Toppings – syrup, fruit, whipped cream, powdered sugar (optional)
Instructions
  1. Pour bread cubes into the cake pan that you’ll be using for this recipe. Fill the pan slightly over the top – the bread will shrink slightly during cooking. I use a 7-inch cheesecake pan, but a Pyrex bowl works also.
  2. Prepare your pressure cooker by adding 1 cup of water and placing a steamer rack in the insert. Prepare a tin foil sling for your cake pan, if you can’t easily remove the pan from the pressure cooker. To prepare a foil sling, roll two long pieces of tin foil into 1 inch wide strips, cross the strips in an x on the bottom of the cake pan to lift it easily.
  3. Combine milk, eggs, brown sugar, vanilla, cinnamon, and any optional ingredients into a large bowl.
  4. Toss bread cubes with the milk and egg mixture.
  5. Oil or butter the cake pan. Line the cake pan if you think it will leak or wrap it in tin foil.
  6. Pour the bread and egg mixture into the oiled cake pan.
  7. Cover the top of the cake pan with tin foil or a couple paper towels to keep the top of the French toast dry.
  8. Cook on high pressure for 15 minutes. Turn off the keep warm setting.
  9. Once the cooking time is complete, allow to rest 5 minutes before manually releasing the remaining pressure.
  10. If you’d like a crispier top, drizzle the melted butter over the top and put under the broiler for 3-4 minutes until you see it bubbling.
  11. Serve with syrup, fruit, whipped cream, or powdered sugar and enjoy!
3.5.3208


Filed Under: recipes Tagged With: breakfast, French toast, Instant Pot, pressure cooker

Pressure Cooker “Baked” Beans

July 20, 2018 by andrea Leave a Comment

My mom has a great baked bean recipe for the crock pot. It takes anywhere from 3- 6 hours to cook in the crock pot and uses canned beans. I have tried and tried to convert her recipe to use soaked, dried beans in the crock pot, but I’ve finally decided I don’t have the patience for them to cook that long. Plus the sauce never got thick enough with the soaked beans. Enter the pressure cooker. After trying several different baked bean recipes for the pressure cooker, I finally found one that came close to what I wanted. A little tweaking and used the seasoning in my mom’s recipe, and I think we have a winner!

Pressure Cooker “Baked” Beans
Author: Andrea
Prep time: 12 hours
Cook time: 35 mins
Total time: 12 hours 35 mins
This is an update of my moms crock baked beans. Plan ahead and soak your beans the night before. Soak extra and freeze them and save time the next time you make this recipe.
Ingredients
  • 2 cups of dried beans – navy is traditional, but I use a combination of pinto, black, butter and kidney.
  • 6-8 thick cut slices of bacon, cut into 1 inch pieces
  • 1 small onion, roughly chopped
  • 2 1/2 cup of water
  • 1 cup brown sugar
  • 1 T molasses
  • 1/4 c catsup
  • 1 t mustard
  • 1/4 t salt
Instructions
  1. The night before or morning of, rinse and soak beans in clean water. Cover by at least three inches of water. After 8-12 hours, drain. You should have about 4 cups of soaked beans, or about 2 pounds.
  2. Heat pressure cooker to sauté and brown bacon. When bacon is almost done, add onion and sauté another 3 or 4 minutes until onion is translucent.
  3. Add drained beans, 2 1/2 cup of water, brown sugar, molasses, catsup, mustard and salt. Stir.
  4. Lock lid on pressure cooker and cook at high pressure for 35 minutes. When timer beeps, turn pressure cooker off and wait 10 minutes. After 10 minutes use a quick pressure release to release any remaining pressure. Discard any beans that are floating. Check several beans to see if they’re tender. If not, pressure cook 5 minutes longer and check again.
  5. Leave lid off. Turn pressure cooker to simmer and simmer beans uncovered, stirring occasionally so the bottom doesn’t burn, until the sauce is the desired consistency.
  6. * If you don’t have time for an overnight soak, use the browning setting to bring 6 cups of water to a boil. Boil beans for two minutes. Turn pressure cooker off and let beans soak one hour. Proceed with the recipe as directed.
3.5.3208


Filed Under: recipes Tagged With: beans, pressure cook, pressure cooker, recipe

Classic Sourdough Waffles (or Pancakes)

June 20, 2018 by andrea Leave a Comment

There’s nothing like a pile of waffles early in the morning. And it’s even better when most of the work is done the night before.

This is a recipe that I usually teach in my Sourdough Baking Class – it is super easy and is also a great way to use up the unfed starter instead of discarding it.

Also – if you forget to make the overnight sponge the night before, don’t sweat it. I’ve done the overnight sponge a couple hours before finishing the batter and still had great waffles.

And while I’m technically one of those people who believe that pancakes and waffles deserve separate recipes, this recipe can bridge that gap in a pinch. You know… for those mornings when you want waffles but the kids are screaming for pancakes.

Classic Sourdough Waffles (or Pancakes)
Cuisine: Breakfast
Author: Andrea
Prep time: 10 mins
Cook time: 10 mins
Total time: 20 mins
Serves: 16 large crispy waffles
This is a make ahead recipe – spend 5 minutes the night before and make your morning a little easier. Half the recipe if you want fewer waffles, or freeze the extra to cover breakfast for the rest of the week.
Ingredients
  • Overnight Sponge:
  • 2 cups white whole wheat flour (freshly ground, if you have it)
  • 2 T sugar
  • 2 cups buttermile, whey, or sour milk
  • 1 cup sourdough starter, unfed
  • Waffle or pancake Batter
  • all of the overnight sponge
  • 2 large eggs
  • 1/4/ cup vegetable oil or melted butter
  • 3/4 t salt
  • 1 t baking soda
  • 1 t cinnamon
Instructions
  1. Day 1 – combine all ingredients of overnight sponge (flour through sourdough starter) in a large bowl. Cover with plastic and let rest at room temperature (or 8-12 hours). Yes, the milk overnight will be fine.
  2. Day 2 – Combine the overnight sponge with remaining ingredients. Stir just until combined. Cook as pancakes on a hot griddle or use batter to make waffles in a hot waffle iron.
3.5.3208


Filed Under: recipes Tagged With: breakfast, pancake, waffle, whole grain

Sweet and Sour Cabbage

April 30, 2018 by andrea Leave a Comment

This dish may sound strange to the non-Germans out there. Give it a chance – it may surprise you. I like to make this dish with red cabbage, but if you have a green cabbage handy, just use it. You can also mix up the cumin and swap it out with fennel or caraway seeds.

Finally, just to throw in a little pressure cooker love – if you were to make this without the pressure cooker, you’ll be cooking it for about an hour.  Here it cooks for 3 minutes under pressure. Can’t beat that.

Have fun and enjoy.

Sweet and Sour Cabbage
Recipe Type: side dish
Author: Andrea
Prep time: 20 mins
Cook time: 3 mins
Total time: 23 mins
Serves: 4-6
This cabbage dish is a great side to roasted meats. Use red cabbage for a colorful addition to your plate.
Ingredients
  • 1 T vegetable oil
  • 1 medium onion,sliced
  • 1 t cumin seeds
  • 1 small head cabbage (about 1 1/2 pounds)
  • 2 t raw sugar
  • 1 t salt
  • 1/2 cup apple cider vinegar
  • 1/2 cup water
Instructions
  1. Heat the pressure cooker base on medium heat, add the oil, and heat briefly. Stir in the onion and cumin and saute until the onion has softened (about 3 minutes).
  2. Add the cabbage and stir to distribute the onions.
  3. Sprinkle with the sugar and salt and then pour the vinegar and waterover the top.
  4. Close and lock the lid of the pressure cooker. Cook at high pressure for 3 minutes. If using an electric pressure cooker, turn the “keep warm” setting off.
  5. When the time is up, open the cooker using the Normal Release method.
  6. Give the cabbage a final stir, transfer to a serving dish, and serve immediately.
3.5.3208


Filed Under: recipes Tagged With: cabbage, pressure cooker, side dish

Pressure Cooked Beans

January 13, 2018 by andrea Leave a Comment

Beans are a great thing to do in the pressure cooker. Sure, sure, it’s easy to just buy a can of beans at the store. But really, there is no comparison between canned beans and home cooked beans. Just give it a try. And… if you have been cooking beans, but you haven’t been using a pressure cooker, then you will love the time savings.

This is a super simple recipe and it’s mainly written for the purpose of making beans. The rest of the salad is just to fancy up the beans. You can use this approach for any bean. Smaller beans like black beans cook about 3-4 minutes and larger beans go up to 9-12 minutes. Hip Pressure Cooking cook book has a good table of bean cooking times, or you  can just google the type of bean you have and figure out times from there. If you only do a few types of beans, just do the internet search and put the times on a sticky note and stick into one of your cabinets or cookbooks for future reference.

A couple notes on the dried beans themselves.

  • It’s best if you can find fresh beans. I noticed that not every grocery store even carries dried beans. I find the best ones at our local ethnic grocery store – they have a high turn over of beans, so its pretty easy to get fresh ones. Also, most are sold in clear bags. Spend a quick second and look in the bag – maybe the brand that is a little cheaper also has beans that look a little wrinkled or funny? then just spend the extra 20 cents and get the bag that looks better. We also have a farmer at the local farmers market that sells dried beans. His beans are super expensive – but I know from experience the time and energy that he has put into those beans, so that price is covering his costs (hopefully) – his beans will also be like no other bean out there. I know, I sound a little bean crazy.
  • The beans need to be washed and soaked when you get them. Even the fancy beans from the local farmer need to be washed. Look through them and make sure you remove any little stones or any beans that look wrinkled or broken – you won’t get them all, but just do your best. Then rinse off the beans, drain, rinse again, and drain. Now put the beans into a large bowl and cover with at least two inches of water.
  • In an ideal world, the beans should soak 8-12 hours on the counter. If you don’t have enough planning for this method, you can also do a quick soak method on them. Here’s a quick soak method – place washed beans in your pressure cooker and cover with 2 inches of water. Follow pressure cooker instructions and bring to high pressure for 1 minute followed by a natural pressure release. Then follow your cooking instructions for soaked beans.
  • Here is what I do when I’m making beans – I soak a bunch of beans for 8-12 hours. I use the ones I need in my recipe and then freeze the rest of them (drained) in 2 cup portions for future use. I mark them as soaked so I know they are ready to go in future recipes. This is a great way to have beans on hand for any recipes that you may not have planned out 24 hours ahead of time!
Beans in the Pressure Cooker
Author: Andrea
Prep time: 12 hours
Cook time: 6 mins
Total time: 12 hours 6 mins
This is a general recipe for making beans in your pressure cooker.
Ingredients
  • 1 bag of dried cannelini or other white beans, pre-soaked or quick soaked
  • 1 small onion (optional)
  • 1 garlic clove (optional)
  • 1 small peeled carrot (optional)
  • 1/2 green pepper (optional)
  • 1 bay leaf
  • 1 T apple cider vinegar
  • 1 t olive oil
Instructions
  1. Place all ingredients in your pressure cooker.
  2. Cover with about 2 inches of water – do not fill pressure cooker higher than 1/2 full.
  3. Following instructions on your pressure cooker, bring to high pressure. Cook at high pressure for 6 minutes in a stovetop pressure cooker or 7-8 minutes in an electric pressure cooker. If you are using other type of beans, follow recommended pressure cooking times for the size and type of bean.
  4. Allow pressure to release following natural release methods. Make sure to release using natural release methods and beans tend to foam and can cause small particles to block the release valve – this is especially likely if you do a quick pressure release.
  5. Drain the beans. You can save the liquid to use in soups. Discard the vegetables if you used them.
  6. Salt the beans while still warm.
3.5.3208


Filed Under: recipes Tagged With: beans, fast, pressure cooked

Easy Mini Chocolate Lava Cake in the Pressure Cooker

January 13, 2018 by andrea Leave a Comment

This is a take on one of my favorite chocolate cakes. I’ve modified it to make individual cakes using my pressure cooker. I’ve also made this recipe as easy as possible to make – we often make it in my pressure cooking classes and I don’t like to unnecessarily complicate things during those classes!

The first thing you’ll want to do is find small jars or ramekins for baking the cakes. I use 4 ounce Ball glass jelly jars for making this recipe. I find that size is just about the right size for individual cakes in our house. You are welcome to use larger jars or ramekins – just adjust the cooking time up 2-3 minutes if you are using larger containers.

I typically make this in my 8 quart stovetop cooker, because I can easily fit eight small 4-ounce jars in this cooker. Once you make a layer of jars on the bottom of the cooker, you can stack a second layer on top of those. Stack the jars so they are slightly off-set from each other, kind of like if you were staking a solo cup tower. Depending on the size of your electric cooker, the second layer can be harder to fit – in that case, just cook them in two batches.

Also, I use chocolate chips in this recipe as the chocolate. I don’t use anything fancy for the chocolate – I use whatever is around the house, which is typically Kirkland brand chips. They end up tasting pretty darn good. I also think that the espresso powder that I use helps to intensify the chocolate flavor. I get mine from King Arthur Flour and I use the tiniest bit so my kids can’t taste the coffee –  a little of this special ingredient goes a long way. Feel free to leave the expresso powder out, if you don’t have it.

Easy Mini Chocolate Lava Cake in the Pressure Cooker
Author: Andrea
Prep time: 15 mins
Cook time: 5 mins
Total time: 20 mins
Serves: 8
This is a super quick and easy chocolate dessert in the pressure cooker. If
Ingredients
  • 1/2 cup butter
  • 4 ounces chocolate chips
  • 1 1/2 cup confectioners sugar
  • 2 eggs at room temperature * see note at bottom of recipe.
  • 3 egg yolks at room temperature *see note at bottom of recipe
  • 1/2 t instant coffee granules or espresso powder (optional)
  • 1 t vanilla
  • 1/2 cup (2 ounces) flour – white or finely ground whole wheat pastry flour)
  • 1/4 t salt
  • whipped cream or ice cream for serving (optional)
Instructions
  1. Butter or oil 8, 4 ounce ramekins or jars.
  2. Chop up butter and melt with chocolate chips in the microwave. Cook for 30 seconds, stir, add 30 seconds and stir again. Be sure to stir – the chips don’t just melt and tell you they are melted. Let this mixture cool a bit to room temperature.
  3. Using a wooden spoon, stir confectioners sugar into melted chocolate.
  4. In a separate bowl, beat the eggs and egg yolks together.
  5. Stir eggs, egg yolks, vanilla, instant coffee granules (if using) into the chocolate.
  6. Using a wooden spoon, add flour and salt to the chocolate mixture, stirring until combined.
  7. Divide the batter evenly between the ramekins. Don’t overfill, because they will puff up a bit during baking.
  8. Put one cup of water and a steamer rack in your pressure cooker. Stack the ramekins in the pressure cooker. Use two layers, if necessary.
  9. Follow your pressure cooker’s instructions and cook at high pressure for 5 minutes. Turn off the keep warm setting. Allow to natural release for 5-10 minutes, depending on how gooey you like the center.
  10. After the natural release period, release remaining pressure using the quick release method and serve warm. These are great with whipped cream or a little ice cream.
  11. If not serving right away, you can set the lid back on the cooker after releasing pressure and they will stay warm for about 30-45 minutes.
  12. Note on eggs – the 2 eggs plus 3 egg yolks makes an excellent cake, but if you don’t feel like messing with the extra egg whites, you can make this recipe with four eggs. It will be a little less rich, but great, nonetheless.
3.5.3251


Filed Under: recipes Tagged With: cake, chocolate, cooker, dessert, easy, pressure, pressure cook

Butternut Squash & Mushroom Risotto

January 13, 2018 by andrea Leave a Comment

I just looked at the earlier butternut squash risotto recipe that I had put out. While that recipe is awesome if you have pureed squash sitting around the house, it can be a little labor intensive, if you don’t.

This recipe is a slight variation on my original and cuts out the pureeing step. Also, this recipe is very flexible – feel free to adjust the ingredients as you see fit. One ingredient that it calls for is dried mushrooms – you can leave these out if you don’t have them on hand, but I highly recommend you try it sometime with the dried mushrooms. I find mine at the farmer’s market – they are a great way to add a depth of flavor to your foods. Crumble them up good (or even powder them up) because a little goes a long way.

Using a pressure cooker to make the risotto is amazing – no stirring required and so easy. If you’ve ever made risotto the traditional way on a stovetop, you may never go back.

Hope you enjoy.

Butternut Squash & Mushroom Risotto
Author: Andrea
Prep time: 10 mins
Cook time: 7 mins
Total time: 17 mins
This recipe is extremely flexible – sub out the leek with shallots – change out the white wine with vermouth – leave out the dried mushrooms if you don’t have them (but they are wonderful) – or swap out the sage with thyme.
Ingredients
  • 2 T unsalted butter
  • 1 medium leek, white and pale green parts only, halved lengthwise, washed, and thinly sliced
  • 1 1/2 cups white Arborio rice
  • 1/4 cup dry white wine
  • 4 cups (1 quart) chicken or vegetable broth
  • 2 cups seeded, peeled, and finely chopped butternut squash
  • 1/2 ounce dried porcini mushrooms, crumbled
  • 1 t dried sage
  • 1/2 cup finely grated Parmesan cheese
Instructions
  1. Melt the butter in the bottom of your stovetop (over medium heat) or electric cooker (set on the browning function). Add the leek and stir often until softened (not browned).
  2. Add the rice, stir until cooked with butter – about 30 seconds. Pour in the white wine and stir until absorbed in the rice – 1 to 2 minutes.
  3. Add the broth, squash, dried porcini, and sage.
  4. Lock the lid onto the pot.
  5. Follow the directions of your cooker and bring the pressure to high for 7 minutes.
  6. Use the quick-release method to bring the pot’s pressure back to normal.
  7. Unlock and open the cooker. If there is still liquid in the pot, turn the heat to medium (use browning function on electric) and bring to a simmer, stirring until thickened – about 2 minutes.
  8. Stir in the cheese. Put the lid back onto the cooker without locking it into place. Set aside for about 5 minutes to melt the cheese and blend the flavors. Stir again before serving.
3.5.3208


Filed Under: recipes Tagged With: butternut, mushroom, risotto, squash

Hot Chocolate

December 30, 2017 by andrea Leave a Comment

Hot Chocolate
I have been trying to make a good cup of homemade hot chocolate for a while now. Most of the premade hot cocoa mixes have ingredients that I don’t recognize (even some of the really expensive mixes). And when I find a mix that has ingredients I recognize, I keep finding myself thinking that I should be able to make it at home and with less sugar. So after many iterations, my family and I have finally settled on this recipe. The kids and I did a lot of tastetesting to get to this point – it’s a rough job, but in this case, the kids were champs in helping out.

Hot Chocolate
Author: Andrea
Cook time: 10 mins
Total time: 10 mins
Serves: 5 cups
This makes about 5 cups of cocoa. You decide how many that serves! I also use a pretty minimum amount of sugar – I recommend starting there and adding a little more as you need. I’ve seen recipes that use up to four times as much as this, but it seems unnecessary to me.
Ingredients
  • 1/3 cup of half and half, heavy cream, or whole milk
  • 1/4 cup of brown sugar
  • 1/3 cup of cocoa powder
  • 4 cups of milk (use whole, if you have it)
  • 1/2 -1 t of cinnamon (optional)
  • 1/4 t of nutmeg (freshly grated, if you have it) (optional)
  • 1 t of vanilla
  • mini marshmallows, for serving (optional)
  • whipped cream, for serving (optional)
Instructions
  1. Heat the 1/3 cup of half and half with brown sugar in a small sauce pan set over low heat. Heat and stir just until the sugar disolves
  2. Add cocoa powder and 4 cups of milk. Heat and stir with a whisk until just warm enough for drinking.
  3. Stir in cinnamon, nutmeg and vanilla just before serving.
  4. Add marshmallows and whipped cream at serving time.
3.5.3208


Filed Under: recipes Tagged With: drink, hot chocolate, recipe

Applesauce Cake

July 2, 2016 by andrea Leave a Comment

This is a quick, simple cake that is great for using up the bottom of a jar of applesauce. My grandma used to make applesauce cake and while this isn’t her exact recipe, it does stir up fond memories. My favorite part of this cake is how the top turns into a crunchy layer while the cake is soft.

Applesauce Cake
Recipe Type: Dessert
Author: Andrea
Prep time: 15 mins
Cook time: 60 mins
Total time: 1 hour 15 mins
Serves: 16
Ingredients
  • 1/2 cup of softened butter
  • 1 cup of brown sugar
  • 2 eggs
  • 1 t vanilla
  • 2 1/4 cups of flour – freshly milled whole wheat flour is the best!
  • 2 t baking soda
  • 1/2 t salt
  • 2 t cinnamon
  • 1/2 t nutmeg
  • 2 cups of applesauce, unsweetened
  • 1 cup of chopped walnuts
  • 2 T sugar, for topping
  • 1/2 t cinnamon, for topping
Instructions
  1. Preheat oven to 350 degrees. Butter or oil bottom and sides of 8×8 cake pan.
  2. Beat butter in the bowl of your stand mixer using cake whisks. Add sugar and beat until combined. Add eggs one at a time. Add vanilla and beat until light and fluffy. About 3 minutes.
  3. Combine dry ingredients (flour through nutmeg) in a small bowl and whisk to combine.
  4. Add dry ingredients alternately with applesauce to the butter mixture. Scrape bowl between additions.
  5. Stir in chopped walnuts.
  6. Pour batter into prepared pan.
  7. Combine 2 T sugar and 1/2 t cinnamon and sprinkle over top of cake.
  8. Bake 50-60 minutes at 350 degrees or until a toothpick in the center comes clean.
  9. Let cool in pan before serving. We like to eat it a little warm.
3.5.3208


Filed Under: recipes Tagged With: apple, apple sauce, cake, dessert, flour, whole wheat

  • « Previous Page
  • 1
  • …
  • 3
  • 4
  • 5
  • 6
  • 7
  • 8
  • Next Page »

Posts

  • Clatter in the Kitchen
  • recipes
  • Uncategorized

Recent Comments

  • andrea on Whole Wheat Bread (small batch)
  • andrea on Sourdough Beer Pizza Crust
  • andrea on Recipe for Holiday Jam
  • andrea on (Sourdough Optional) Carrot Muffins
  • andrea on Lentil and Ham Bone Soup

Recent Comments

  • andrea on Whole Wheat Bread (small batch)
  • andrea on Sourdough Beer Pizza Crust
  • andrea on Recipe for Holiday Jam
  • andrea on (Sourdough Optional) Carrot Muffins
  • andrea on Lentil and Ham Bone Soup

Posts

  • Clatter in the Kitchen
  • recipes
  • Uncategorized
  • Facebook

Copyright © 2025 · Foodie Child Theme by Shay Bocks · Built on the Genesis Framework · Powered by WordPress