My Kitchen Clatter

Real Food - Real Life

  • About Me
  • Classes
    • Upcoming Classes
    • Baking Classes
    • Pressure Cooking Classes
    • Fermentation Classes
    • Canning Classes
    • Kombucha Classes
  • Equipment
    • Nutrimill Plus Grain Mill
    • Nutrimill Classic Grain Mill
    • Nutrimill Harvest Grain Mill
    • Bosch Universal Mixer
    • Ankarsrum Original Assistant
    • Filter Pro Dehydrator
  • Grains & Supplies
  • Recipes
  • Clatter in the Kitchen

Spaghetti & Meatballs – Instant Pot

February 3, 2022 by andrea Leave a Comment

Spaghetti and meatballs - five ingredients!

Let me introduce you to one of my absolute favorite go-to weeknight meals. I always have the ingredients for spaghetti in the pantry, but learning how to make spaghetti and meatballs in the pressure changer is so much simpler than the stovetop. I’ve had a recipe for Pasta and Meat Sauce on my site for a while, but I love incorporating the pasta into the cooking. This recipe is one that I pull out on nights where I really want to order carry-out, but I know it would be quicker to cook at home. If you’re looking for other ideas for quick week-night meals, we also love my recipes for Cheesy Chili Mac and Instant Pot Sloppy Joes.

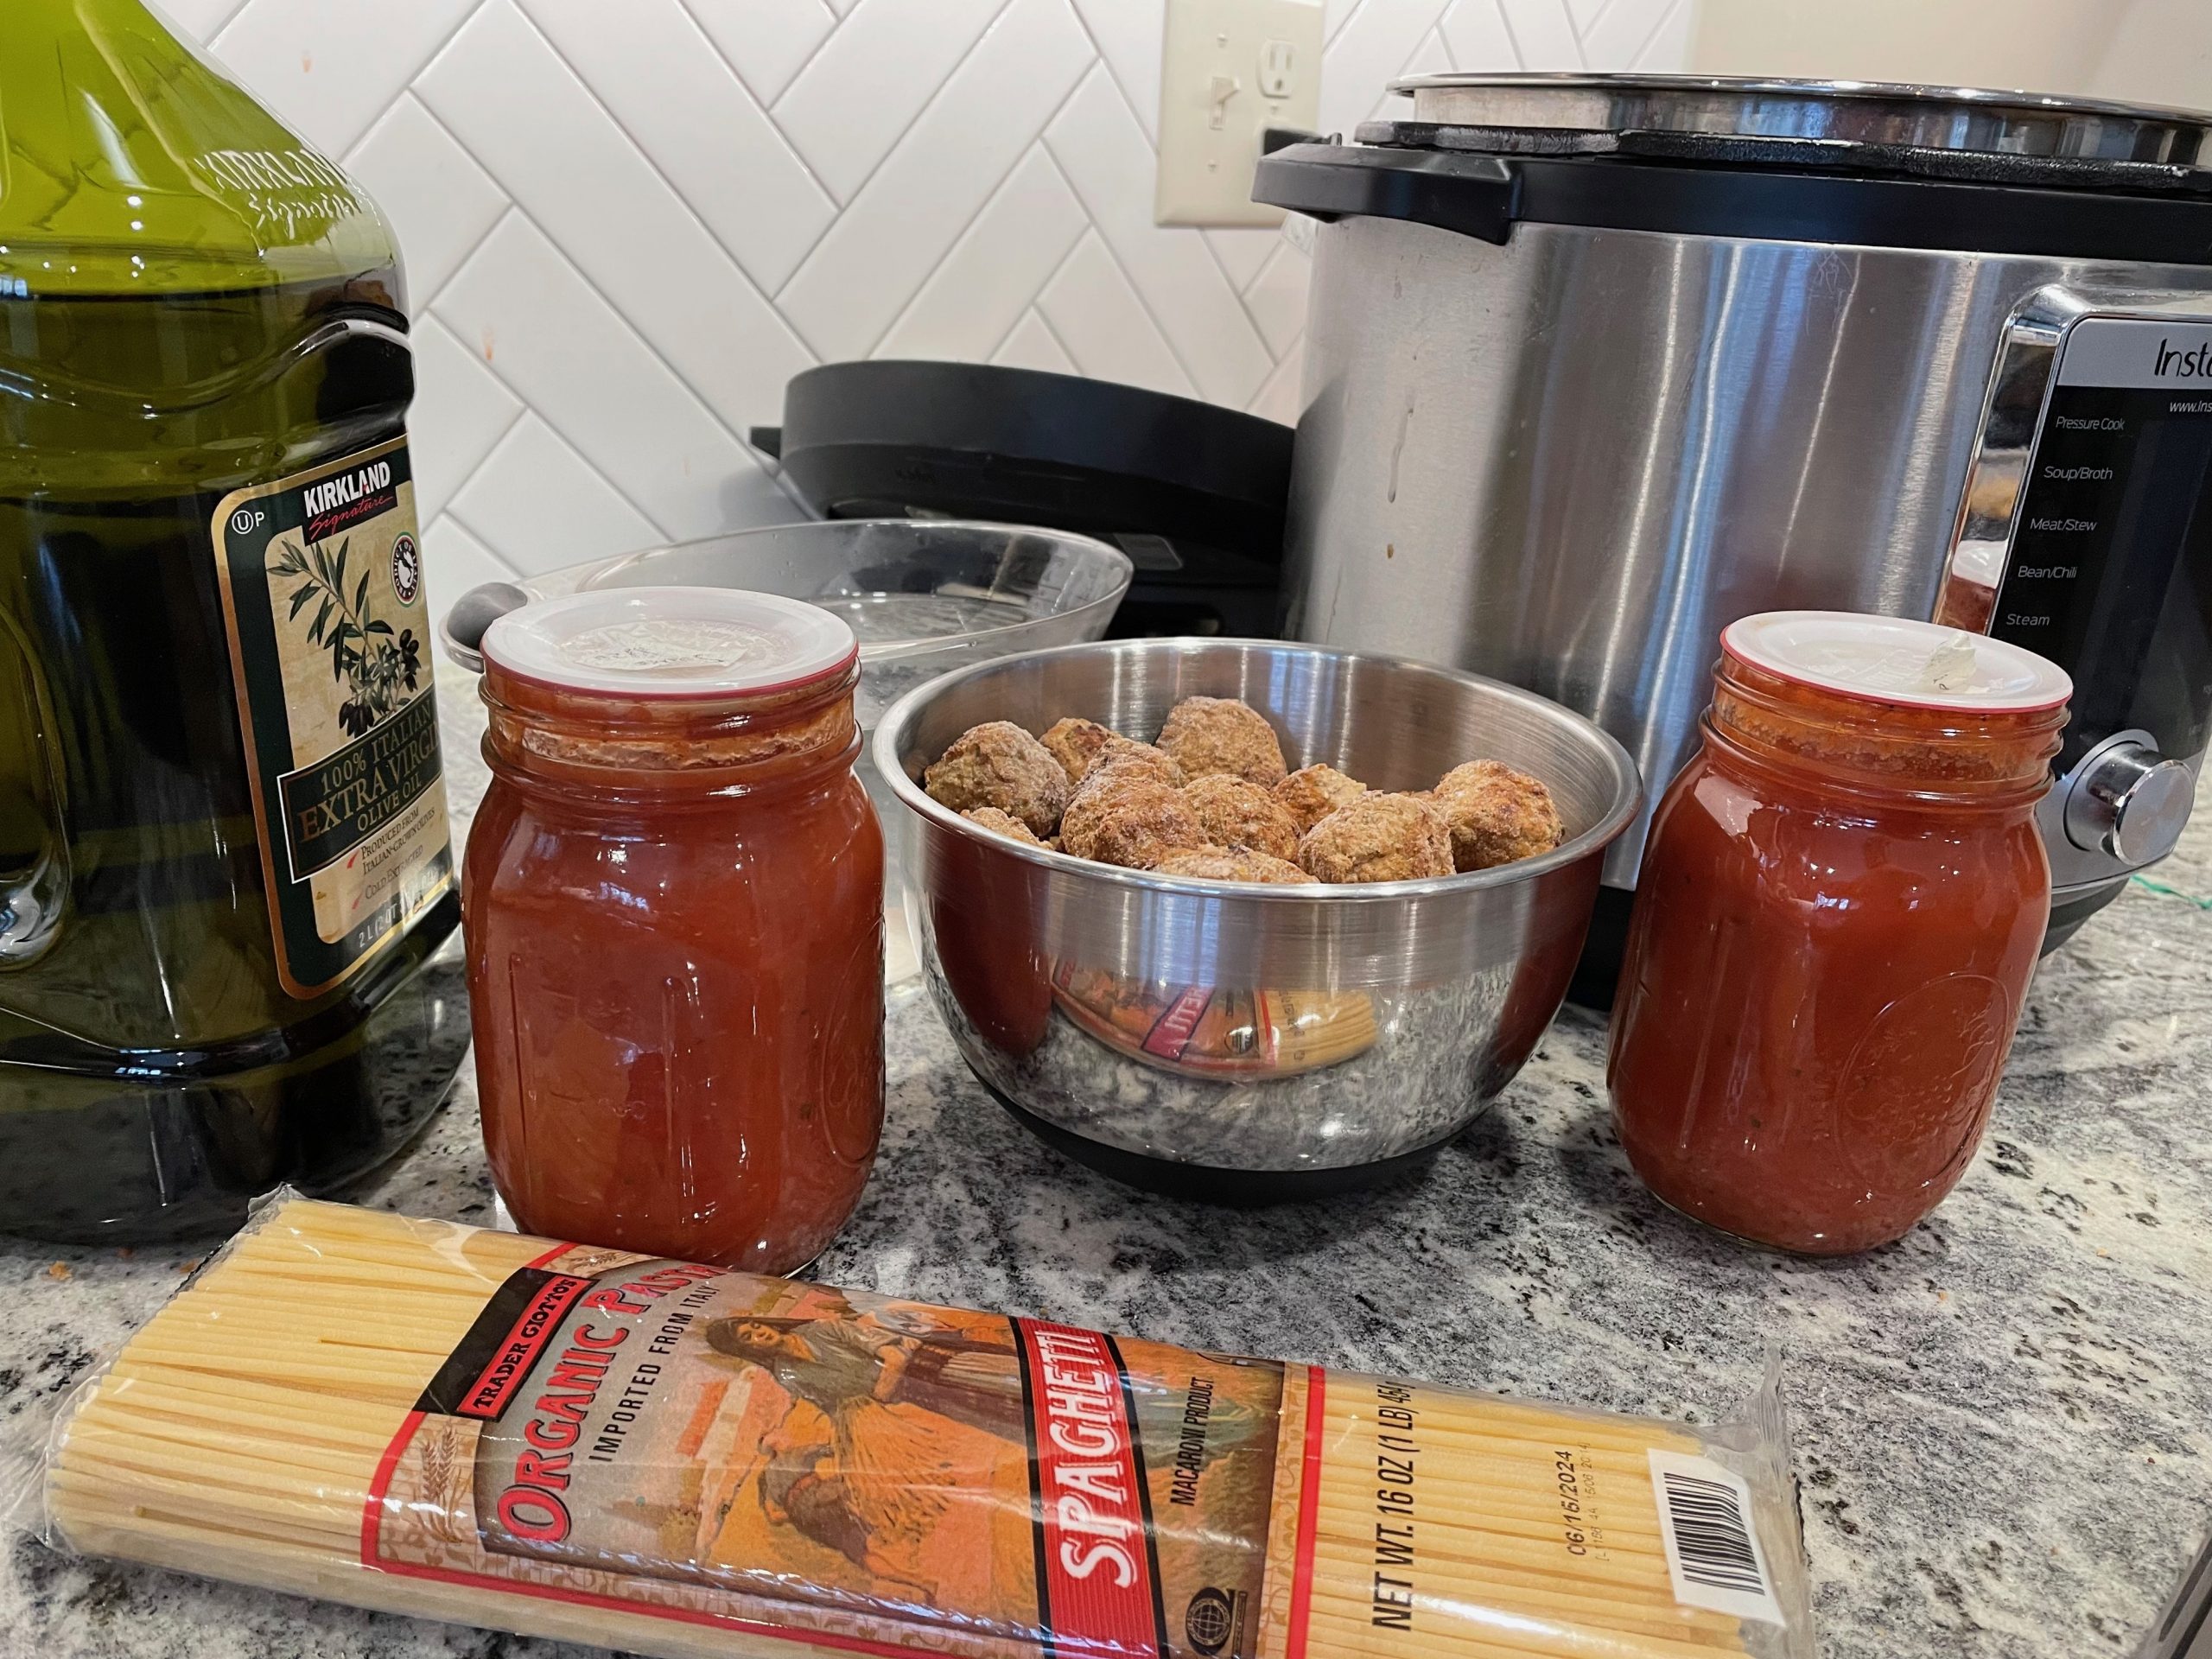
A couple thoughts on this recipe. I save lots of time and energy by using frozen Italian meatballs from Costco. Find your favorite brand and just go with it. I usually dump in about a pound and a half of meatballs to feed the six of us. That’s thirty-six meatballs – yes, I count them – meatball fights are a real thing at our table. Feel free to adjust the meatball amount to what you need – the cooking time remains the same.

This really does seem to serve the six of us with a few leftovers. We typically add a salad and bread. If you want to use a whole package of spaghetti, you should add an extra cup of water and your sauce will be a bit thinner.

Instant Pot Spagetti & Meatballs

Serving Size:
serves 6
Time:
total time 30 minutes
Difficulty:
easy peasy

Ingredients

  • 1-2 lb frozen meatballs, homemade or frozen from a bag
  • 12 oz uncooked spaghetti noodles
  • 1 T olive oil
  • 32 oz pasta sauce
  • 3 cups water
  • parmesan cheese for serving

Directions

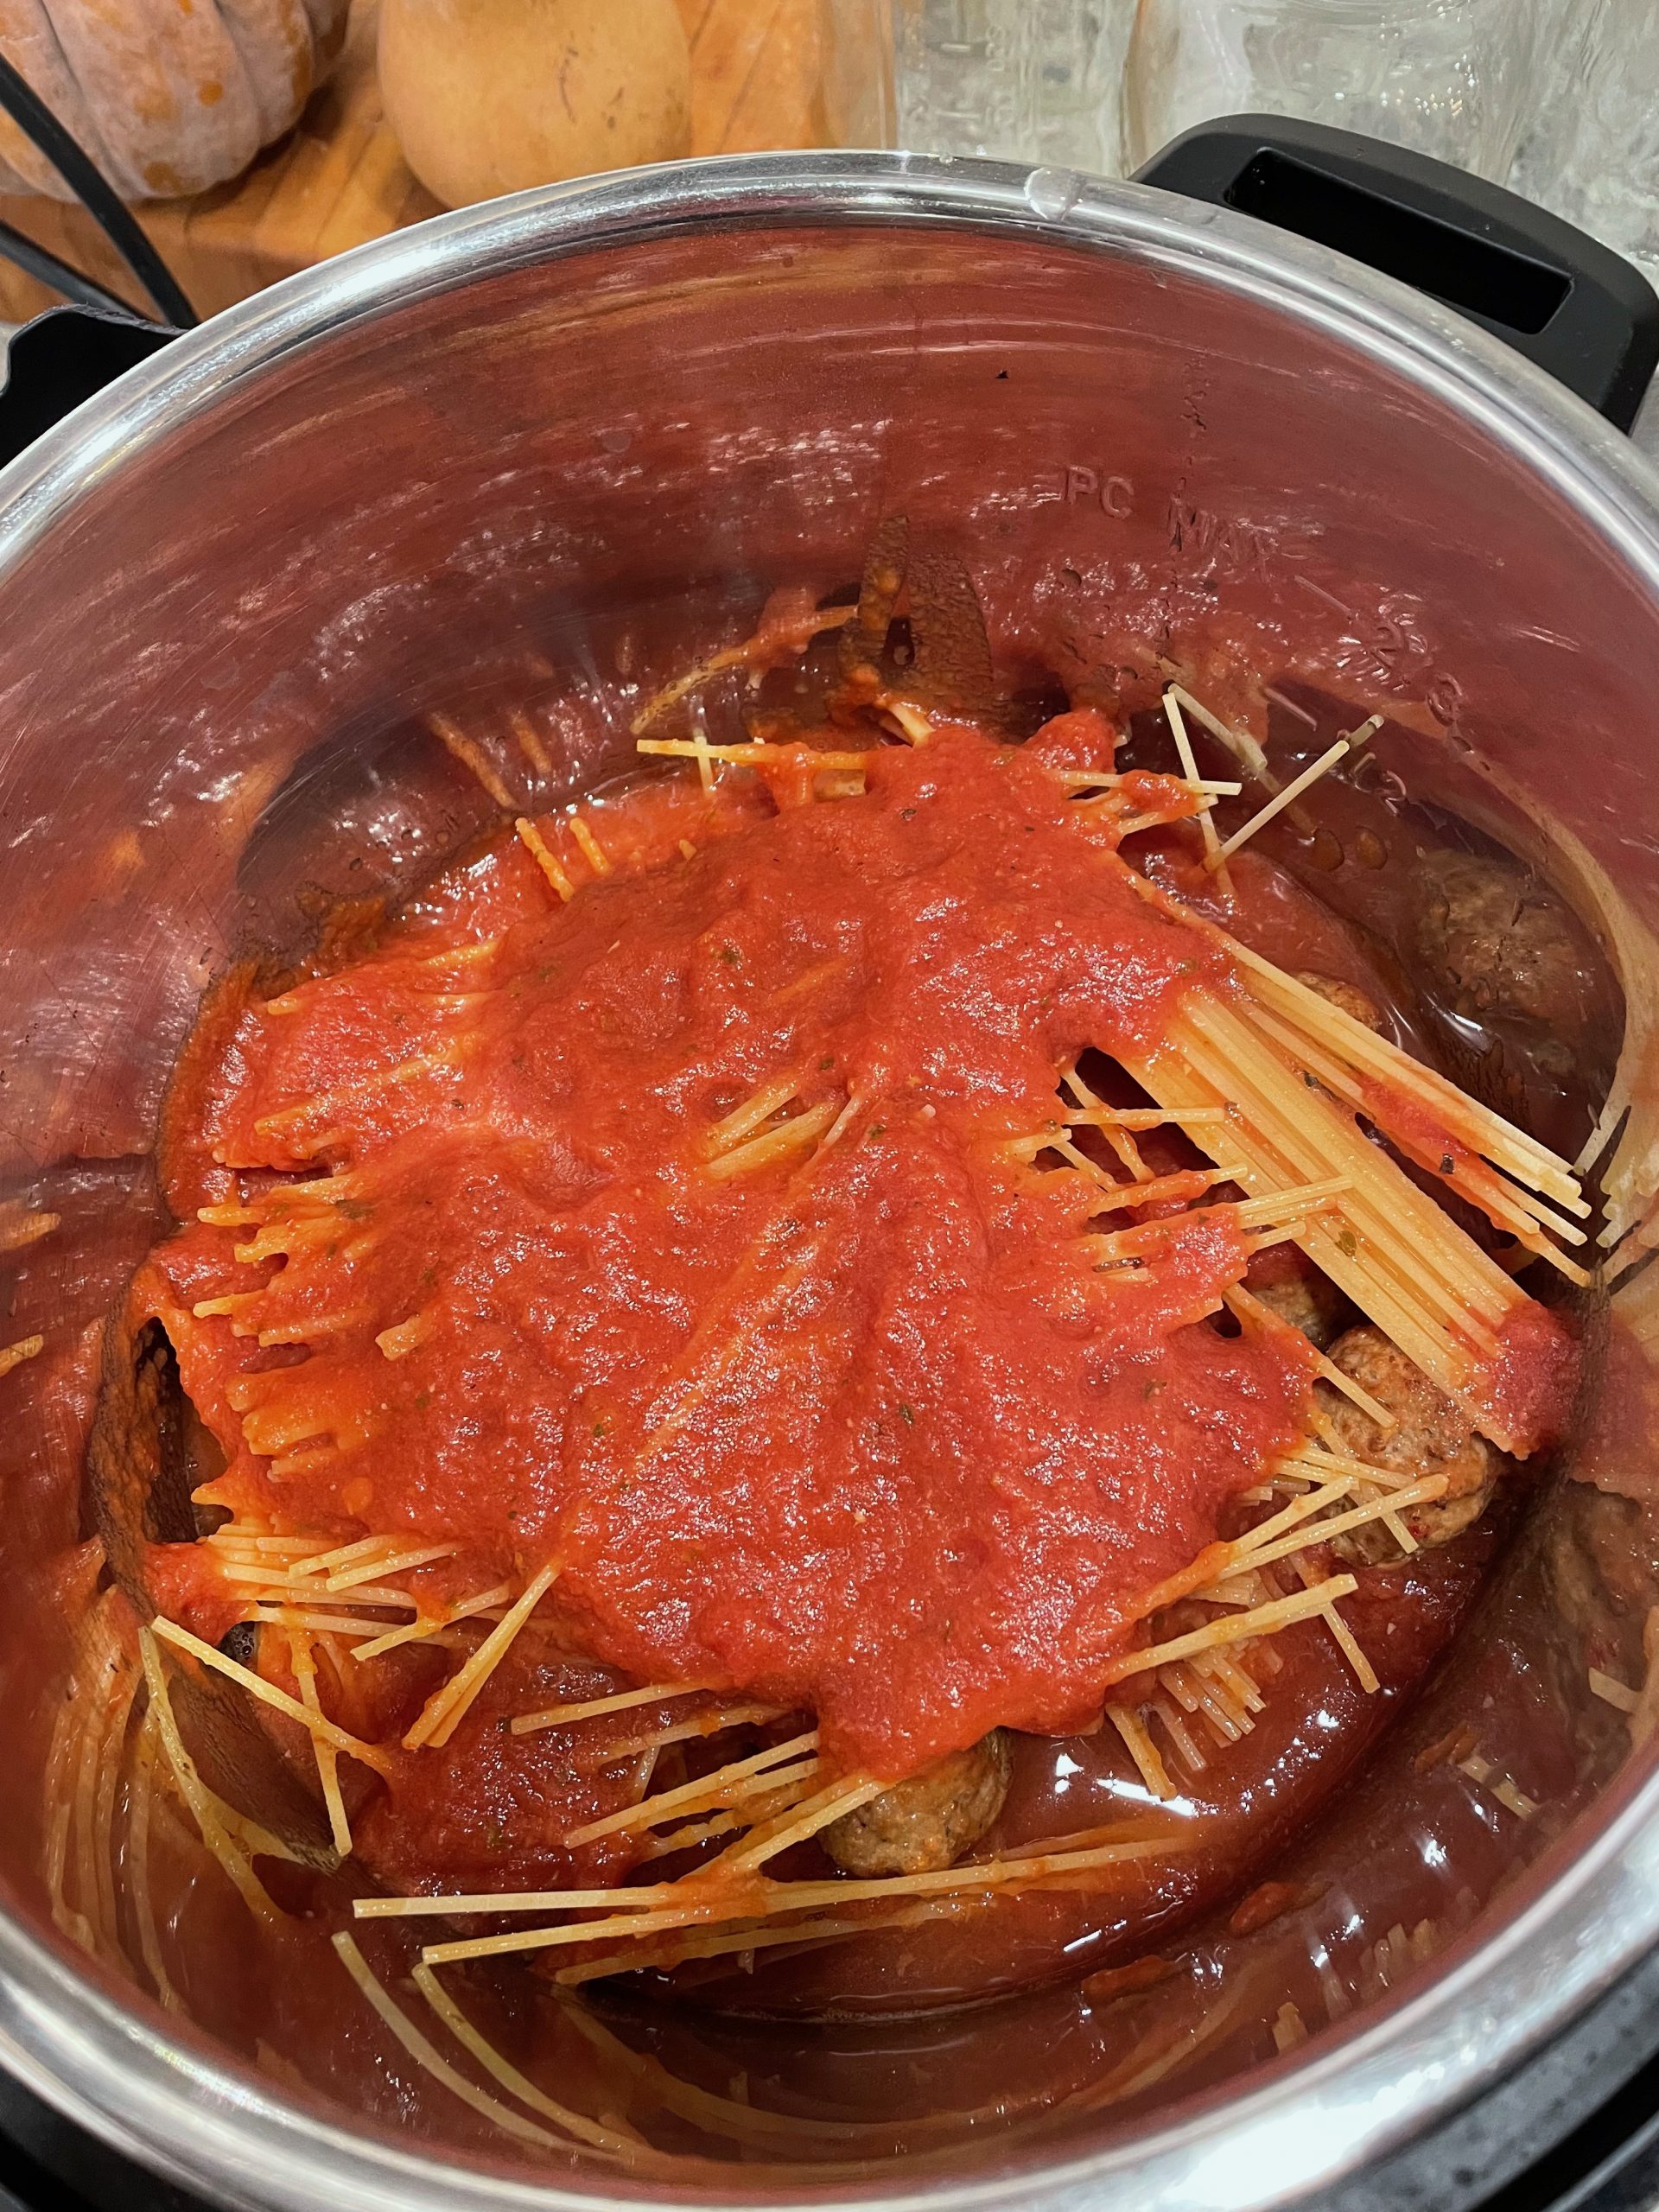
  1. Toss the meatballs into the bottom of your instant pot.
  2. Break the spaghetti noodles in half and scatter over top of the meatballs.
  3. Drizzle the olive oil on top of the spaghetti. Pour in the pasta sauce and water on top of the spaghetti. Add a little extra water if you need to make sure the spaghetti is covered with liquid. Don’t stir!
  4. Place the lid on the pressure cooker and set the time to 8 minutes. When the timer is up, release the pressure using a quick release method. Open the lid, stir, and serve.

Filed Under: recipes, Uncategorized Tagged With: dinner, easy, Instant Pot, pressure cooking

Instant Pot – Cheesy Chili Mac

April 19, 2021 by andrea Leave a Comment

This recipe for cheesy chili mac is another great one for a quick weeknight meal. The pasta cooks perfectly and soaks up all the great flavors of the chili. Plus the cheese on top really adds a nice touch.

This recipe is one that I use to teach the beauty of pressure cooked beans. If you aren’t a bean person, then you can leave them out of the recipe. I give two ways to approach the beans in this recipe. The first is to just use a can of beans, and this is definitely a bit quicker and easier. The second approach gives directions to use dried beans instead of canned beans. For dried beans, you will need to clean and soak 1 cup of beans about 8-12 hours ahead of cooking. Your cooking time will be slightly longer using dried beans.

About cooking pasta in the instant pot – pasta tends to continue absorbing water as long as it is in liquid. If made as written, you may want to eat it pretty quickly after cooking. You can expect that the leftovers may have soggy pasta. I recommend trying the recipe once to see how you like the pasta. If you are averse to pasta cooked in this manner, you can cook the pasta separately from the rest of the meal and stir it into the chili before serving. 

Instant Pot – Cheesy Chili Mac

Serving Size:
6
Time:
7-14 minutes cook time
30 minutes total
Difficulty:
medium

Ingredients

  • 2 T olive oil
  • 1 medium yellow onion, chopped (about 1 cup)
  • 2 – 4 1/2 ounce cans mild or hot chopped green chiles (1 cup)
  • 1 medium garlic clove, peeled and minced (1 teaspoon)
  • 1 1/2 pounds lean ground beef
  • 1/2 cup chile powder (adjust to taste – if it is spicy powder, use less)
  • 2 t ground cumin
  • 1/2 t table salt
  • 2 cups beef or chicken broth
  • 28 ounces crushed tomatoes (canned is fine)
  • 15 ounce can of kidney beans, drained and rinsed (1 3/4 cups) or one cup of soaked, dried kidney beans
  • 8 ounce dried ziti
  • 4 ounce shredded cheddar (1 cup)

Directions

  1. With the insert in the electric pressure cooker, turn the cooker to medium heat on Saute setting and allow to warm up 1-2 minutes. Add the olive oil and onion and cook, stirring often, until the onion begins to soften, about 3-4 minutes. The onion should not brown. Add the chilis and garlic and continue cooking until the liquid has mostly evaporated, about 2 more minutes. 
  2. Add the ground beef to the the pot. Cook, stirring often to break up the meat. Cook 3-4 minutes until the meat is no longer pink. Add the chili powder, cumin and salt, stir, and allow to toast the spices for about 30 seconds.
  3. Add the broth to the pot and stir to scrape the bottom of the pan and loosed all of the browned bits off of the bottom of the pan. This step is important so that the pot does not default to the burn warning later in the cooking process. Once the pot bottom is cleaned, turn off the pot.
  4. Stir in the tomatoes and beans. If you are using canned kidney beans, add the pasta also at this point. Lock the lid on the pot.
  5. Cook at high pressure for 7 minutes.
  6. Use the quick-release method to bring the pot’s pressure back to normal.
  7. If you used dried, soaked kidney beans, unlatch the lid, open the pot and stir in the pasta. Replace the lid and cook for another 7 minutes. This approach allows your beans and pasta to cook perfectly.
  8. Unlatch the lid and open the pot, stir in the cheddar cheese. Set the lid back on the pot for 5 minutes to melt the cheese and mellow the flavors. Stir again before serving. 

Filed Under: recipes Tagged With: bean, easy, Instant Pot, pressure cooking

Instant Pot Chicken Tacos

April 13, 2021 by andrea Leave a Comment

This is a super quick way to get dinner on the table. Only four ingredients and you basically dump everything into your instant pot.

If you are like me and enjoy rice with your tacos, I’m also sharing a trick of cooking the rice at the same time as the taco meat. You will basically put the rice and its water into a separate bowl and set it on top of the chicken. Then the two will cook at the same time. If you have a rack that sits nicely over top of the chicken without hitting the bottom of the lid, use it. But if your rack doesn’t sit nicely (and it probably won’t), it can seem a little awkward to plop the bowl of uncooked rice on top of the chicken. Never fear. It will work. Just put the bowl of rice on the chicken, however you can make it work. Be forewarned, the rice will likely pick up a little of the color and flavor of the tacos. Not a problem in our house, but if you are looking for perfectly plain, white rice – don’t follow this method.

This cooks so quickly that you may find it takes you longer to prep your toppings. Hey. There are worse things in the world. Just let the pressure cooker go into the the warm setting and open it just before you are ready to eat.

Instant Pot Chicken Tacos

Serving Size:
4-6
Time:
25 minutes total
Difficulty:
easy

Ingredients

  • 1-2 pounds of chicken breasts
  • 1 cup of chicken broth (or water)
  • 1 cup of your favorite salsa (I like salsa verde)
  • 2-3 T of taco seasoning (adjust to taste)

Ingredients – Rice (Optional)

  • 1 cup of your favorite rice – white, brown, long or short, doesn’t matter
  • 1 1/4 cup of water (add 1/4 cup of water for brown rice)

Directions

  1. Add chicken, broth, salsa, and taco seasoning to the insert pot of your instant pot. Stir.
  2. If you are making rice, rinse the rice. Combine the rinsed rice and water in a 4 or 6-cup oven safe bowl (such as a pyrex dish). If you have a rack, place it on top of the chicken and set the rice dish on the rack. If your rack doesn’t fit, you can wiggle the chicken around to set the rack in the pot or you can set the rack on the chicken, or you can just set the rice bowl directly on top of the chicken.
  3. Lock the lid on the pressure cooker. Set the cooker to high pressure and cook for 12 minutes. Allow the pressure to release naturally for 10 minutes and then release the remaining pressure manually.
  4. Using oven mitts, remove the bowl of rice. Using tongs, place the chicken onto a cutting board and allow to cool for a couple minutes. You can use two forks to easily shred the chicken for tacos. If you made extra chicken, you can make short work of the shredding by placing the chicken breasts in your mixer bowl and use either the dough hook (Bosch mixer) or the cookie paddle (Kitchen Aid) give a few pulses and let the machine do the work for you.
  5. Serve shredded taco meat with your favorite shells, tortillas, and taco toppings.
  6. A quick note on the extra liquid in the pot. You can (and should) add some of it to the shredded chicken so you have nice moist taco meat. But, you may have some extra left over. Before you toss it, consider saving it for a second meal. If you have leftover chicken, add it back into the cooking liquid the next day for a chicken taco soup. Serve over tortilla chips with a little cheese and sour cream on the top.

Filed Under: recipes Tagged With: easy, homemade, Instant Pot, pressure cooking

Instant Pot Sloppy Joes

April 6, 2021 by andrea 2 Comments

This is such a quick and easy way to make sloppy Joes. The stovetop version of this recipe would require about 30 minutes of simmer time – in the pressure cooker, you set the cook time for 5 minutes on high pressure. Then you can sit back and let the pressure cooker do the rest of the work – no stirring necessary. And since this recipe uses the quick pressure release method, there is little added time at the end of cooking. Start to finish, this recipe will take about 30 minutes total.

After the mixture is cooked and the lid is removed, you may need to simmer it for a few minutes to help it thicken. If you have a little extra time, just put the lid back on and let it rest with no extra heat – it will thicken up on it’s own.

I’ve also given an option to substitute some of the meat with whole grains. I will admit, I love the addition of quinoa to the meat – however, it was not a hit with my kids. Back to the basics for our family.

I like to serve these on homemade burger buns. Brioche buns, pretzel buns, or a lovely whole grain burger buns would all be perfect for these.

Instant Pot Sloppy Joes

Serving Size:
6-8
Time:
30 min total
Difficulty:
Easy

Ingredients

  • 2 T Olive oil
  • 1 Medium yellow onion, chopped (about 1 cup)
  • 1 Large red or orange bell pepper, stemmed, cored, and chopped (about 1 cup)
  • 2 Celery ribs, thinly sliced (1/2 cup)
  • 2 Medium garlic cloves, peeled and minced (2 teaspoons)
  • 1 1/2 lbs Ground beef, lean*
  • 1 T Standard chili powder
  • 1 t  Smoked paprika, optional
  • 1 cup Beef or chicken broth
  • 1/2 cup Catsup
  • 1 T Yellow mustard
  • 1 T Brown sugar or molasses
  • 2 t  Apple cider vinegar
  • 1/2 t  Table salt

For Serving

  • 6-8 hamburger buns
  • Pickles or other toppings

* See notes for adding whole grains to the recipe. 

Directions

  1. With the insert in the electric pressure cooker, turn the cooker to medium heat on Saute setting and allow to warm up 1-2 minutes. Add the olive oil and let warm up about a minutes. Add onion, bell pepper, and celery and cook, stirring often, until the onion begins to soften, about 3-4 minutes. The onion should not brown. Add the garlic and continue cooking about 1 more minute. 
  2. Add the ground beef to the the pot. Cook, stirring often to break up the meat. Cook 3-4 minutes until the meat is no longer pink. The meat does not need to be fully cooked, but if it has a higher percentage of fat, it should be cooked enough for most of the fat to cook off. If the meat has fat cooking off, drain the fat off of the meat. Add the chili powder, stir, and allow to toast the spices for about 30 seconds.
  3. Add the broth to the pot and stir to scrape the bottom of the pan and loosen all of the browned bits off of the bottom of the pan. This step is important so that the pot does not default to the burn warning later in the cooking process. Once the pot bottom is cleaned, turn off the pot.
  4. Stir in the catsup, yellow mustard, brown sugar, apple cider vinegar, and salt. Lock the lid on the pot.
  5. Cook at high pressure for 5 minutes.
  6. Use the quick-release method to bring the pot’s pressure back to normal. Unlatch the lid and open the pot. Turn the sauté setting on bring the mixture to a low simmer. Cook, stirring often, until it has thickened and is not as soupy – about 7 minutes.


Recipe notes:

  1. If you’d like to add some whole grains to your recipe, you can reduce the meat to 1 pound and add add 1/2 cup of rolled oats, or 3/4 cup of rinsed quinoa (or a combination of the two) when you stir in the catsup. This may also allow you to to skip the simmering step at the end, as the grains will help to absorb the extra liquid at the end. 

Filed Under: recipes Tagged With: easy, pressure cooking

Pumpkin Chili

October 21, 2015 by andrea Leave a Comment

Sugar Pumpkin

I originally found this recipe for pumpkin chili when I was looking for recipes to share for a pumpkin class. The original recipe came from Thug Kitchen and was pretty fabulous. I’ve upped the tomatoes and vegetables and adjusted it a little to make it my own, which is what you should do with any good chili recipe.

To make your own pumpkin puree, find yourself a sugar pumpkin. Don’t use a regular carving pumpkin – they won’t taste as sweet and you’ll be wasting your time. Wash the pumpkin, cut it in half, and remove the seeds and strings. To cook the pumpkin, you can either roast the halves, cut side down, in a roasting pan with a cup of water. It’ll take about 30-40 minutes at 400 degrees. Alternatively, you can pressure cook the halves for about 6 minutes on high pressure – remember to 1/2 a cup of water or your cooker’s minimum liquid amount. The pumpkin is done with you can easily stick a fork in through the skin. Once the pumpkin is cooked, let it cool, scrape out the flesh and puree it in your blender or food processor until smooth.

These dried beans were harvested from our garden

These dried beans were harvested from our garden

You can use any type of beans in this recipe. The recipe is written for using canned beans or soaked dried beans. If you use dried beans, you have the option for cooking them before adding them to the soup or pressure cooking them as part of the soup. Cooking them before adding, let’s you mix and match your beans in the soup. Save the cooking liquid for the beans and use it in the soup instead of broth or water. I’ve used combinations of black, cannellini, and kidney beans.

If you choose to pressure cook the beans with the soup, either use one type of bean, or pick beans that are about the same size so they cook the at the same rate. Black beans can cook as quickly as 3 minutes under pressure, but cannellini or kidney can take 6 minutes. Adjust the pressure cooking time to the beans that you are using.

Pumpkin Chili
Author: Andrea
Prep time: 30 mins
Cook time: 40 mins
Total time: 1 hour 10 mins
Serves: 8
This is a great fall recipe. It uses pureed pumpkin, tomatoes, beans, and comes together quickly.
Ingredients
  • 2 T olive oil
  • 1 medium onion, chopped finely – about a cup
  • 1 cup of chopped carrots, about 2-3 carrots
  • 1 cup of chopped sweet pepper
  • 1 1/2 T chili powder
  • 1 t ground cumin
  • 4 cloves of garlic, chopped
  • 1 jalapeno, chopped
  • 2 T Braggs Amino Acids or soy sauce
  • 1, 28 oz jars of crushed tomatoes
  • 2 cups of pumpkin puree
  • 4 cups (or 2, 15 ounce cans of beans) – black, cannellini, or whatever you like (if you are dried beans, instead of canned), see special note in instructions for pressure cooked method
  • 4 cups of bean broth, vegetable stock or water
Instructions
  1. Heat the olive oil in a large stockpot over medium heat. Sauté the onion, carrots, and peppers until soft – it’s okay if they brown a little – about 5 minutes.
  2. Add chili powder, cumin, garlic, jalapeno, and amino acids. Sauté for 30 seconds.
  3. Add tomatoes, pumpkin, broth and beans and bring to a simmer. Allow to simmer on the stove for about 30 minutes before serving.
  4. * pressure cooker method – use soaked, dried beans. In step three, add remaining ingredients and pressure cook on high for 6 minutes for a medium size bean (see above notes for more info on cooking times). Done.
3.3.3077


Filed Under: recipes Tagged With: beans, pressure cooking, pumpkin, soup, vegetarian

Apple Pork Roast

October 18, 2015 by andrea Leave a Comment

This is the perfect fall recipe – apples, sauerkraut and pork all in one pot. Plus it is a super easy recipe. Throw it in the crock pot or pressure cooker, forget about it, and it’s done in time for dinner.

This is my mom’s recipe and typical of any good recipe, it came from her head and hasn’t been written down until just now. I hope I do it justice. I was reminded of this recipe this weekend when I was teaching people how to make sauerkraut. This is a great way to use it in a cooked recipe and you’ll be surprised at how everyone loves it. Even if you don’t think you or the kids like sauerkraut, I’d recommend trying this. The apple and kraut combination give it a little sweet and sour kick.

If you have any comments on it, I’d love to hear them in the comment section.

Apple Pork Roast
Author: Andrea
Prep time: 10 mins
Total time: 10 mins
This is a favorite use of sauerkraut in our family. The apples mellow it out a bit and you’ll be surprised at how much you like sauerkraut after tasting it.
Ingredients
  • 1 pork roast, about 3 pounds
  • 2 cups of sauerkraut, drained and rinsed
  • 1 T caraway seed
  • 2 apples, cut up
  • 4-5 small potatoes, cut into 2-3 inch pieces
  • 2 T brown sugar
Instructions
  1. Crock Pot method – Place the pork roast in the bottom of your crock pot or pressure cooker. Add remaining ingredients and stir to combine. Cook in crock pot on high for 6-8 hours
  2. Pressure Cooker Method – The only difference with pressure cooking the roast is that you need to make sure you have enough liquid in the cooker. You can use the sauerkraut juice, but it may result in a very salty roast. I’d recommend adding 1 cup of light beer, or at least the minimum amount required by your cooker to reach pressure. Cook at high pressure for 40 minutes (stovetop cooker) or 55-60 minutes (electric cooker). When the cooking time is up, allow the pressure to release naturally.
3.3.3077


Filed Under: recipes Tagged With: apples, pork, pressure cooking, roast, sauerkraut

Pressure Cooking – Cookbook Reviews

May 11, 2015 by andrea Leave a Comment

Pressure cooking can be so wonderful. It’s a great way to have healthy meals at your fingertips on weeknights. And it can save you from slaving away in the kitchen on your weekends. I just made spare ribs tonight – 20 minutes in the pressure cooker – and then finished them on the grill for extra flavor and crispy charred goodness.

But I think one of the biggest tricks of pressure cooking is finding good cookbooks and recipes. Many recipes that you’ll find are dated or have inaccurate cooking times.

In order to help you along, and save you the time and expense of researching cookbooks, I’ve summarized my favorite cookbooks and websites.

1. Hip Pressure Cooking by Laura D. A. Pazzaglia

www.hippressurecooking.com

This book has more modern recipes. It includes lots of ethnic flavors and it’s best feature is the great timing tables. It covers a lot of pressure cooking basics and has good recipes. The author is not American and some of the basic American style things that you might want to do with a pressure cooker, like baked beans or a simple pot roast are not in this book. This book has timing for both electric and stovetop cookers.


2. The Great Big Pressure Cooker Book by Bruce Weinstein & Mark Scarbrough

This book has tons and tons of recipes. The recipes all cover both electric and stovetop cookers and this is perhaps the best book for electric cooker recipes. The book does not cover the basics of pressure cooking – it jumps right into the recipes. The recipes are well written and most everything I’ve tried so far as been good. I should note that I’m not in love with their method for cooking cheesecakes. So if you are itching to pressure cook a cheesecake, try the next book on this list.

3. Pressure Perfect by Lorna Sass

This book is fairly traditional and does not include a lot of discussion about electric pressure cookers. That being said, the recipes are good and the times are accurate. Lorna Sass is one of the main people who brought pressure cooking back into mainstream culinary discussion in the U.S.


4. www.fagor.com

This is a great starting point for recipes. The recipes are good and it’s FREE! You also get a free little cookbook with your Fagor pressure cooker.


5. Healthy Recipes by Phyllis Stanley & Shirley Heinmets

This book includes a section on pressure cooking in addition to a bunch of great recipes for your Bosch. If you have a Bosch and a pressure cooker, then this is a great book to have in your collection. My favorite cookie recipe is in this book – but it’s not a pressure cooker recipe!. The pressure cooker recipes are all written for a stovetop cooker and include a wide variety of whole grains. The recipes are pretty traditional and are all very good.

Summary

Pick one of the books above based on what you are looking for and get started with your pressure cooker! I’ve found all of the above books at my library and bookstore, with the exception of Healthy Recipes. Healthy Recipes is self-published and is available through me for $24.00.


Filed Under: Clatter in the Kitchen Tagged With: cookbook, pressure cooking

Lentil and Ham Bone Soup

April 7, 2015 by andrea Leave a Comment

When I buy my Easter or Christmas ham, I always buy a bone-in ham.  The bone makes the most wonderful soups.  I always think of ham bone soups as a free meal, because it makes a second meal out of inexpensive ingredients.  In this recipe, I used lentils as the soup base. You could do this recipe with beans or split peas, but lentils were what I had around when I made this up.

Lentl SoupThis is not a pretty soup, but it does taste good.  When I served it to my boys for dinner tonight, we had quite the discussion about needing to taste it before we decide that we don’t like it.  And what do you know? All three liked it and two even asked for seconds. Amazing. That sort of thing never happens around here. Really. Never.

Then as I was taking a photo of the soup, my eight year old asked me if anyone ever reads my website.  I had to admit that I’m pretty sure no one reads my site.  But, if you’ve made it this far, then you’ve proven me wrong! Yeah! I hope you enjoy this soup as much as we did.

This recipe makes a big batch. Once its cooled, I freeze half of it for another day. Serve with crusty bread and a salad and you have a easy, healthy meal.

Lentil and Ham Bone Soup
Recipe Type: soup
Author: Andrea
Prep time: 10 mins
Cook time: 10 mins
Total time: 20 mins
Serves: 10
This is a perfect way to use up that leftover ham bone, but if you don’t have a ham bone, you can use a cup of cubed ham, a smoked pork chop or just leave it out. You can also switch out the lentils with soaked, dried beans or split peas.
Ingredients
  • 1 large onion, chopped
  • 1 T olive oil
  • 1 cup of chopped carrots, about 4 carrots
  • 1 cup of chopped celery, about 4 stalks
  • 3 cups of whole green lentils
  • 3 cloves of garlic, chopped
  • 1 ham bone with meat
  • 1 t oregano
  • 1 bay leaf
  • 8 cups of vegetable or chicken broth or water, or combination
  • salt and pepper to taste
Instructions
  1. In a 6-quart or larger pressure cooker, heat the oil and saute the onion until soft.
  2. Add remaining ingredients and stir.
  3. Place lid on pressure cooker and bring to high pressure over high heat. Lower heat and pressure cook for 10 minutes. If using an electric pressure cooker, program for 10 minutes on high pressure.
  4. Allow pressure to release naturally.
  5. Remove ham bone and bay leaf from the soup.
  6. When bone is cool enough to handle, use a knife to remove any remaining ham pieces and return them to the soup.
  7. Serve with crusty bread and a salad.
3.2.2929


Filed Under: recipes Tagged With: ham bone, lentil soup, pressure cooking

Posts

  • Clatter in the Kitchen
  • recipes
  • Uncategorized

Recent Comments

  • Pam on (Sourdough Optional) Carrot Muffins
  • andrea on Cinnamon Rolls – Tangzhong method
  • Helen Lazzaro on Cinnamon Rolls – Tangzhong method
  • andrea on Hot Cross Buns
  • Susan Toth on Hot Cross Buns
  • Facebook

Copyright © 2023 · Foodie Child Theme by Shay Bocks · Built on the Genesis Framework · Powered by WordPress