My Kitchen Clatter

Real Food - Real Life

  • About Me
  • Classes
    • Upcoming Classes
    • Baking Classes
    • Pressure Cooking Classes
    • Fermentation Classes
    • Canning Classes
    • Kombucha Classes
  • Equipment
    • Nutrimill Plus Grain Mill
    • Nutrimill Classic Grain Mill
    • Nutrimill Harvest Grain Mill
    • Bosch Universal Mixer
    • Ankarsrum Original Assistant
    • Filter Pro Dehydrator
  • Grains & Supplies
  • Recipes
  • Clatter in the Kitchen

Lentil and Ham Bone Soup

April 7, 2015 by andrea 2 Comments

When I buy my Easter or Christmas ham, I always buy a bone-in ham.  The bone makes the most wonderful soups.  I always think of ham bone soups as a free meal, because it makes a second meal out of inexpensive ingredients.  In this recipe, I used lentils as the soup base. You could do this recipe with beans or split peas, but lentils were what I had around when I made this up.

Lentl Soup
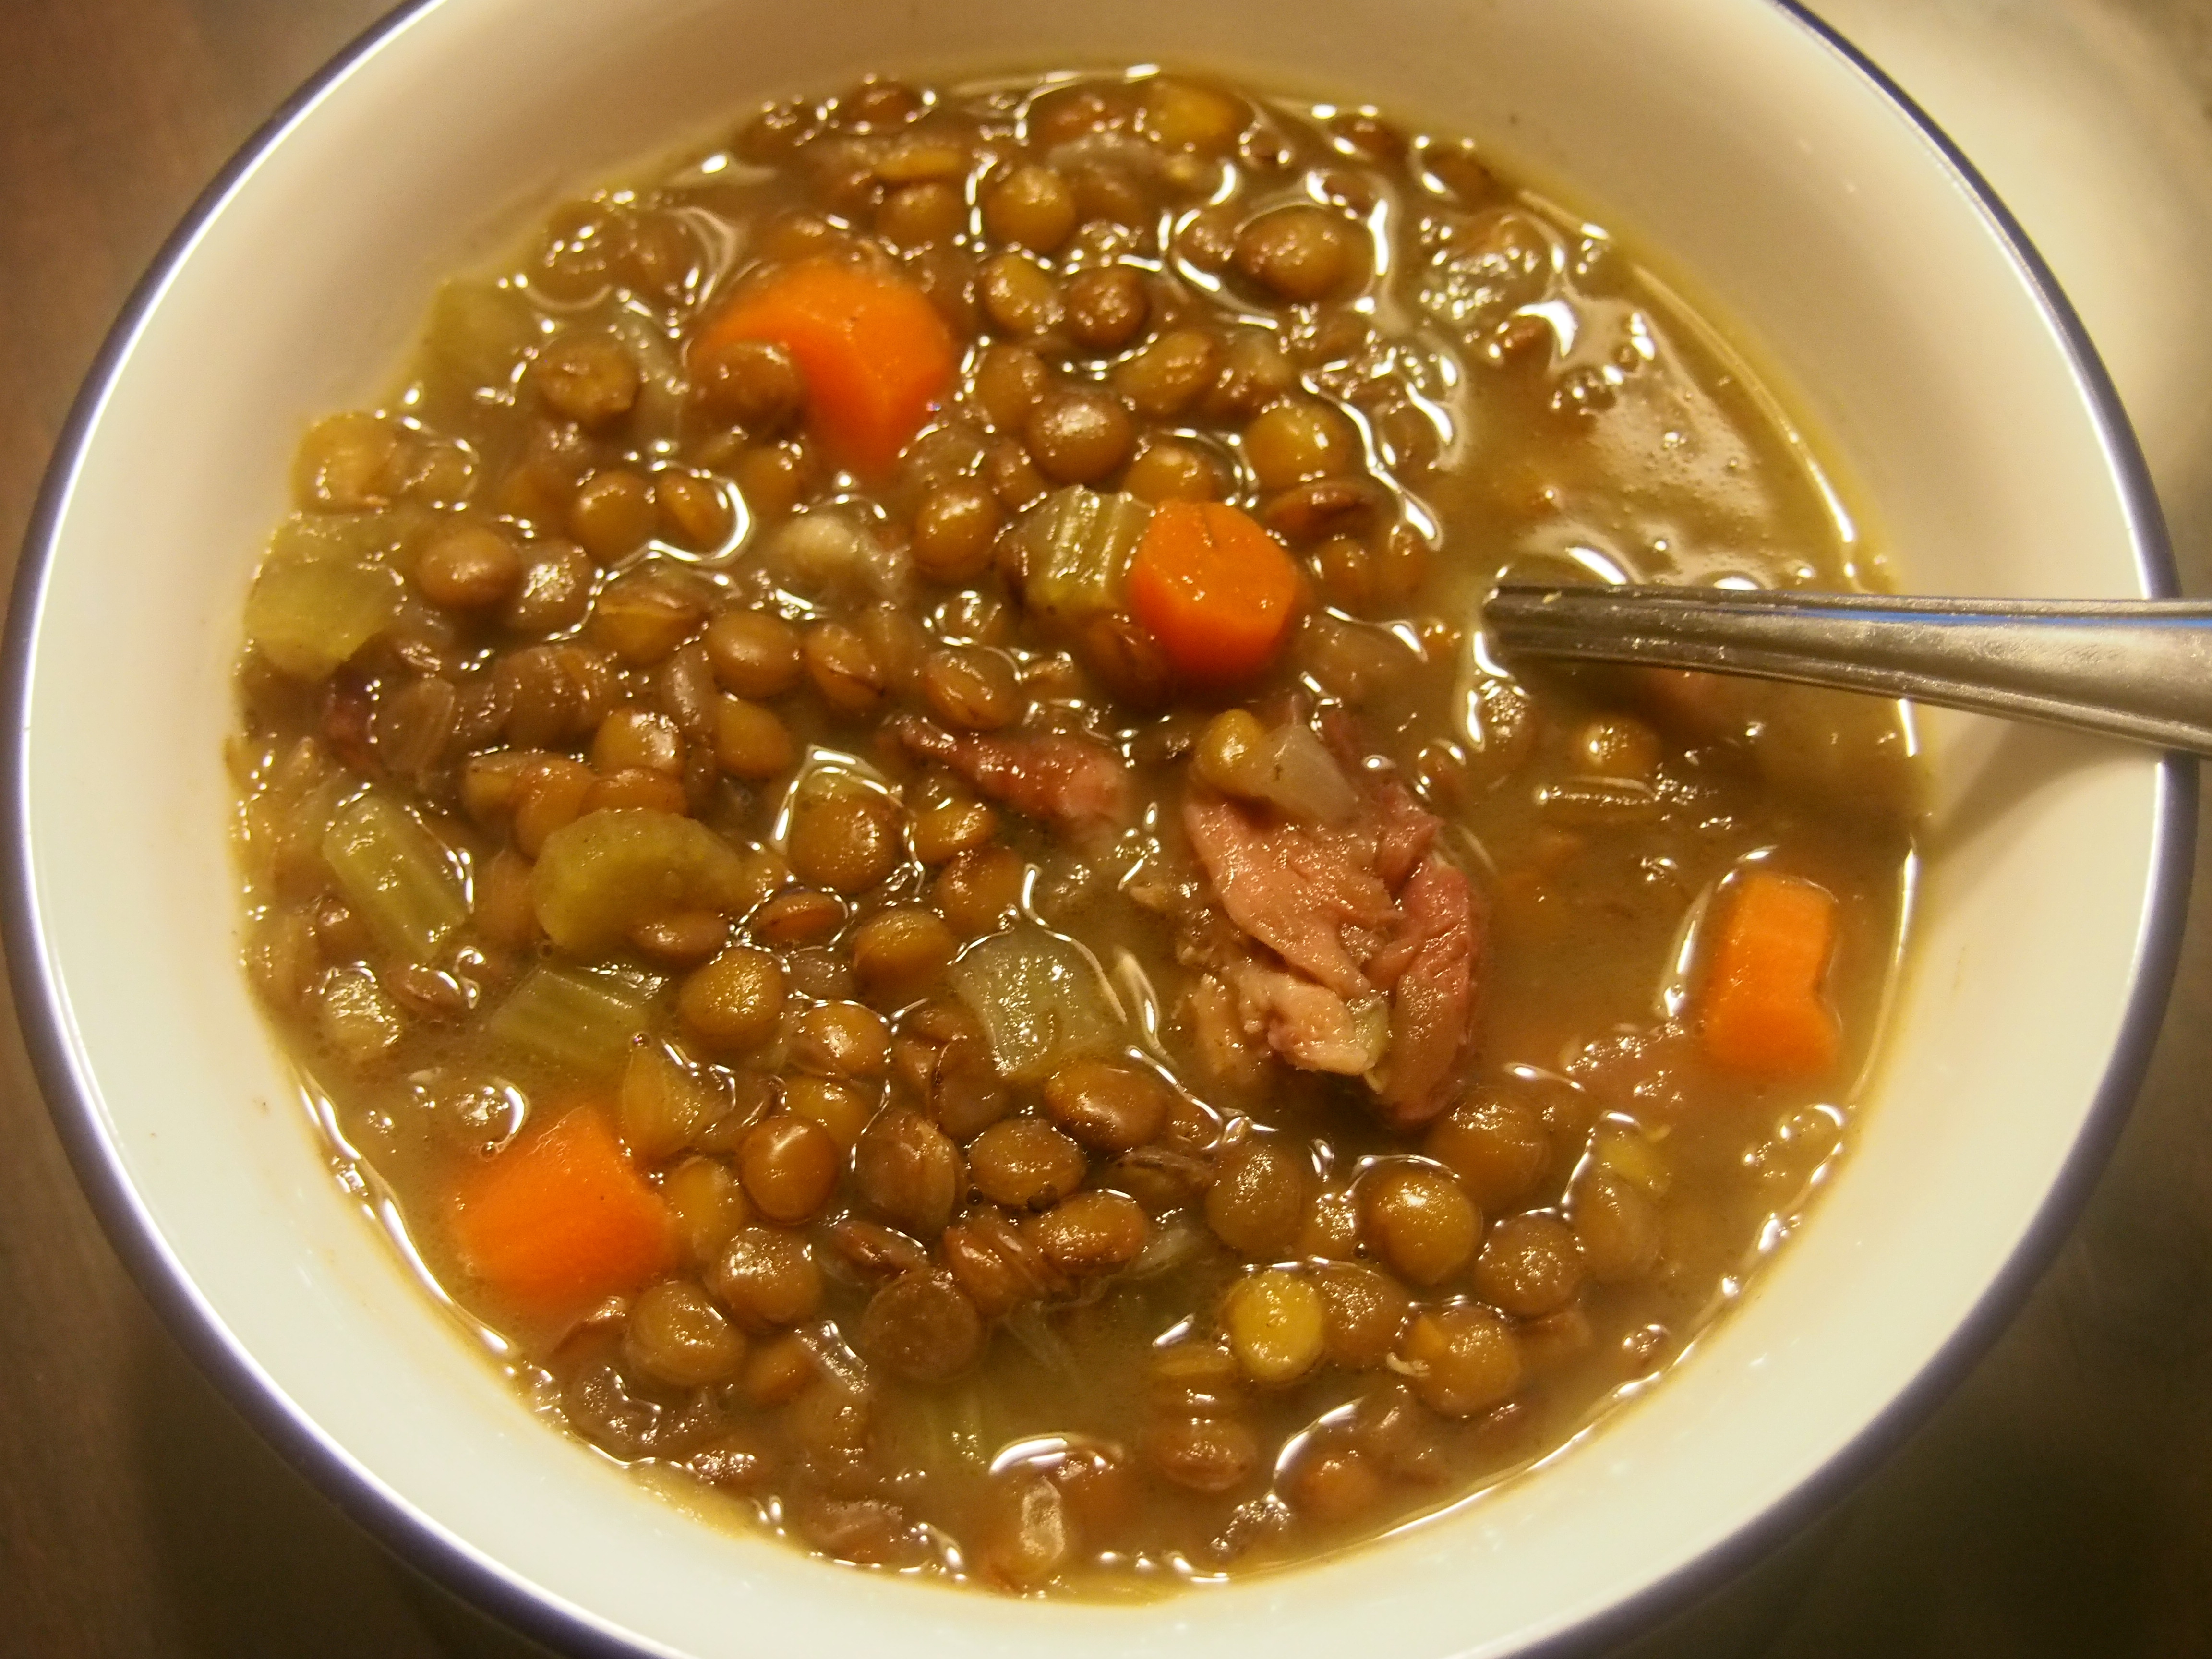
This is not a pretty soup, but it does taste good.  When I served it to my boys for dinner tonight, we had quite the discussion about needing to taste it before we decide that we don’t like it.  And what do you know? All three liked it and two even asked for seconds. Amazing. That sort of thing never happens around here. Really. Never.

Then as I was taking a photo of the soup, my eight year old asked me if anyone ever reads my website.  I had to admit that I’m pretty sure no one reads my site.  But, if you’ve made it this far, then you’ve proven me wrong! Yeah! I hope you enjoy this soup as much as we did.

This recipe makes a big batch. Once its cooled, I freeze half of it for another day. Serve with crusty bread and a salad and you have a easy, healthy meal.

Lentil and Ham Bone Soup
Recipe Type: soup
Author: Andrea
Prep time: 10 mins
Cook time: 10 mins
Total time: 20 mins
Serves: 10
This is a perfect way to use up that leftover ham bone, but if you don’t have a ham bone, you can use a cup of cubed ham, a smoked pork chop or just leave it out. You can also switch out the lentils with soaked, dried beans or split peas.
Ingredients
  • 1 large onion, chopped
  • 1 T olive oil
  • 1 cup of chopped carrots, about 4 carrots
  • 1 cup of chopped celery, about 4 stalks
  • 3 cups of whole green lentils
  • 3 cloves of garlic, chopped
  • 1 ham bone with meat
  • 1 t oregano
  • 1 bay leaf
  • 8 cups of vegetable or chicken broth or water, or combination
  • salt and pepper to taste
Instructions
  1. In a 6-quart or larger pressure cooker, heat the oil and saute the onion until soft.
  2. Add remaining ingredients and stir.
  3. Place lid on pressure cooker and bring to high pressure over high heat. Lower heat and pressure cook for 10 minutes. If using an electric pressure cooker, program for 10 minutes on high pressure.
  4. Allow pressure to release naturally.
  5. Remove ham bone and bay leaf from the soup.
  6. When bone is cool enough to handle, use a knife to remove any remaining ham pieces and return them to the soup.
  7. Serve with crusty bread and a salad.
3.2.2929


Filed Under: recipes Tagged With: ham bone, lentil soup, pressure cooking

Chocolate Cheesecake

April 6, 2015 by andrea Leave a Comment

I love a good dessert. Especially one that involves chocolate. Don’t even get me started on dessert involving fruit – they don’t count as dessert in my book. At any rate, this dessert is one of my favorite. I’ve recently been making this one at my pressure cooking classes. One of the things that often gets overlooked with pressure cooking is dessert. And cheesecakes are especially fabulous in the pressure cooker. If you’ve ever made a cheesecake the traditional way, you’ve probably baked your cake in a water bath. There are no water baths in pressure cooking, but your cheesecake will never have a crack in it or dry out when it’s pressure cooked.

So let’s get started.  The first trick of a great cheesecake is making a great crust.  Not hard. Just important. I used graham cracker crumbs in this recipe. If you want to step up the chocolate factor, you can use chocolate cookies instead – use a crispy cookie.

Graham Cracker CrumbsTo get a good a crust, you need a fine cracker crumb.  The best trick I’ve found for this is to use the grater blade on your mixer or food processor. If you don’t have a grater blade, you can crumble the graham crackers into a plastic Ziploc baggie and roll it with a rolling pin until the crumbs are evenly crushed.

crust mixed


I like to add a little sugar and cinnamon to the crumbs and then mix with some melted butter.  By they way, I love the dough whisk shown in the photo. It’s a really nice cross between a spoon and a whisk.


Graham Cracker CrustOnce you have the crust mixed together, just pat it into your cheesecake pan. I use a 7-inch round, 3-inch deep, springform pan for this recipe. The smaller diameter springform is not a standard size pan, but a larger diameter won’t fit into most pressure cookers.  You don’t need a springform pan for this recipe.  Just use any bowl or dish that fits in your cooker and holds the batter. I’ve made this recipe with a 7-inch size Pyrex dish and it worked perfectly.

graham cracker crustWrap the bottom of the springform pan in aluminum foil to keep the steam off the crust.  This is important.  Let me say it again – wrap the pan tightly with aluminum foil.  You won’t need to do this if you are using a different sort of container. After making the crust, I like to pop it into the freezer while I’m making the cheesecake batter.  I like to think this helps make a crispier crust, but I’m honestly not sure it really makes a difference.

cheesecake ingredients

Now it’s time to start on the fun part – the cheesecake batter.  It’s important that the cream cheese and the eggs are at room temperature, which takes a couple of hours. If you forget to take them out early, set the cream cheese and eggs in warm water while you make the crust.


melted chocolate chips


To melt the chocolate chips, I zap them in the microwave at 30% heat.  Stir every minute.  It will take two or three minutes.  And the chips won’t seem entirely melted, but keep stirring until they all melt together.


cheesecake Whip up the cream cheese using your stand mixer. The cream cheese should be at room temp so you can get it nice and smooth and fluffy.  Yes, fluffy.


OLYMPUS DIGITAL CAMERA


Then add your chocolate and other ingredients to the cream cheese.  Mix just till combined.  Don’t overmix at this point.


Cheesecake
Pour the batter into the prepared pan.  The pan to the right is too full.  The cake will puff up slightly when baking, and get stuck on the tin foil wrapping if it’s this full.  So, take a little batter out, put it into a ramekin and bake it later for 15 minutes under pressure.  No one ever has to know that the cook had an extra little treat.


Cheesecake wrapped

Wrap the pan up completely so no steam can get at the cake.  To get the cake in and out of the pressure cooker, fold two long pieces of tin foil into fourths to make a little carrier to lift the cake.

pressure cooking cheesecake


Add two cups of water to your pressure cooker and put the cake on a trivet to keep it out of the  water. Bring the cooker to high pressure for 50 minutes. Let the pressure release naturally and then remove the cake, uncover and chill before serving. If any moisture collects on the top of the cake, just blot it up with a paper towel.

Chocolate Cheesecake
Recipe Type: Dessert
Author: Andrea
Prep time: 20 mins
Cook time: 50 mins
Total time: 1 hour 10 mins
Serves: 10
This is one of my all time favorite desserts in the pressure cooker. Enjoy!
Ingredients
  • Crust:
  • 1 cup of crushed graham crackers (about 6 full sized crackers)
  • 2 T sugar
  • 1 t cinnamon
  • 4 T melted butter
  • Filling:
  • 12 ounces cream cheese, room temperature
  • 1 cup of chocolate chips, melted
  • 2 eggs, room temperature
  • 1/3 cup of sugar
  • 1/4 cup of cream
  • 1 T vanilla
Instructions
  1. For the crust, prepare a 7-inch springform pan or equivalent size pan by lining with parchment paper. If you aren’t using a springform pan, you can line the entire pan so the cheesecake can be removed from the pan, or you can just cut and serve it out of the pan.
  2. Combine all of the crust ingredients and press into the prepared pan. The crust does not need to go up the entire side of the pan, just an inch or so is fine.
  3. Place the crust into the freezer while making the filling.
  4. To make the filling, cream the cream cheese until smooth and fluffy. It’ll take 3-4 minutes on high in a stand mixer.
  5. Add the remaining ingredients and mix until just combined.
  6. Pour the filling into the prepared crust. Don’t overfill.
  7. Wrap the cheesecake tightly with tin foil.
  8. Add two cups of water to a 6 quart or larger pressure cooker.
  9. Place a trivet or stand into the cooker and carefully lower cheesecake onto the trivet. Make sure the cheesecake is not sitting in the water.
  10. Bring the pressure cooker to high pressure and cook for 50 minutes.
  11. Let pressure release naturally.
  12. Unwrap cake and chill overnight or until ready to serve.
3.2.2929


Filed Under: recipes Tagged With: cheesecake, chocolate, pressure cooker

Blueberry Muffins

February 24, 2015 by andrea Leave a Comment

I love muffins!  They have a little sweetness to them like a cookie, but it is easy to sneak in some healthy ingredients without compromising what you expect a muffin to look or taste like.  I don’t like it when someone tries to make a “healthy” cookie and you end up with something that doesn’t remotely resemble a cookie – but you can make a muffin little healthier and still have a muffin.

When I start with a new muffin recipe, I typically cut back the sugar by 1/3 to 1/2 of what the original recipe calls for.  I also like to add in yogurt and maybe some fruit.  This recipe for blueberry muffins covers all of those approaches and results in a great muffin.

I made this muffin at a recent class on Cookies & Quick Breads and I love bringing them the kid’s playdates.  I think the nutmeg and almond flavoring make it a little extra special.  Give it a try – you wouldn’t know that it is made with whole wheat flour.

Blueberry Muffins
Author: Andrea
Prep time: 10 mins
Cook time: 20 mins
Total time: 30 mins
Serves: 18 muffins
If you’d like, you can substitute 3/4 cup honey for the sugar. I’ve also made these with fresh blueberries and they are awesome.
Ingredients
  • 3 cups whole wheat flour, preferably freshly milled (13 oz)
  • 1 teaspoon baking soda
  • 2 teaspoons baking powder
  • 1/2 teaspoon salt
  • 1/4 teaspoon nutmeg (freshly ground)
  • 1 cup sugar
  • 1 egg
  • 1/2 cup coconut oil, melted (can substitute butter, if you’d like)
  • 1 cup plain, unflavored yogurt (if using Greek yogurt, use 1/2 cup of yogurt and 1/2 cup of milk)
  • 1/2 t almond extract
  • 1 1/2 cups of frozen blueberries
Instructions
  1. Preheat oven to 375 degrees.
  2. In a bowl, whisk together dry ingredients (whole wheat flour through salt).
  3. In a separate bowl, whisk together sugar through almond extract.
  4. Add wet ingredients and coconut oil to the dry ingredients and stir just til combined. Using a rubber spatula to make sure the dry ingredients on the bottom are stirred in.
  5. Add blueberries and stir just til combined.
  6. Spray muffin tin pans and scoop the batter into the muffin tins.
  7. Bake 20 minutes until lightly browned and cooked through.
3.5.3208


Filed Under: recipes Tagged With: blueberry, class, muffin, whole wheat flour

Whole Wheat Bread (small batch)

February 3, 2015 by andrea 7 Comments

This is essentially the same recipe that I teach in my bread classes, but it is adjusted for a smaller capacity mixer than the Bosch Universal or Ankarsrum.

The real trick to making this 100% whole grain bread work is high quality whole grain flour. If you’ve read much of my site, you know I use home milled flours most of the time. If you aren’t home milling and only have access to store bought flour, make sure to buy high quality whole grain flour – brands such as King Arthur and Bob’s Red Mill will work well. Another option is to source locally grown and milled flours. Check out what is at your local food co-op or order from a local farm. My favorite farm here in Illinois is Janie’s Mill. Check them out and let me know what you think!

This recipe will give you a soft, beautiful loaf – just perfect for sandwiches.  And so much more nutritious than anything you can get from the store.  Enjoy!

Whole Grain Sandwich Bread Small Batch
Recipe Type: Bread
Author: Andrea
Prep time: 20 mins
Rising time: 1-2 hours
Cook time: 30 mins
Total time: 2 to 3 hours
Serves: 2 loaves
This is my favorite sandwich bread, downsized to two loaves. If you have a high capacity mixer, you might be interested in the large batch recipe. For the rest of us, I hope you enjoy this recipe!
Ingredients
  • 2 cups of warm water (bath tub temp)
  • 1/4 cup of honey
  • 1/4 cup of coconut or olive oil
  • 2 t salt
  • 2 t instant yeast
  • 1/2 cup of white flour
  • 6 cups of whole wheat flour, approximate – freshly milled is best
Instructions
  1. Combine water, honey and oil in the bowl of a stand mixer.
  2. Add white flour and 2 and 1/2 cups of whole wheat flour and stir till combined.
  3. Stir in 1 more cup of the flour.
  4. With machine running, add all but 1/2 cup of the remaining flour until the dough is soft and not too sticky. Do not add add all of the whole wheat flour at this step. It should just form a ball and can be a little sticky. You’ll get another chance to add flour in step 6. Flour, especially whole grain flour, can absorb a lot of water during the bread making process.
  5. Cover and allow wet dough to rest for 10 minutes. This allows the flour to hydrate.
  6. Turn your mixer on and add salt and yeast to the dough. Check the dough consistency now. If it is still a little wet and isn’t forming a nice soft ball, then add the remaining 1/2 cup of flour. It should form a soft ball and press in easily with your finger. The softer the dough at this point, the nicer your final loaf of bread will be.
  7. Knead for about 10-12 minutes on the lowest mixer setting, until the dough is smooth and passes the window pane test. Be advised that the window pane test is tougher to achieve with whole grain breads, so if you come close, call it a good day.
  8. Place the dough in an oiled pan and let rise, covered, until about doubled in size. This rise will take about one hour.
  9. Gently deflate dough and shape into two loaves (8.5 x 4 pans work best for whole grain breads), oil tops of loaves with a small amount of olive oil or cover gently with a towel.
  10. Let rise a second time until the dough is about 1 inch above the lip of the pan. Depending on kitchen conditions – this rise will take about 30-45 minutes. To tell if your bread has risen enough, try the “poke test” – when you think it has risen enough, gently press your finger about 1 inch down into the bread – the bread should feel soft and the indent will most remain. That is when the bread is ready.
  11. About 15 minutes before you are going to bake, preheat your oven to 375 degrees.
  12. When the bread is ready for the oven, lower the temp down to 350 degrees. Bake for 30 minutes, until golden brown.
  13. Remove loaves from pans immediately and cool on a cooling rack.
3.5.3208

Filed Under: recipes Tagged With: bread, flour, fresh flour, milling, wheat, whole wheat

Whole Wheat Pancakes

December 11, 2014 by andrea Leave a Comment

Whole Wheat Pancakes

Snowman PancakeI can often bribe my boys to stay in bed at night by promising them a special breakfast the next morning.  The other night, they requested snowman chocolate chip pancakes. No problem.  Just a slight modification on the regular pancake recipe and you’ve got snowmen – and really happy little boys.  You can see in the photo, that we also gave gingerbread man shaped pancakes a shot.  Eh, I prefer the snowmen.  But, if you want fancier shapes, you can use metal cookie cutters to get different shapes.  Just don’t overfill the cookie cutter, or you’ll get overflow that ruins your shape.  Also – remember to oil the cutters before you start.

For my chocolate chip pancakes, I sparingly add a few chocolate chips after I’ve poured the batter onto a hot griddle.  I do the same for blueberries – you can use frozen or fresh.

Lumps are okay! At least in pancake batter.This is what your batter should look like once you’ve mixed the wet ingredients into the dry ingredients.  Don’t overstir it – the lumps are okay.  Just 10-15 strokes with a wooden spoon or spatula and you’ll be good.  Too much stirring will make your pancakes tough.  And we don’t want that.

It is also a good idea to let the batter rest 5-10 minutes before you start making the pancakes.  It helps to let the flour absorb some liquid and gives it more rise on the griddle.

Once you have this recipe mastered, try substituting half of the whole wheat flour with buckwheat flour.  It makes your pancakes so amazingly tender.  Just watch out – the pancakes from I-Hop may never taste as good again.

I even forgot the sugar the last time I made these, and no one noticed the difference.  The cinnamon and butter gave them enough flavor – of course, the maple syrup probably didn’t hurt either.

And of course, my standard disclaimer – the freshly ground whole grain flours make the difference in this recipe.  If you try this recipe with store bought whole wheat – they will be good, but not as good it can get.

Whole Wheat Pancakes
Recipe Type: Breakfast
Author: Andrea
Prep time: 10 mins
Cook time: 10 mins
Total time: 20 mins
Serves: 12 pancakes
Ingredients
  • 1 cup (4.5 oz) of whole wheat flour – I use freshly ground
  • 1 t baking powder
  • 1/2 t baking soda
  • 1 t cinnamon
  • 1/2 t salt
  • 1 t sugar
  • 1 egg
  • 1 cup of buttermilk, sour milk, or whey
  • 1 T coconut oil or butter, melted
Instructions
  1. While preparing the batter, heat a cast iron skillet or griddle on the stovetop. Throw some bacon on there, if you want.
  2. Whisk together dry ingredients (flour through sugar) in a large bowl. Whisk egg to break the yolk and combine with buttermilk. Add egg mixture and oil to the dry ingredients. Whisk until just wet – it doesn’t need to be smooth, a few lumps are okay.
  3. When the griddle is hot enough that a couple water drops dance on it, you are ready to cook your pancakes. I use a soup ladle to spoon the batter onto the griddle. This is when I add chocolate chips or blueberries to the pancakes. Flip when you see the bubbles start to pop. Cook for a minute or so on the second side until they are nicely browned. Enjoy!
3.2.2802


Filed Under: recipes Tagged With: chocolate chips, cinnamon, pancake, snowmen, whole wheat

Cream Cheese Braid

November 6, 2014 by andrea Leave a Comment

As I’m typing in this recipe, I’m thinking of chilly winter mornings.  Those days where we don’t have anywhere to be and can just hang out in our PJs all morning.  Nothing is better on those mornings than to have a loaf of this bread in the freezer ready to pop into the oven for a sweet treat.  Trust me, your family will love you for it!  And it you are really nice, you can even give one of your extra loaves to a neighbor or family friend.  The loaves are just the right size that you won’t have many (if any) leftovers.  Enjoy!

Cream Cheese Braid
Recipe Type: Bread
Author: Andrea
Prep time: 48 hours
Cook time: 15 mins
Total time: 48 hours 15 mins
Serves: 4 loaves
This is one my favorite holiday breads. I bake several and freeze them for gifts. The bread can easily be reheated in a 325 degree oven for 15 minutes as a quick holiday breakfast. This recipe is written for the Bosch Universal, but it can be easily adapted for other mixers. If you are using a Bosch, you can double the recipe.
Ingredients
  • DOUGH:
  • 1/2 c granulated sugar
  • 1/3 cup butter
  • 1/2 t salt
  • 8 oz sour cream
  • 4 t instant yeast
  • 1/2 c warm water (100-110 degrees)
  • 2 large eggs, lightly beaten
  • 2 t apple cider vinegar
  • 2 t vital wheat gluten
  • 4 cups whole wheat flour (I use freshly milled)
  • FILLING:
  • 2/3 c of your favorite jam or preserves (blueberry, apple or raspberry are my favorites)
  • 1/4 c granulated sugar
  • 1 t vanilla extract
  • 12 oz cream cheese, softened
  • 1/2 large egg, lightly beaten
  • GLAZE:
  • 1 1/2 c sifted powdered sugar
  • 2 T milk
  • 1 t vanilla extract
Instructions
  1. To prepare dough, combine first four ingredients (sugar through sour cream) in a saucepan over medium heat, stirring until sugar dissolves. Remove from heat, cool. Combine sour cream mixture, yeast, water, eggs, cider vinegar, and vital wheat gluten into bowl of mixer (I use my Bosch Universal with the dough hook extender). Add about half of the flour and pulse to just combine. Turn the mixer to speed one and add remaining flour in half cup increments – stopping when the dough is just cleaning the edge of the bowl. You may use slightly more or less than 4 cups of flour. Turn the speed to 2 and let it knead for 6 minutes. Dough will be soft and sticky. Transfer dough to an oiled bowl, cover and chill in the fridge for 8 hours or overnight.
  2. To prepare filling, combine preserves, 1/4 c sugar, vanilla, cream cheese and 1/2 beaten egg in a mixer bowl. Beat at medium speed until well blended (I use the wire whisks and scraper on my Universal for this.)
  3. Remove dough from fridge and divide into four equal portions. Turn each portion out onto a lightly oiled surface and knead lightly four or five times to warm up. Roll each portion into a 12 x 8 inch rectangle. Spread about 1/2 – 1 cup of filling over each portion. Don’t use too much filling – you’ll regret it because it will ooze everywhere. If you have any extra filling, it will keep in the fridge and is great on a bagel or toast. Starting at a long side of the dough, carefully roll up each portion jelly-roll fashion, pinch seam and ends to seal.
  4. Place two loaves on each of 2 baking sheets coated with oil. Cut 4 (1/4 inch deep) “X”‘s on the top of each loaf with scissors or a sharp knife. Cover and let rise in a warm place (85 degrees), free from drafts, 25 minutes or until doubled in size.
  5. Preheat oven to 375 degrees.
  6. Place 1 baking sheet in over (keep remaining sheet covered). Bake at 375 degrees for 15 minutes or until lightly browned. Repeat procedure with remaining loaves. Cool loaves slightly.
  7. At this point, you can cool loaves completely (3 hours), bag and freeze until needed. Warm in a 325 degree oven for approximately 15 minutes.
  8. To prepare glaze, combine powdered sugar, milk and vanilla, stirring with a whisk. The glaze can be transferred to baggies and frozen with loaves. Drizzle warm loaves with glaze.
3.2.2802

Filed Under: recipes

Morning Glory Muffins

November 6, 2014 by andrea Leave a Comment

Morning Glory Muffin

This is one of my favorite muffins for a good energy boost.  All whole wheat flour goodness, plus some dried fruit and nuts.  Yummy!  I freeze all the extras (or make a double batch) and send these with the kids to school for the lunches or snacks.

Morning Glory Muffins
Recipe Type: breads
Author: Andrea
Prep time: 20 mins
Cook time: 20 mins
Total time: 40 mins
Serves: 12 muffins
Ingredients
  • 1 1/2 cup whole wheat flour
  • 1 cup rolled oats
  • 3 T ground flaxseed
  • 1/2 cup packed brown sugar
  • 2 t baking soda
  • 1/4 t salt
  • 1 cup plain yogurt
  • 1 cup mashed ripe banana (about 2)
  • 1 large egg
  • 1 cup chopped pitted dates or prunes
  • 3/4 c chopped walnuts
  • 1/2 c chopped dried pineapple
Instructions
  1. Preheat oven to 350
  2. Spray 18 muffin cups with non-stick spray.
  3. Combine the dry ingredients together (flour through salt) in a bowl. Whisk together.
  4. Combine the yogurt, banana and egg.
  5. Stir the wet ingredients into the dry ingredients until just mixed – about 15 stirs with a wooden spoon.
  6. Fold in the dried fruit and nuts.
  7. Spoon or scoop into the muffin tins. Bake at 350 degrees for 20 minutes or until a toothpick into the center comes clean. Remove the muffins immediately and let cool on a wire rack.
3.2.2802


Filed Under: recipes

Sugared Cardamom Braid – Two Ways

November 6, 2014 by andrea 1 Comment

Sugared Cardamom BreadThis bread reminds me of my childhood and Christmas all rolled up into one pretty little loaf of bread.  My mom used to bake loaves upon loaves of cardamom raisin bread at Christmas time. She would send my sister and I to school with beautiful loaves of fresh baked bread for our teachers as their Christmas gifts.  I imagine the teachers must have loved getting those loaves.

While this isn’t my mom’s exact recipe, it does include the cardamom and I think it is just as wonderful.  I’ve carried on my mother’s tradition, with this bread.  I share it with neighbors, teachers, and anyone who stops by our home for the holidays.  It freezes beautifully, so you can make a big batch ahead of time, freeze the loaves and distribute to all of your neighbors when it is convenient.  And by the way, it is the absolute best toasted.

cardamombreadWhen you are shaping the loaves, you can either make one large loaf, or three smaller loaves. I usually do three smaller loaves for sharing. Just divide the dough into thirds and then thirds again (if you are going to make three loaves). Roll each third into a long snake and braid it up all pretty. Let rise and then brush with an egg wash and sprinkle with turbinado sugar. The sugar makes it all sparkly and pretty – which is just what we need when we are doing holiday baking, right?breadbraids


If you don’t have home milled whole wheat flour, my recommendation is to skip the whole wheat flour entirely and use a good bread flour, such as King Arthur (red or blue bag work well). If you are using bread flour, you can skip the dough enhancer and vital wheat gluten.

Enjoy!


Sugared Cardamom Braid – Whole Wheat
Recipe Type: Bread
Author: Andrea
Prep time: 2 hours
Cook time: 25 mins
Total time: 2 hours 25 mins
Serves: 3 small loaves
This bread freezes well and makes great gifts. Toasted, it is wonderful. It also makes superb French toast and bread pudding.
Ingredients
  • 1 1/3 cups milk (whole or 2% is best)
  • 1/2 cup granulated sugar
  • 6 T butter
  • 2 T grated lemon rind or lemon extract
  • 1/2 to 1 t ground cardamom (I use 1 t)
  • 1 1/2 t salt
  • 2 t dough enhancer or unpasteurized apple cider vinegar (not needed if you use white flour)
  • 2 t vital wheat gluten (not needed if you use white flour)
  • 4 1/2 to 5 cups home milled whole wheat flour* (or white flour, or a combination of wheat and white)
  • 2 t instant yeast
  • 1 large egg
  • GLAZE
  • 1 large egg white, lightly beaten
  • 1 T water
  • 1 T coarse-grain sugar, such as Turbindo
Instructions
  1. Combine the milk through the salt in a heavy saucepan over low heat. Cook 5 minutes or until sugar dissolves and a thermometer registers 115 degrees, stirring frequently. Remove saucepan from heat. Let cool down to 115 degrees, if necessary.
  2. Add the warm milk mixture into your mixer bowl. Add the dough enhancer, vital wheat gluten, yeast, egg and about half of the flour. If you are using your Bosch Universal mixer, and have a dough hook extender, use it. Mix just to combine. Turn machine to low and continue adding flour 1/2 cup at a time until the dough just cleans the sides of the bowl. You may not use all of the flour.
  3. Knead the dough for 6-10 minutes or until the surface is smooth and elastic. The dough should be soft.
  4. Place dough in a large bowl coated with cooking oil, turning to coat top. Cover and let rise in a warm place (85 degrees), free from drafts, 1 hour or until doubled in size. Lightly punch dough down; cover and let rest 5 minutes.
  5. Divide dough into 3 equal portions for three smaller loaves (about 1 pound each). Working with one portion, divide it again into three equal portions to make a three strand braid, or six equal portions for a six strand braid. Shape each portion into a 10-inch rope. Pinch ends together at one end. Braid ropes on a lightly oiled surface, pinch loose ends to seal or turn them under. Place braid on a baking sheet coated with oil. Repeat with remaining portions of dough so that you have three loaves formed. Cover and let rise 30 minutes or until doubled in size.
  6. Preheat over to 375 degrees
  7. Combine egg white and water; brush over top of loaf. Sprinkle with course-grain sugar. Bake at 375 degrees for 25 minutes or until golden and loaf sounds hollow when tapped. Remove from oven; cool on a wire rack.
  8. * Note: If you don’t home mill your flour, replace the whole wheat flour with a good bread flour, such as King Arthur’s All Purpose or Bread Flour (red or blue bags).
  9. * Note: For braiding ideas, videos and diagrams, I recommend Pinterest or King Arthur Flour’s website.
3.5.3251


Filed Under: recipes Tagged With: braid, bread, cardamom, gift giving, holiday baking, recipe, whole wheat

Kimchi

November 6, 2014 by andrea Leave a Comment

traditional kimchi

traditional kimchi

I’m in the process of my first attempt at making kimchi.  I like my ferments.  I’ve gotten the hang of sauerkraut and sourdough, but kimchi is a new world for me.  I’m honestly only making it, because I came across the recipe in a fermentation book by Sandor Katz and I happened to have all the ingredients sitting in the fridge.  The Napa cabbage in particular kept talking to me every time I opened the fridge door – he’d say things like, “what are you going to do with me?” and “I’m beautiful, don’t let me go to the compost bin” and “Farmer Sue did not spend all that effort growing me so you could talk to me in the fridge”.  So, now that beautiful head of Napa cabbage has been chopped up with some radishes, carrots, ginger, garlic, hot peppers, and onion and is fermenting on the kitchen counter.

Well, it was on the kitchen counter.  It didn’t last two days – it’s now out in the garage.  Stinking up the garage.

The ironic thing is that I don’t even know what kimchi is really supposed to taste like.  Mine is quite spicy.  Leave the lips burning for hours spicy.  So, that’s not bad.  The recipe said it will be ready in about seven days, but I’m not sure mine will take that long.  Warmer temps will help it ferment more quickly, but it might slow down now that it’s in the garage.  Once it’s where I like it, I can seal up the jar and store it in the fridge until it’s eaten up.  We might have to eat it quickly so I don’t have it smelly up the fridge.  Thank goodness for the back-up fridge in the garage!

And here’s the other reason for making these ferments, they are supposed to be fabulous for your digestive system.  They help with all the good bacteria in your gut.  My man was recently on some antibiotics, so now the trick will be seeing if I can get him to eat the kimchi.  Wish me luck.  Maybe wish him luck.

Filed Under: Clatter in the Kitchen Tagged With: ferment, kimchi

  • « Previous Page
  • 1
  • …
  • 7
  • 8
  • 9

Posts

  • Clatter in the Kitchen
  • recipes
  • Uncategorized

Recent Comments

  • andrea on Whole Wheat Bread (small batch)
  • andrea on Sourdough Beer Pizza Crust
  • andrea on Recipe for Holiday Jam
  • andrea on (Sourdough Optional) Carrot Muffins
  • andrea on Lentil and Ham Bone Soup

Recent Comments

  • andrea on Whole Wheat Bread (small batch)
  • andrea on Sourdough Beer Pizza Crust
  • andrea on Recipe for Holiday Jam
  • andrea on (Sourdough Optional) Carrot Muffins
  • andrea on Lentil and Ham Bone Soup

Posts

  • Clatter in the Kitchen
  • recipes
  • Uncategorized
  • Facebook

Copyright © 2025 · Foodie Child Theme by Shay Bocks · Built on the Genesis Framework · Powered by WordPress